Quick Start Guide
Cisco Secure Email Cloud Gateway
About
This guide leads you through a few simple steps required to set up and administrate Cisco Secure Email Cloud Gateway. For more detailed instructions and best practices on configuring Secure Email services, please visit: https://www.cisco.com/c/m/en_us/products/security/email-security/setup-guide.html
Step 1 - Configure RELAYLIST at Host Access Table (HAT)
Step 2 - Add Receiving Domain in the Recipient Access Table (RAT)
Step 3 - Setup SMTP Routes
Step 4 - Add Executive Names in Pre-defined Dictionary
Step 5 - Connect AMP reputation setting to the nearest file reputation server (outside US)
Configure RELAYLIST at Host Access Table (HAT)
In order to send mail outbound through the Cisco Cloud Email Security (your email server -> Cisco CES -> Internet), you will need to add the public IP address (or an FQDN that's resolvable in DNS) of the email server to the RELAYLIST in the HAT:
- Navigate to Mail Policies > HAT Overview
- Click RELAYLIST Sender Group
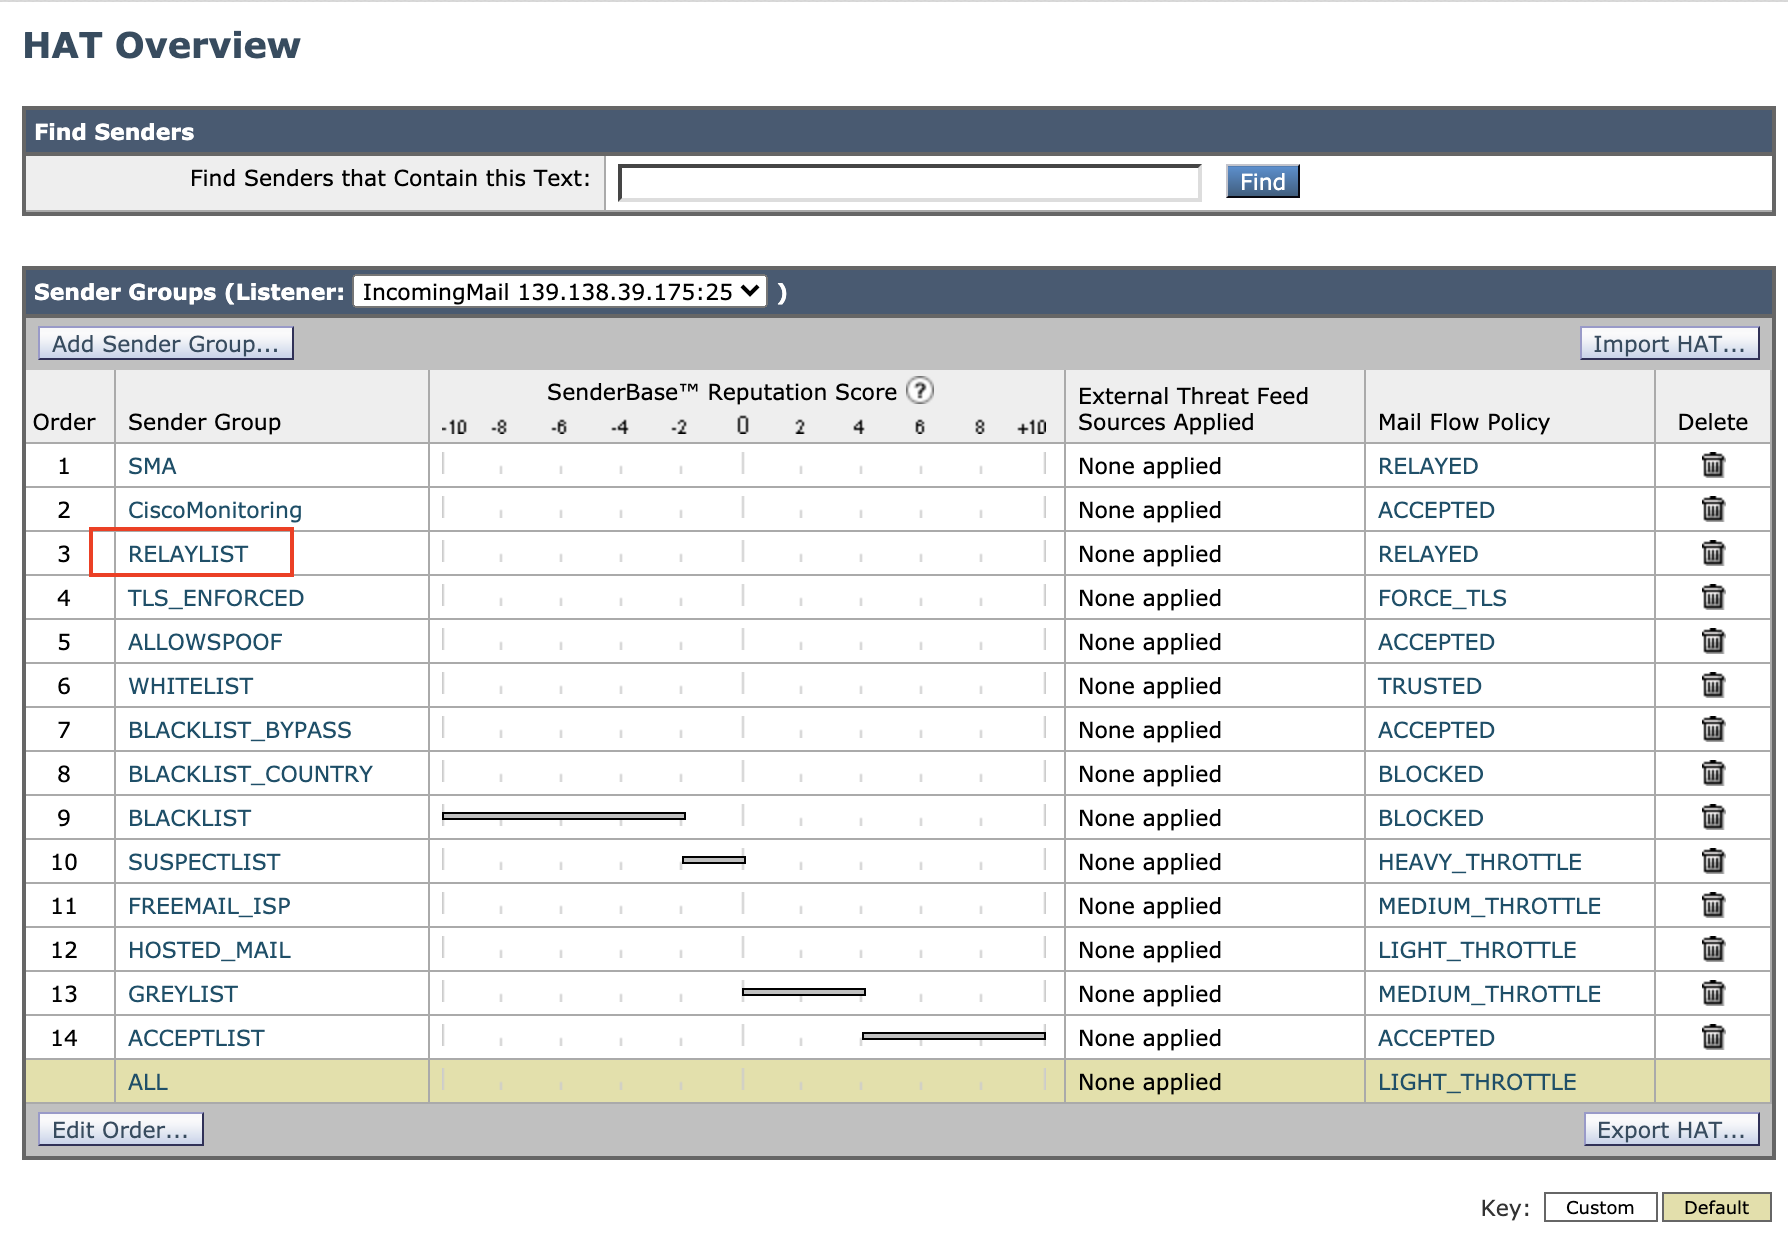
- Click Add Sender ...
- Add Sender: customer's email server IP address or hostname
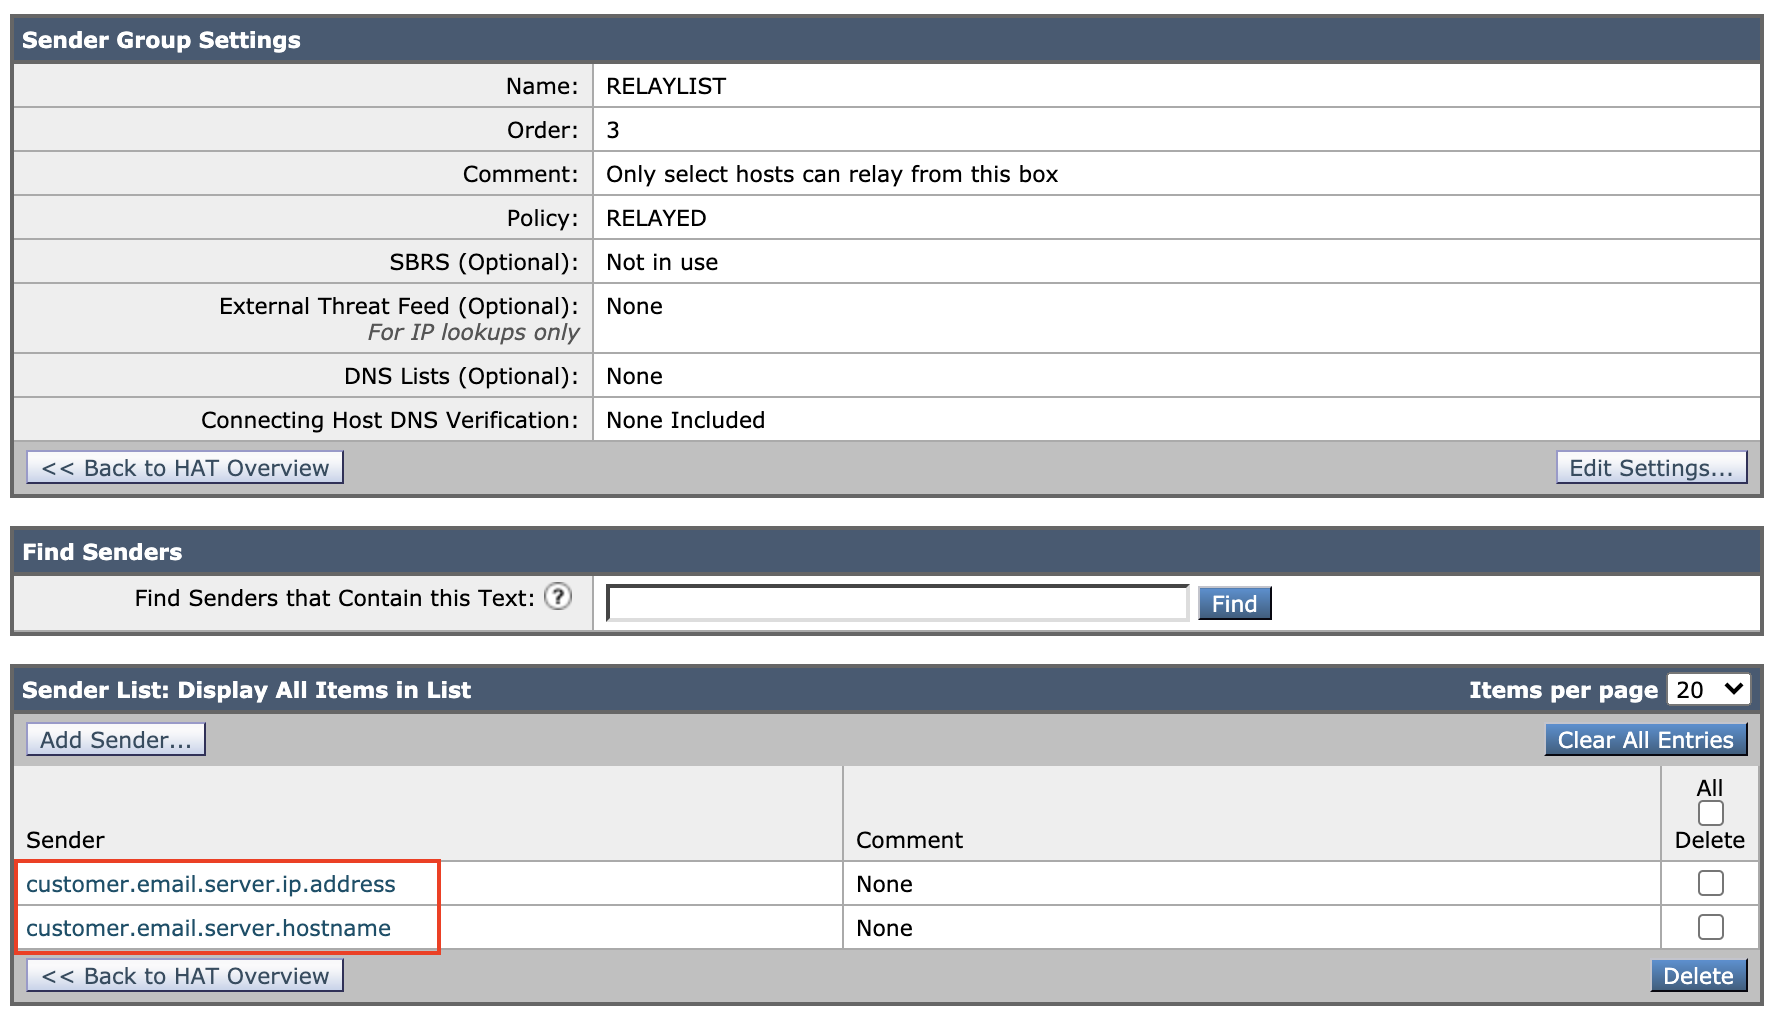
- Click Submit
- Click Commit Changes
That is all that needs to be done on the Cisco CES side to enable outbound mail flow. You may need to take other steps - such as adjusting the firewall settings, or configuring your email server to send outbound through the Cisco CES - but those steps are outside of the scope of service.
You should be given a basic understanding of how the HAT works. Specific key points:
- The HAT matches on IP addresses or sending domains (what you get when you do a reverse DNS lookup on an IP). This is distinct from the mail policies, which match sending email addresses (Envelope sender, From, or Reply-To) and/or receiving addresses.
- The WHITELIST sender group has higher per-connection limits defined in the associated mail flow policy (TRUSTED) and disables spam scanning. This should be used for trusted senders. A/V scanning and other forms of scanning (AMP, graymail) are not disabled on this policy.
- The BLACKLIST sender group drops an incoming connection that matches that sender group immediately before any SMTP conversation begins. Messages that hit the BLACKLIST sender group will not be visible in message tracking by default.
Add Receiving Domain in the Recipient Access Table (RAT)
Each domain that you wish to receive mail for will need to be added to the Recipient Access Table (RAT). To do this:
- Navigate to Mail Policies > Recipient Access Table (RAT)

- Click Add recipient
- Add customer's email domain
- The action should be Accept for any domain you wish to receive mail for.
- Checking the Bypass LDAP Accept Queries and Bypass SMTP call-ahead boxes will disable these for the domain being added.
- Setting Bypass Receiving Control to Yes will disregard any throttling settings on the listener for this specific domain.
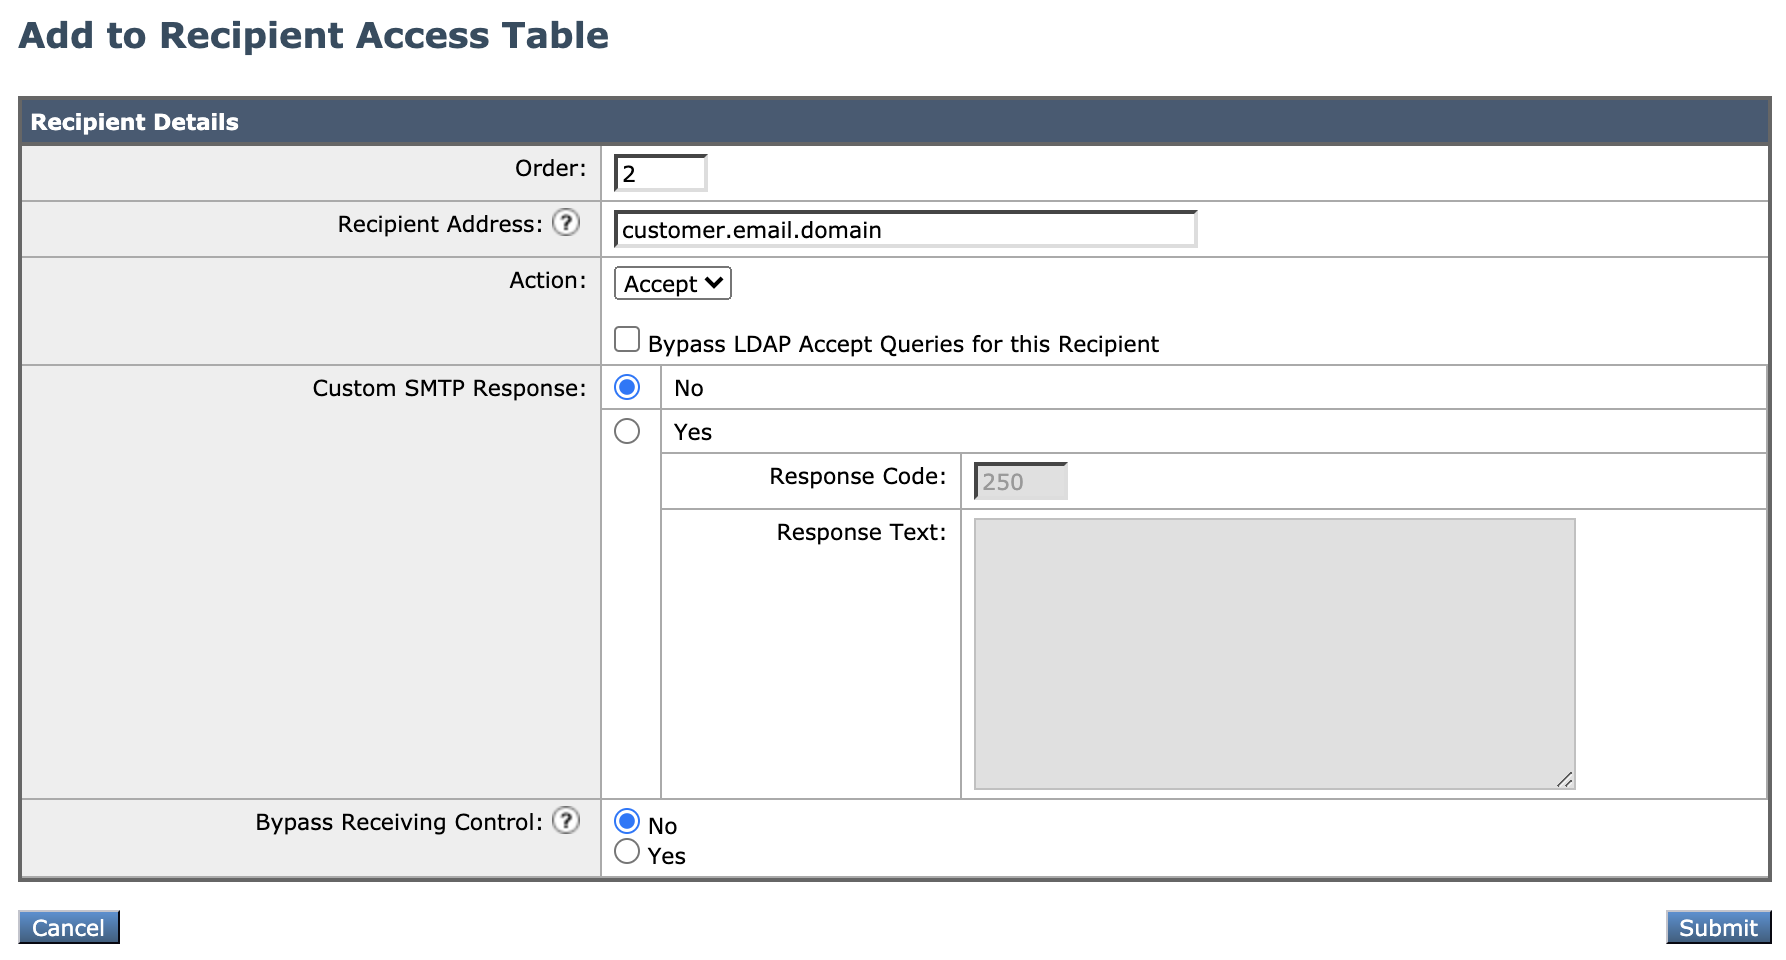
- Click Submit
- Click Commit Changes
This will need to be done for every domain you wish to receive mail for. For example, if you want to receive mail for example.com, example.org, and example.mil, each of those domains will need to be added to the RAT with an "Accept" action.
Setup SMTP Routes
SMTP Routes allow you to redirect all emails for a particular domain to a different MTA host. To setup SMTP routes:
- Navigate to Network > SMTP Routes
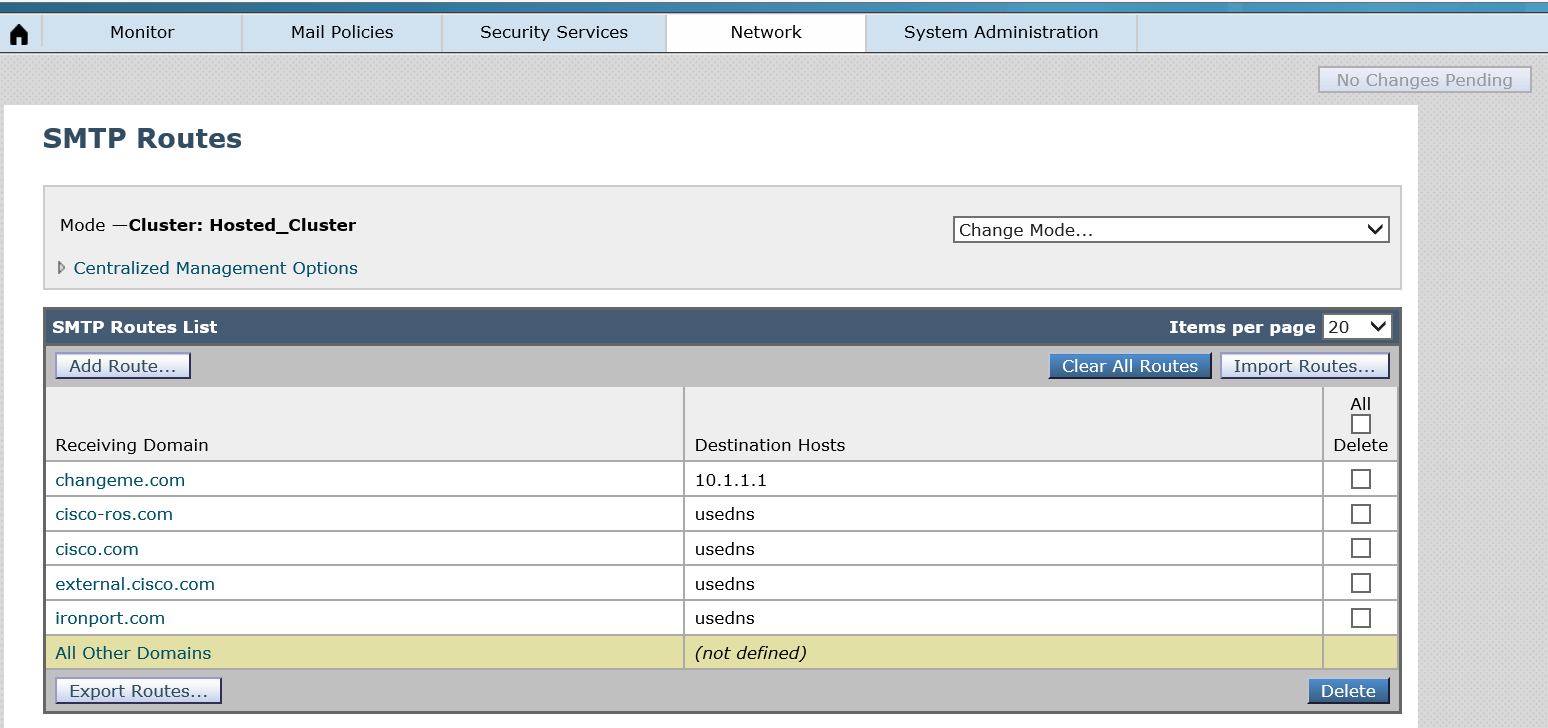
- Click Add Route
- The Receiving Domain should be the domain that you wish to receive mail for.
- The Destination Hosts should be the IP addresses or DNS records for the servers that will be receiving the mail from the Cisco CES.
You are allowed to add multiple servers, with the same or different priorities, but clicking Add Row. For example:
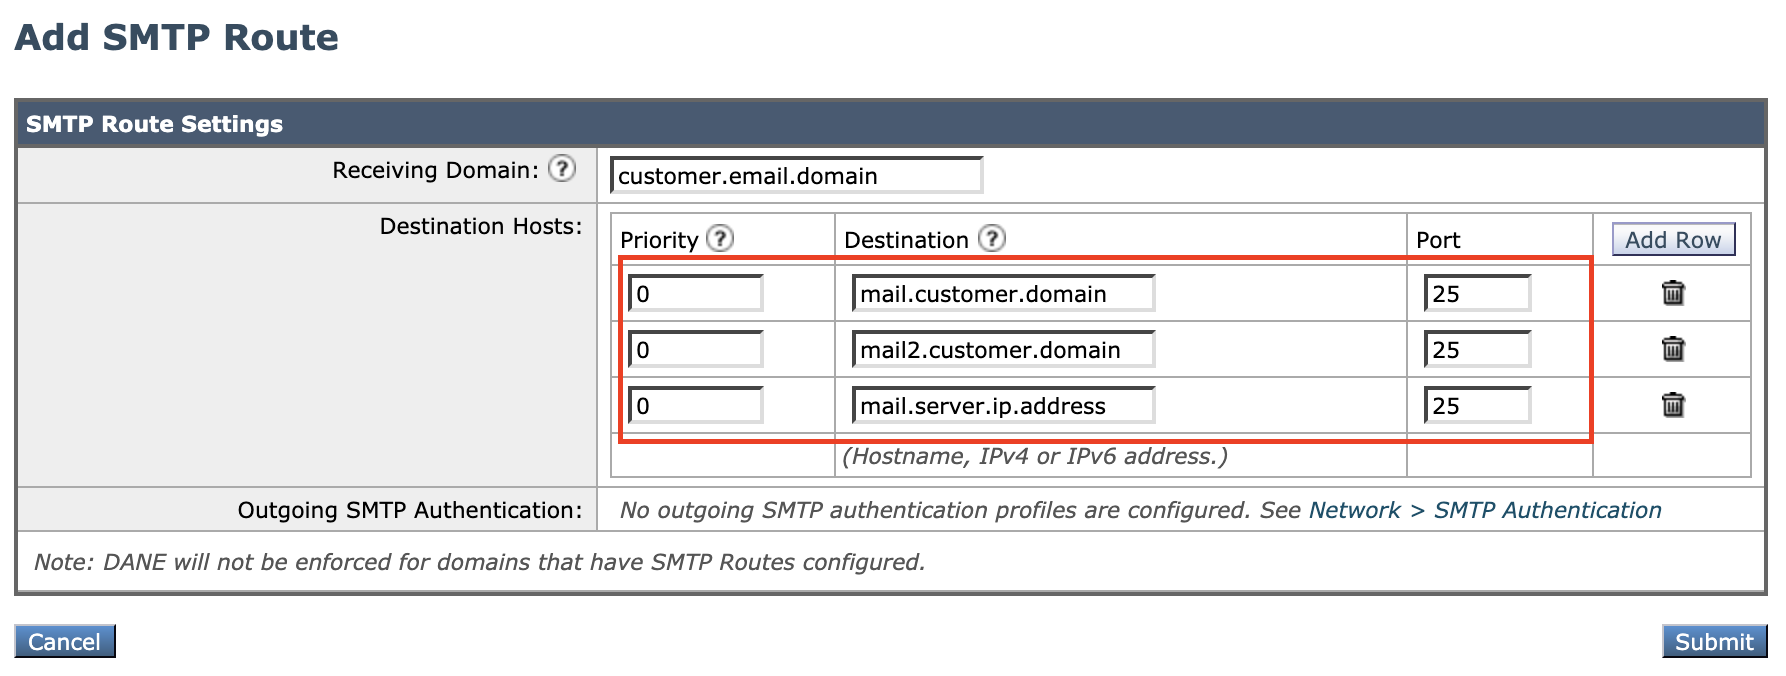
- This will need to be done for each domain that receives mail from the Cisco CES. For example, even if example.org, example.com, and example.mil all deliver to the same mail servers, an SMTP route will be needed for each of those domains.
- Click Submit and Commit Changes
Forged Email Detection - Add Executive Names in Pre-defined Dictionary
Forged Email Detection (FED) easily detect spear-phishing attacks by examining one or more parts of an SMTP message for manipulation including the “envelope-from”, “reply-to” or the ‘From” headers. To enable the FED feature:
- Navigate to Mail Policies > Dictionaries
- Click the pre-defined Executive_FED
- Click the bin icon to delete the term placeholder

- Insert all your executive names (e.g. Joe Smith) in the Add Terms column
- Click Add (Note: make sure all entries are exported to the right side of the box)
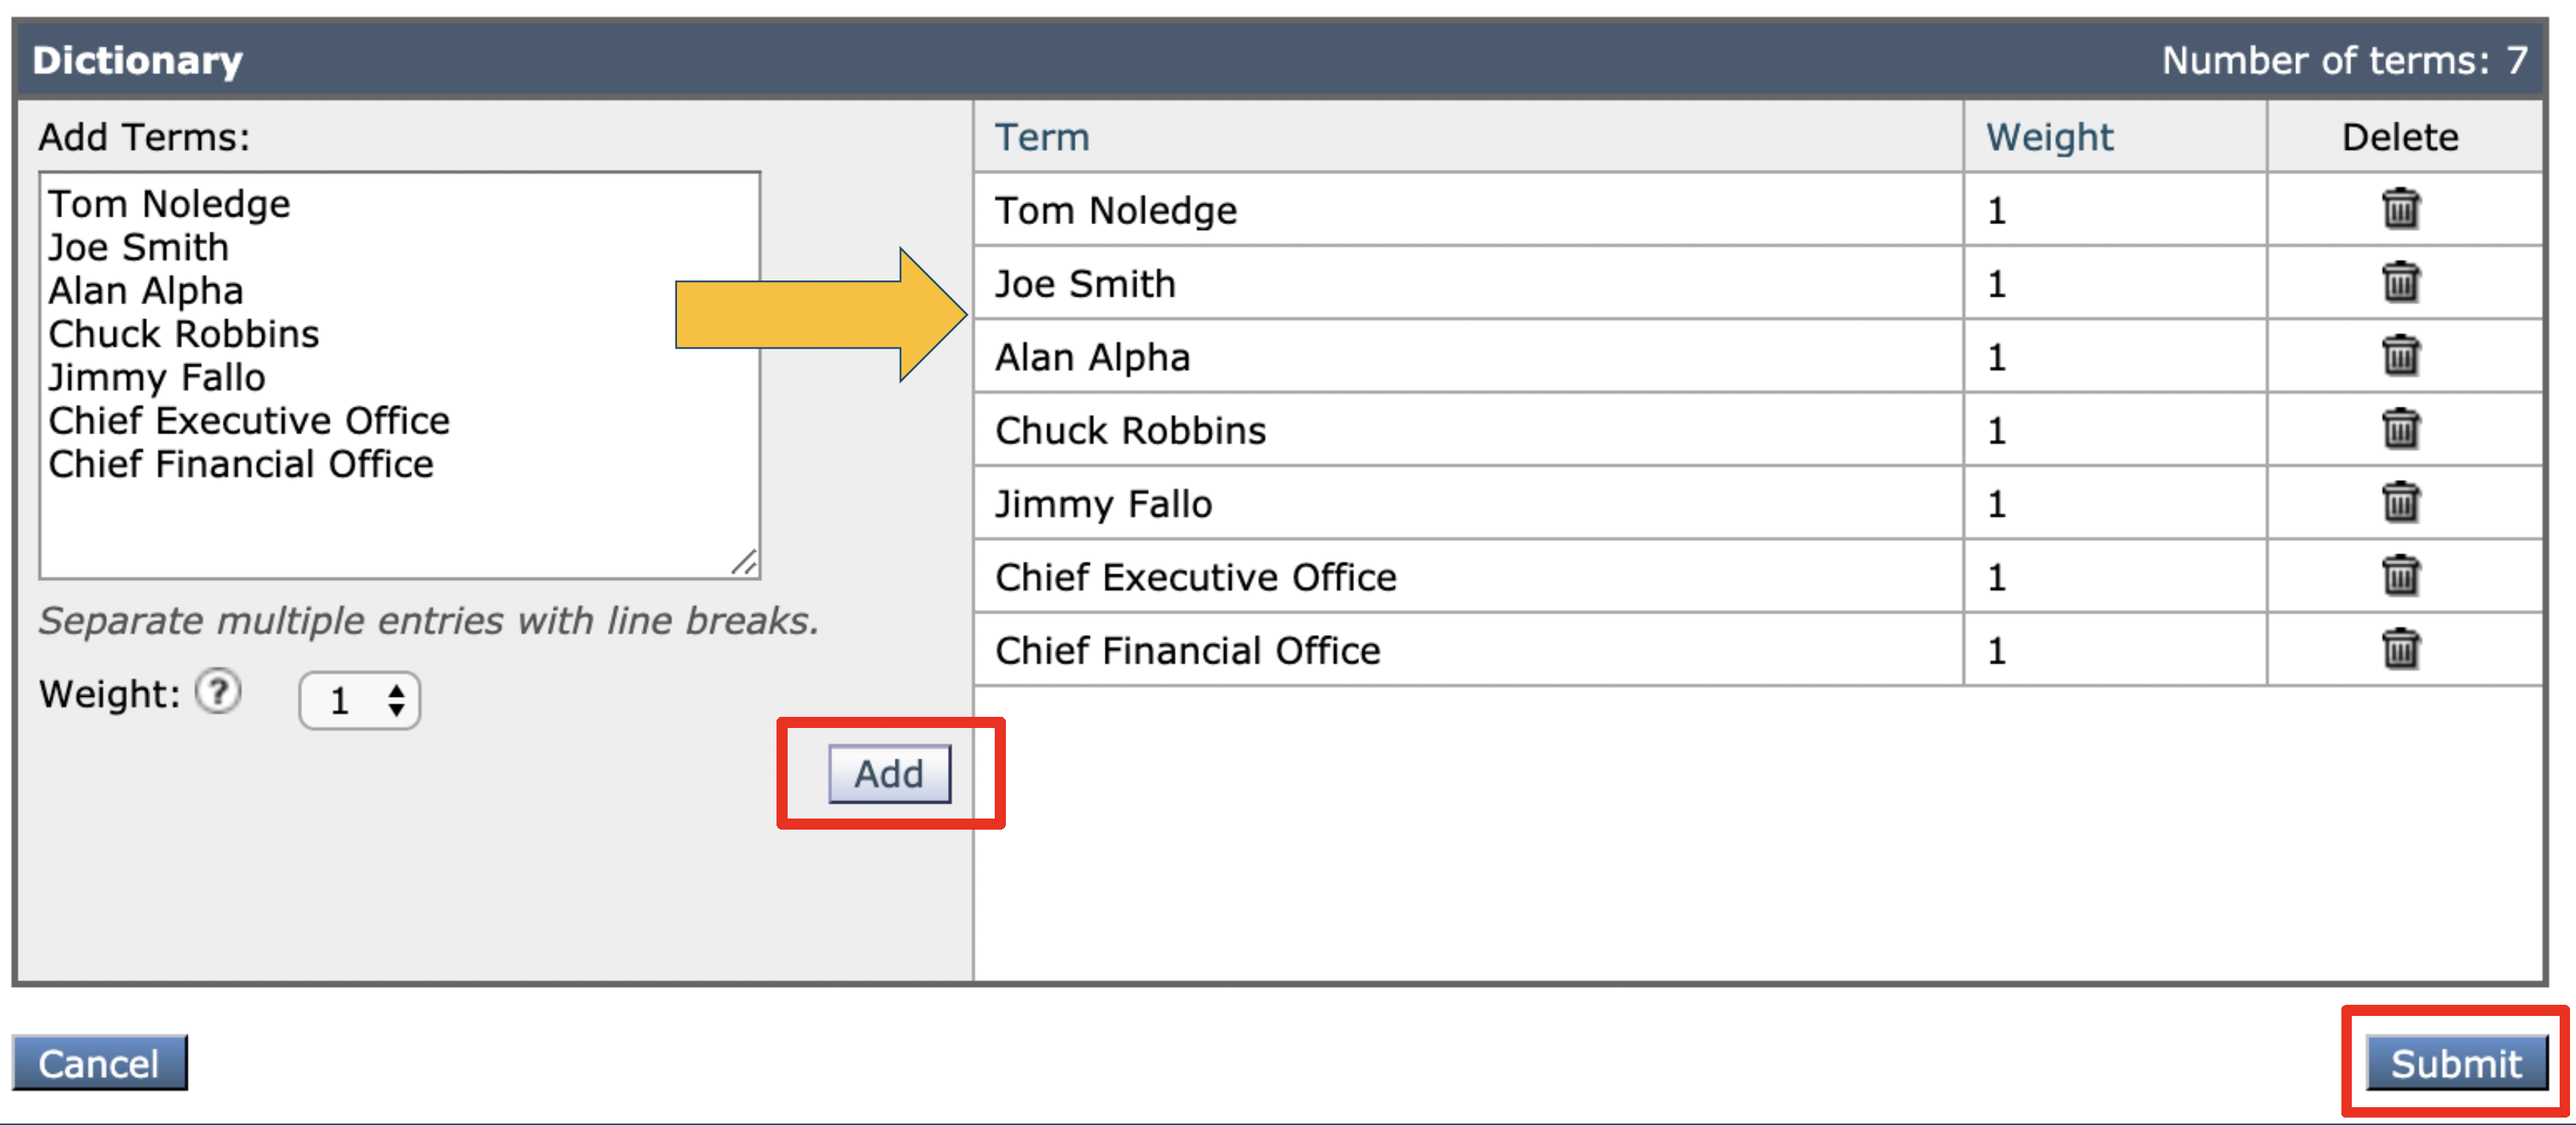
- Click Submit
Please ensure the FED content filter is active in the default Incoming Mail Policy
- Navigate to Mail Policies > Incoming Mail Policies
- Click within the Content Filter box of the Default Policy
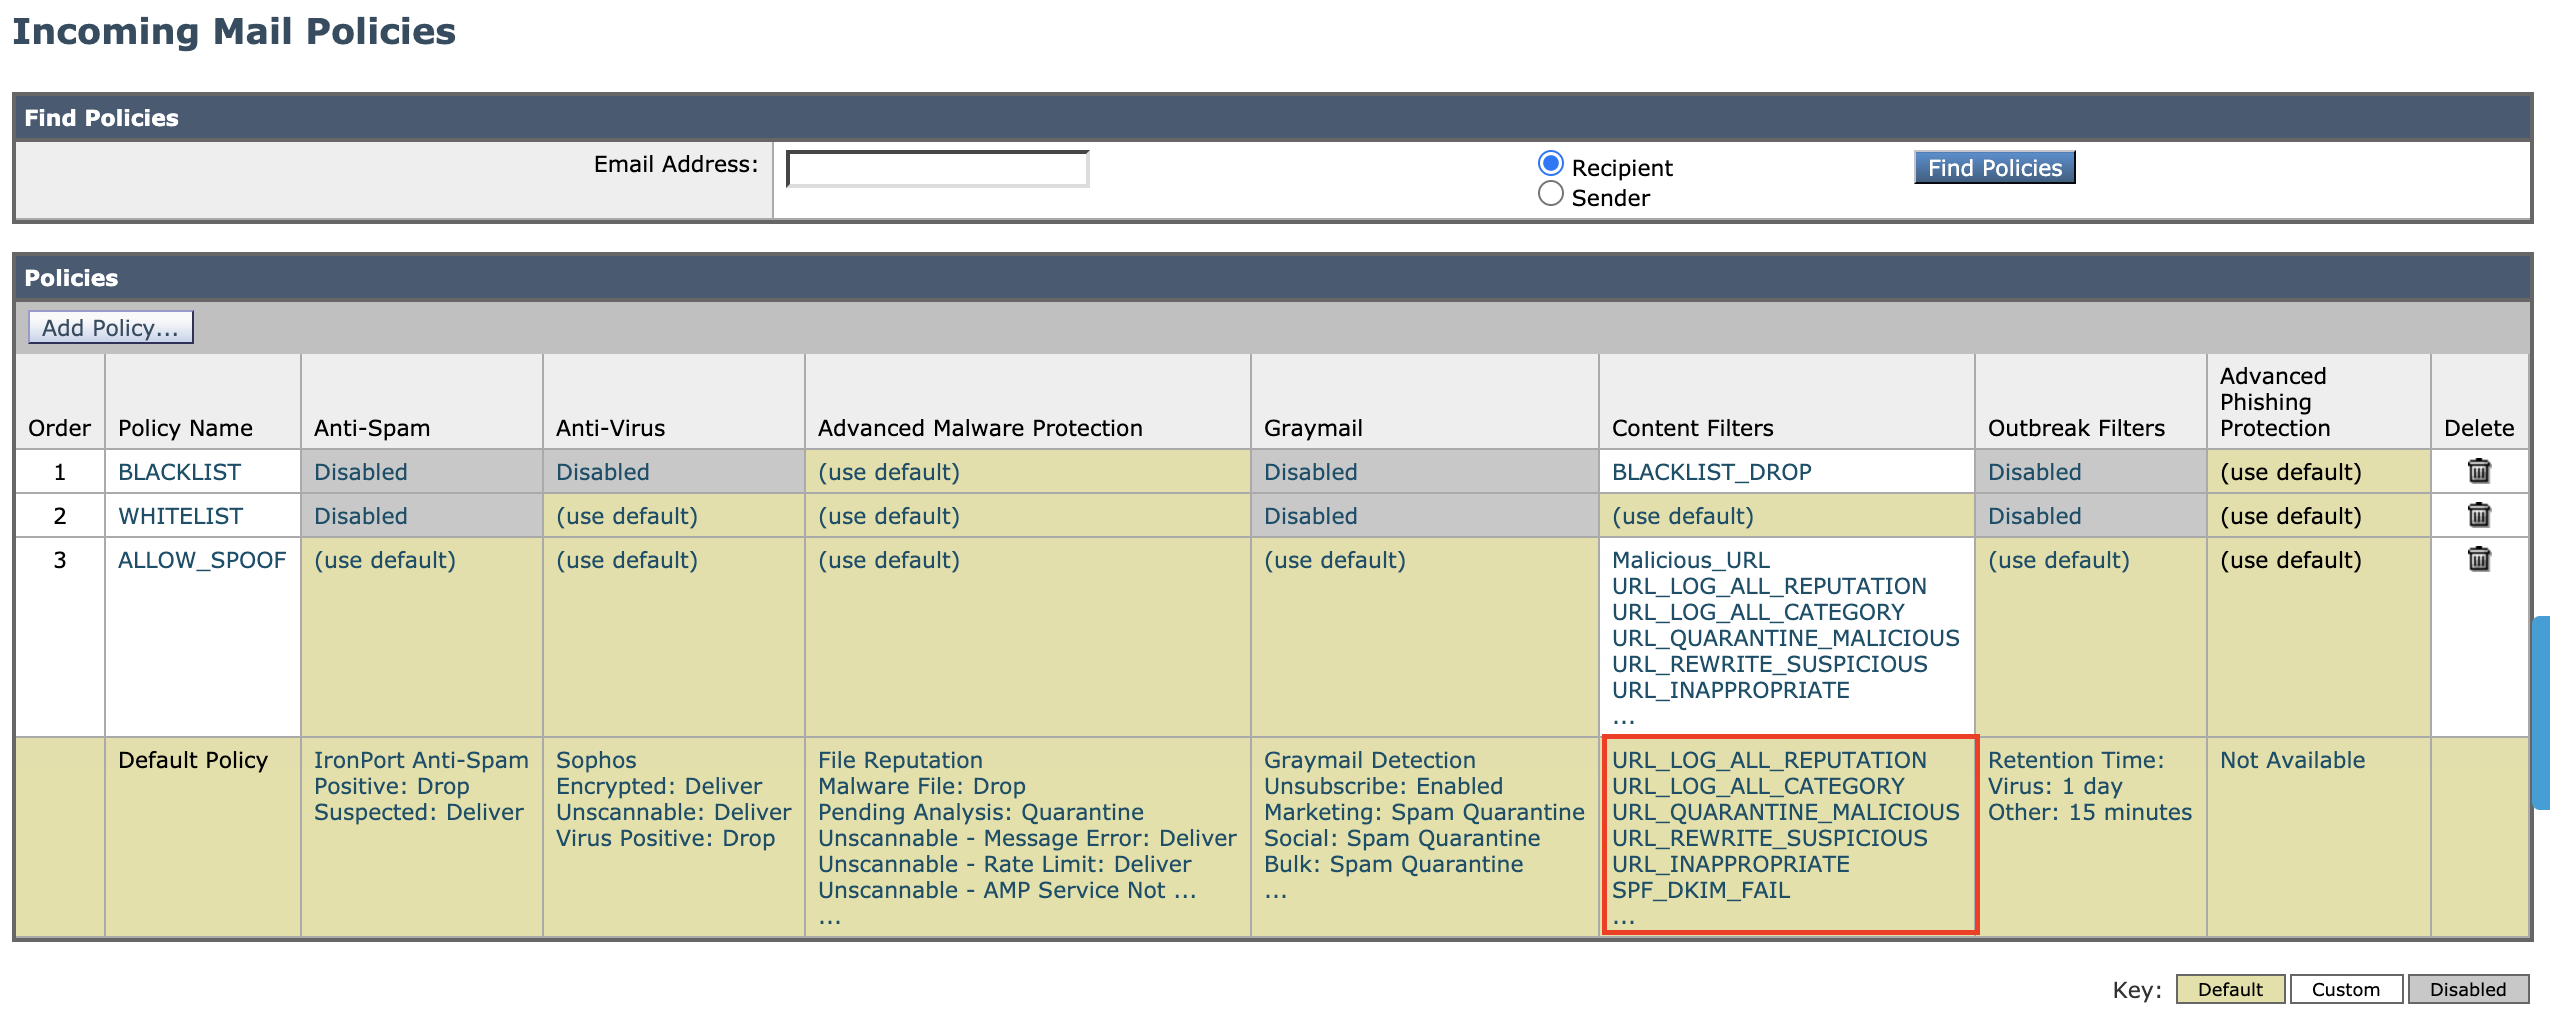
- Make sure the filter rule EXECUTIVE_SPOOF is checked

- Click Submit and Commit Changes
Connect AMP reputation setting to the nearest file reputation server (outside the US)
- Navigate to Security Services > File Reputation and Analysis
- Click Edit Global Settings …

- Expand Advanced Settings for File Reputation
- Choose the nearest file reputation server (e.g. UK CES point to EUROPE server)

- Click Submit and Commit Changes
Updated about 2 years ago
