Configuring Microsoft Azure AD for SAML Log-in
Single Sign-On (SSO) using SAML 2.0
Looking for G Suite SAML setup example?
About
Do you use Microsoft Azure AD to manage users? Would you like to utilize single sign-on for your Cisco Secure Email Gateway/Cloud Gateway or Cisco Secure Email and Web Manager?
Configuring Microsoft Azure AD for SAML Log-in
[ESA] Configure Service Provider (SP) settings on ESA
Note
You will need to have an SP certificate and private key created for this. Using openssl from your PC/host, please run the following to create a self-signed certificate:
openssl req -x509 -sha256 -nodes -days 365 -newkey rsa:2048 -keyout privateKey.key -out certificate.crtIf you have a certificate already created or have other means to create a certificate, please feel free to utilize what you know. Just remember, you will need a certificate (.crt), a private key (.pem), and a passphrase for the certificate (if applicable).
Cluster Configuration Note
Before you begin, please note that SAML is Restricted to Machine Level. If you are configuring SAML for a cluster, you need to go to Machine Mode for the first gateway to configure.
Pay close attention; in the first step --- there is a configuration option for "Share this configuration across machines in cluster". Check this on the first gateway you are configuring. Submit and commit your configuration changes. Then, on the second (or additional) gateway, log in and navigate to the SAML configuration screen. Then, update the Assertion Consumer URL to match the gateway you are logged in on.
- Log in to your Cisco Secure Email Gateway or Cloud Gateway UI
- Navigate to System Administration > SAML
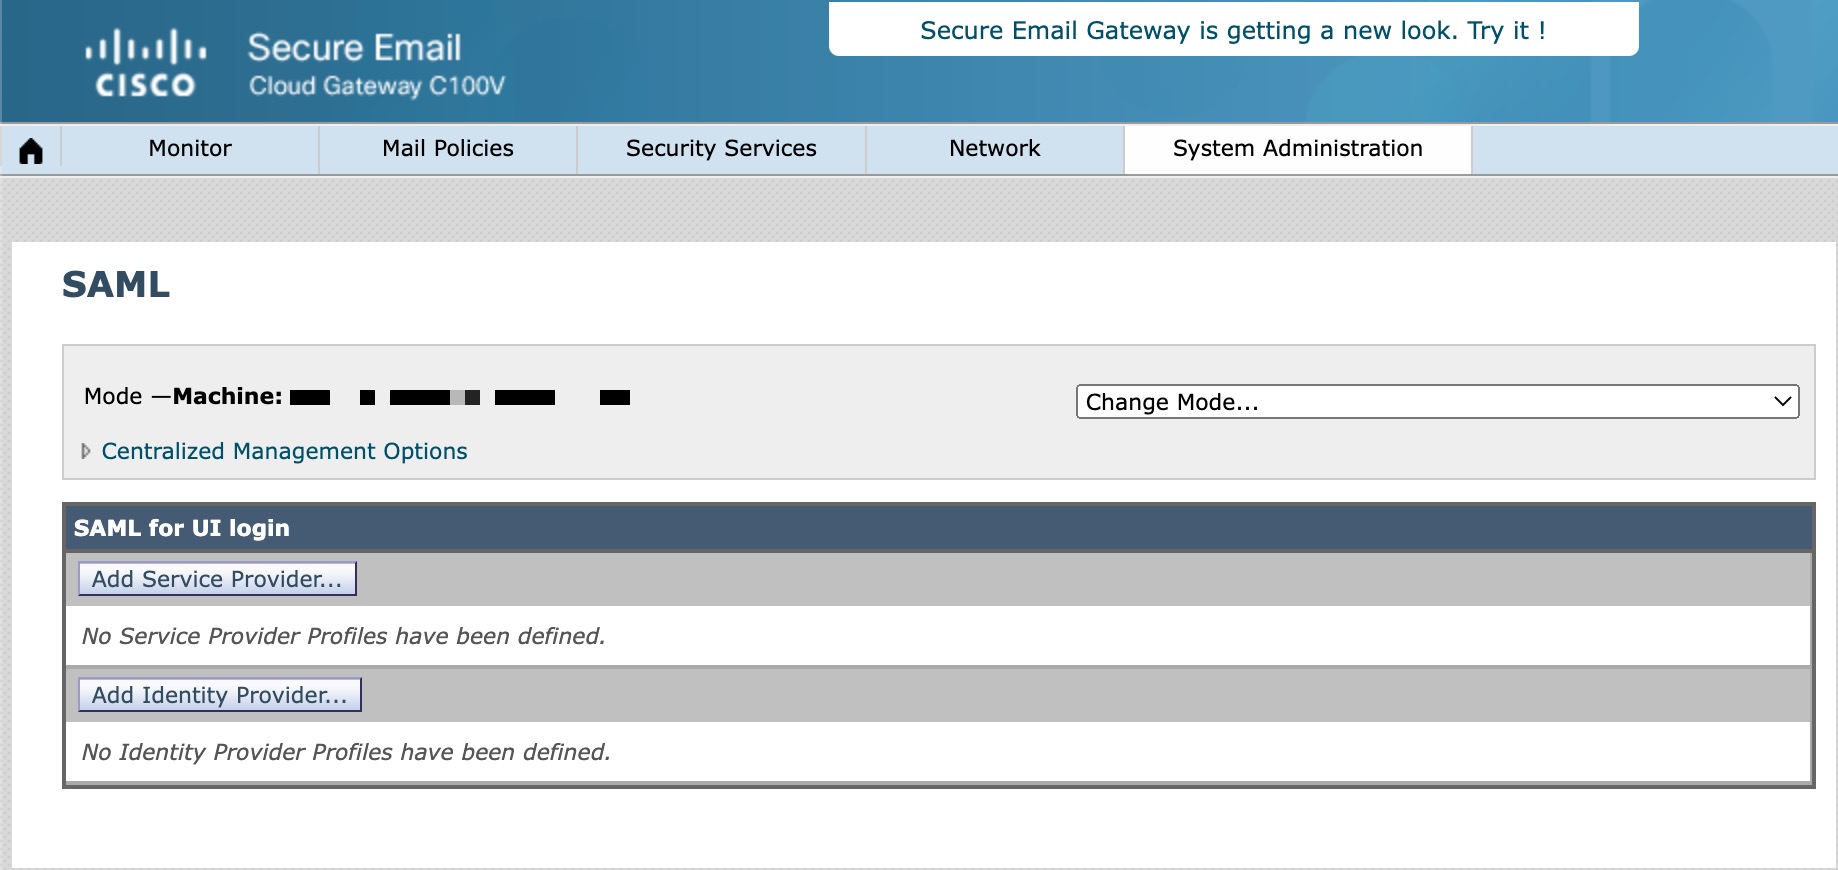
- Click on Add Service Provider...
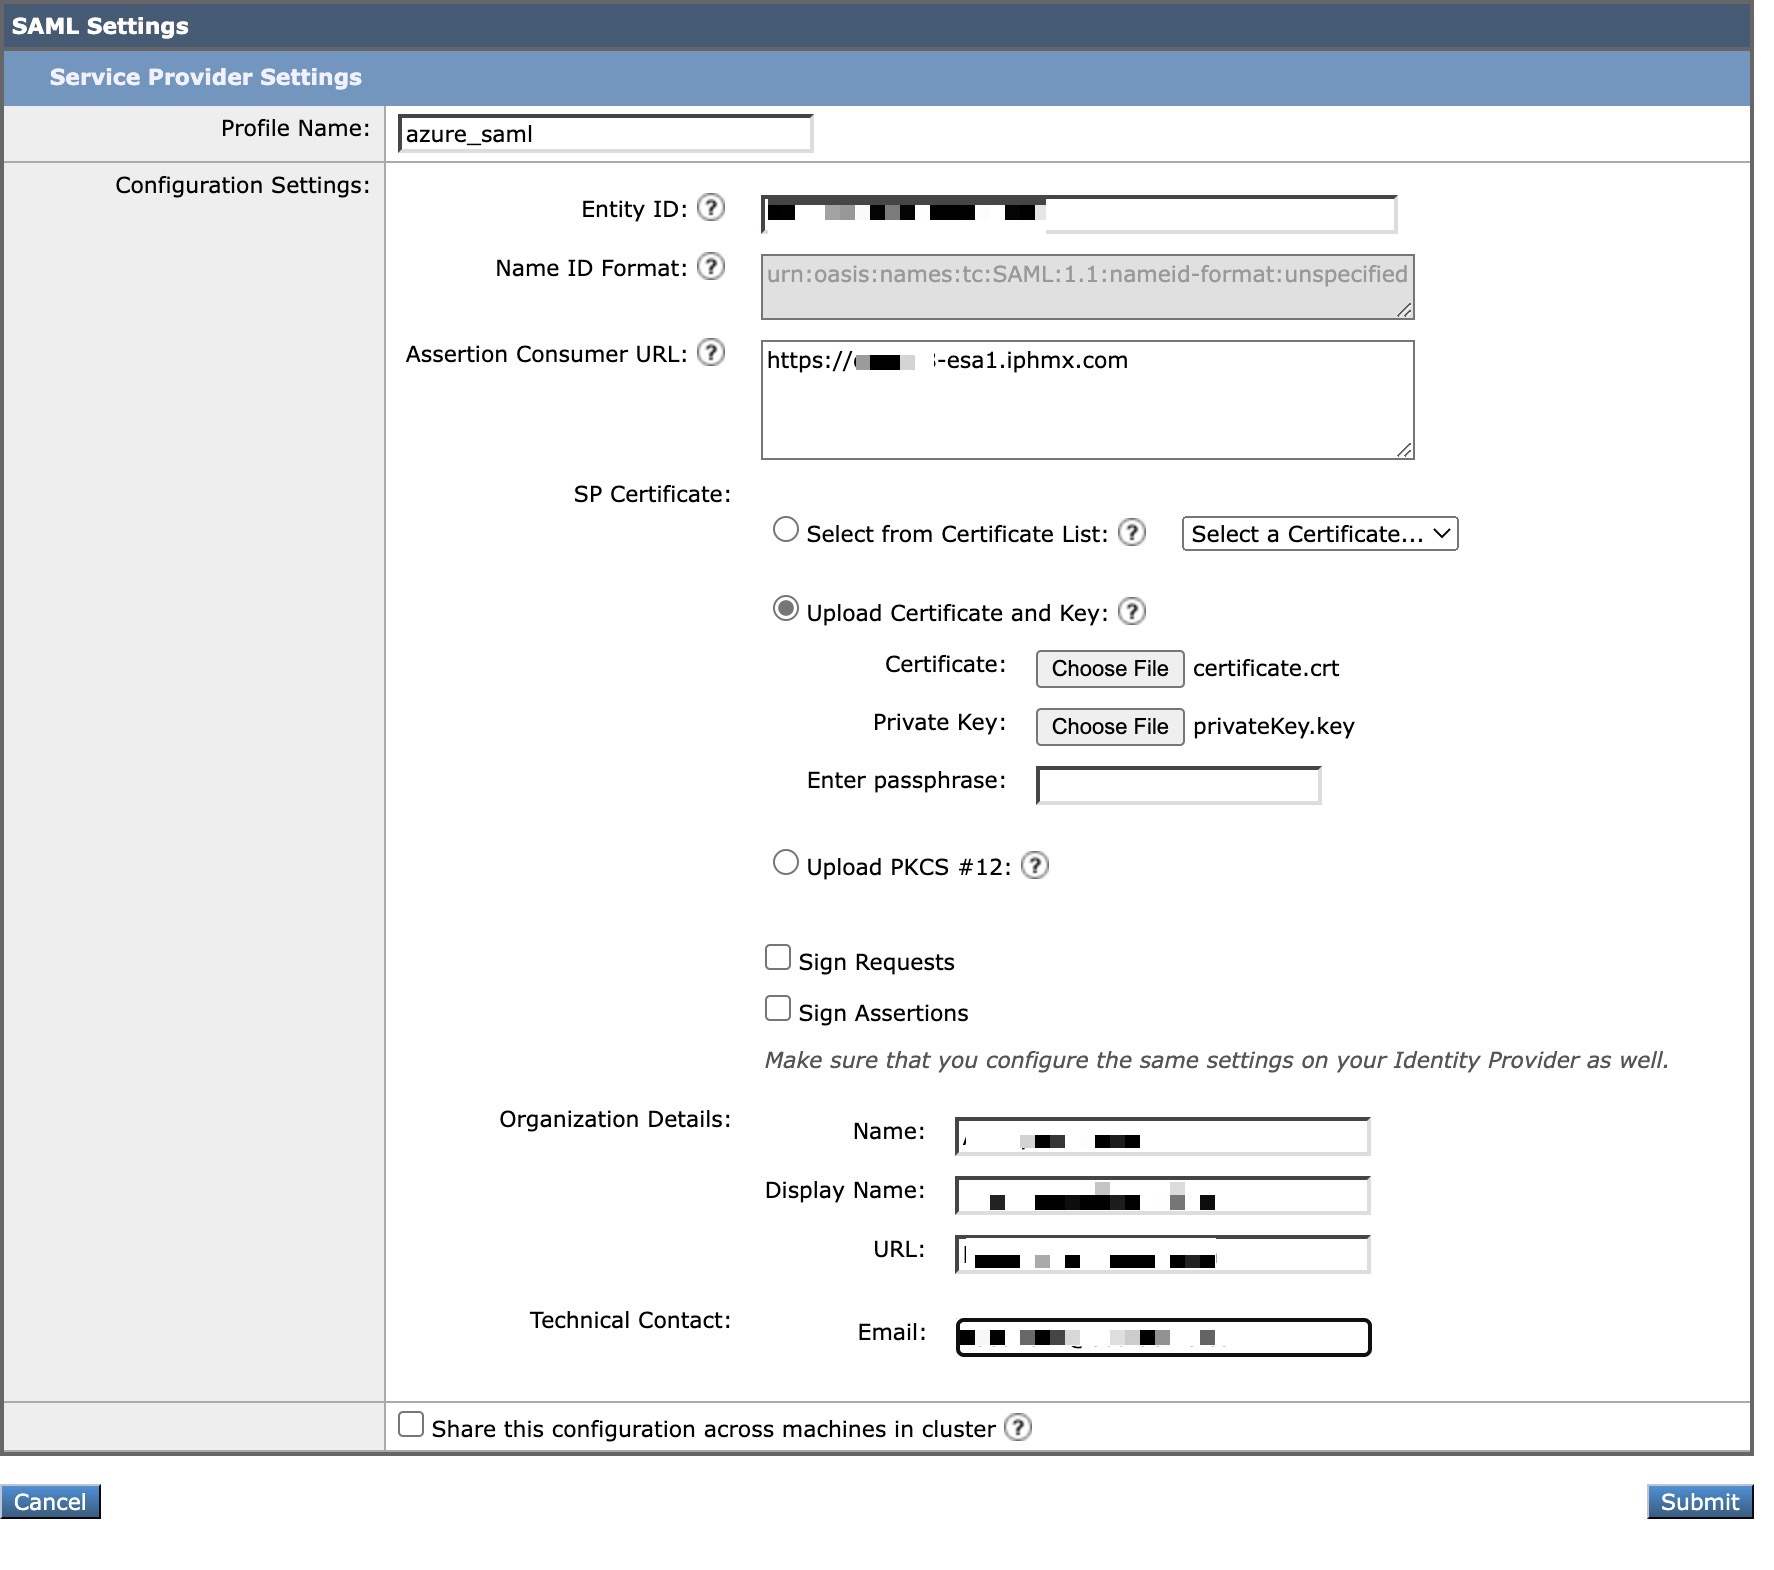
- Create a Profile Name, such as "azure_saml"
- Create an Entity ID
- The Entity ID can be ANYTHING of your choice; indicate it as "CIsco SAML" or something to easily recall
- Create an Assertion Customer URL
- The Assertion Customer URL will be the DNS or the proxy URL that you use to connect to your Gateway (i.e., https://dhXXYY-esa1.iphmx.com) externally
- For SP Certificate, upload the certificate and key you created or have available
- Finally, enter in your Organization Details and Technical Contact:
Cluster Configuration Note
Again - this is the section you will want to check "Share this configuration across machines in cluster."
Keeping this option unchecked and making any changes in this form will keep all changes at this machine level only. Checking this option will push service provider configuration settings across machines in the cluster. However, Assertion Consumer URLs for individual gateways will be generated automatically based on the hostnames of individual gateways. If the hostname is not accessible, please modify it to the URL used to access the appliance's Web Interface.
- Click Submit and complete by committing your configuration changes
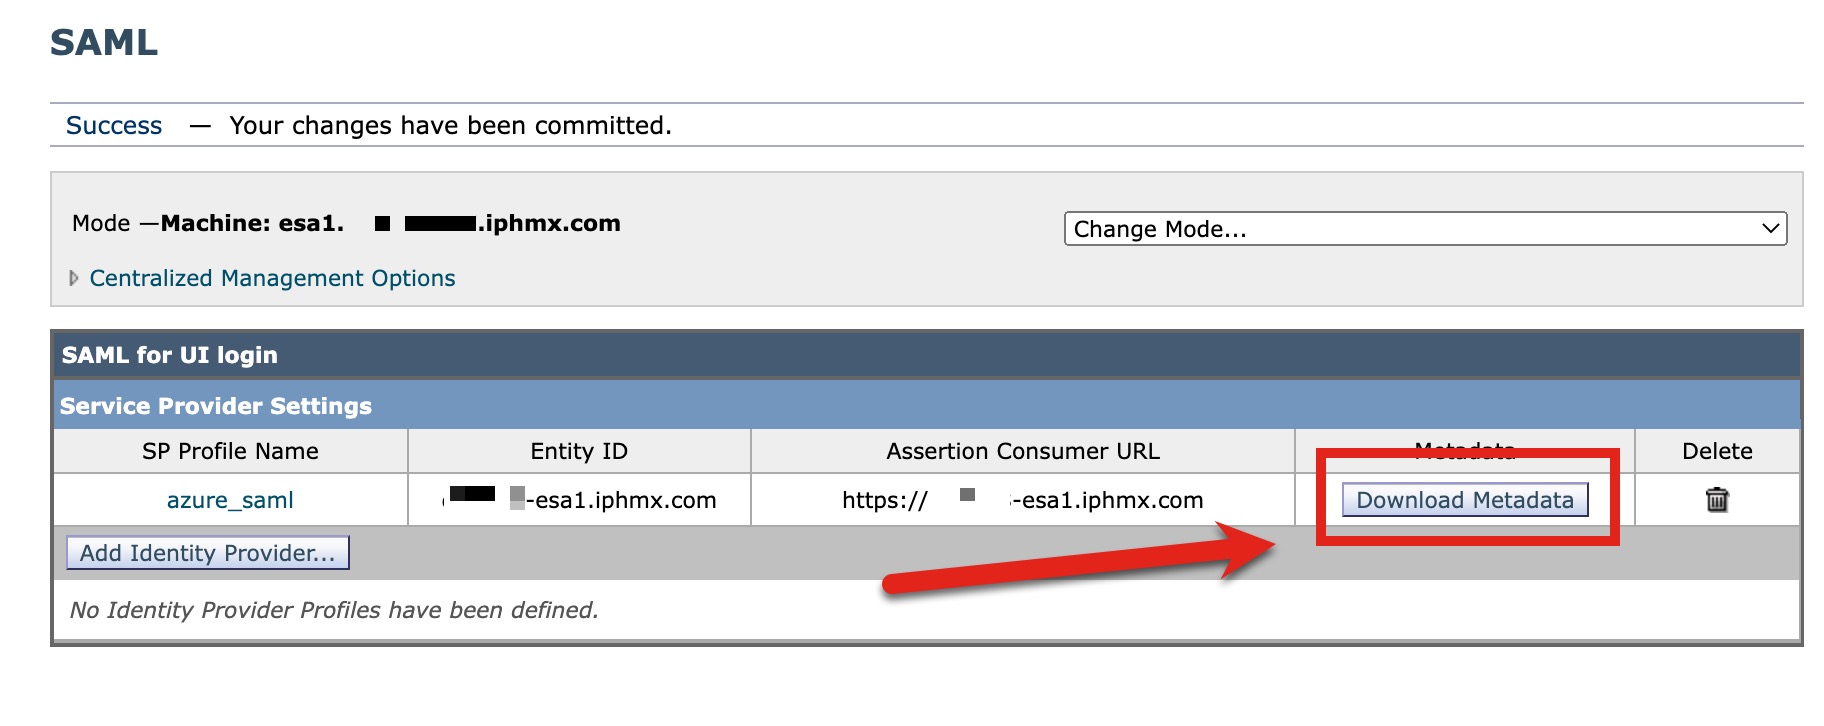
- Click Download Metadata to retrieve your SP metadata file (XML):
[Azure] Create an Enterprise Application
- Log in to your Azure Admin Portal
- Navigate to Azure Active Directory > Enterprise applications
- Click + New application
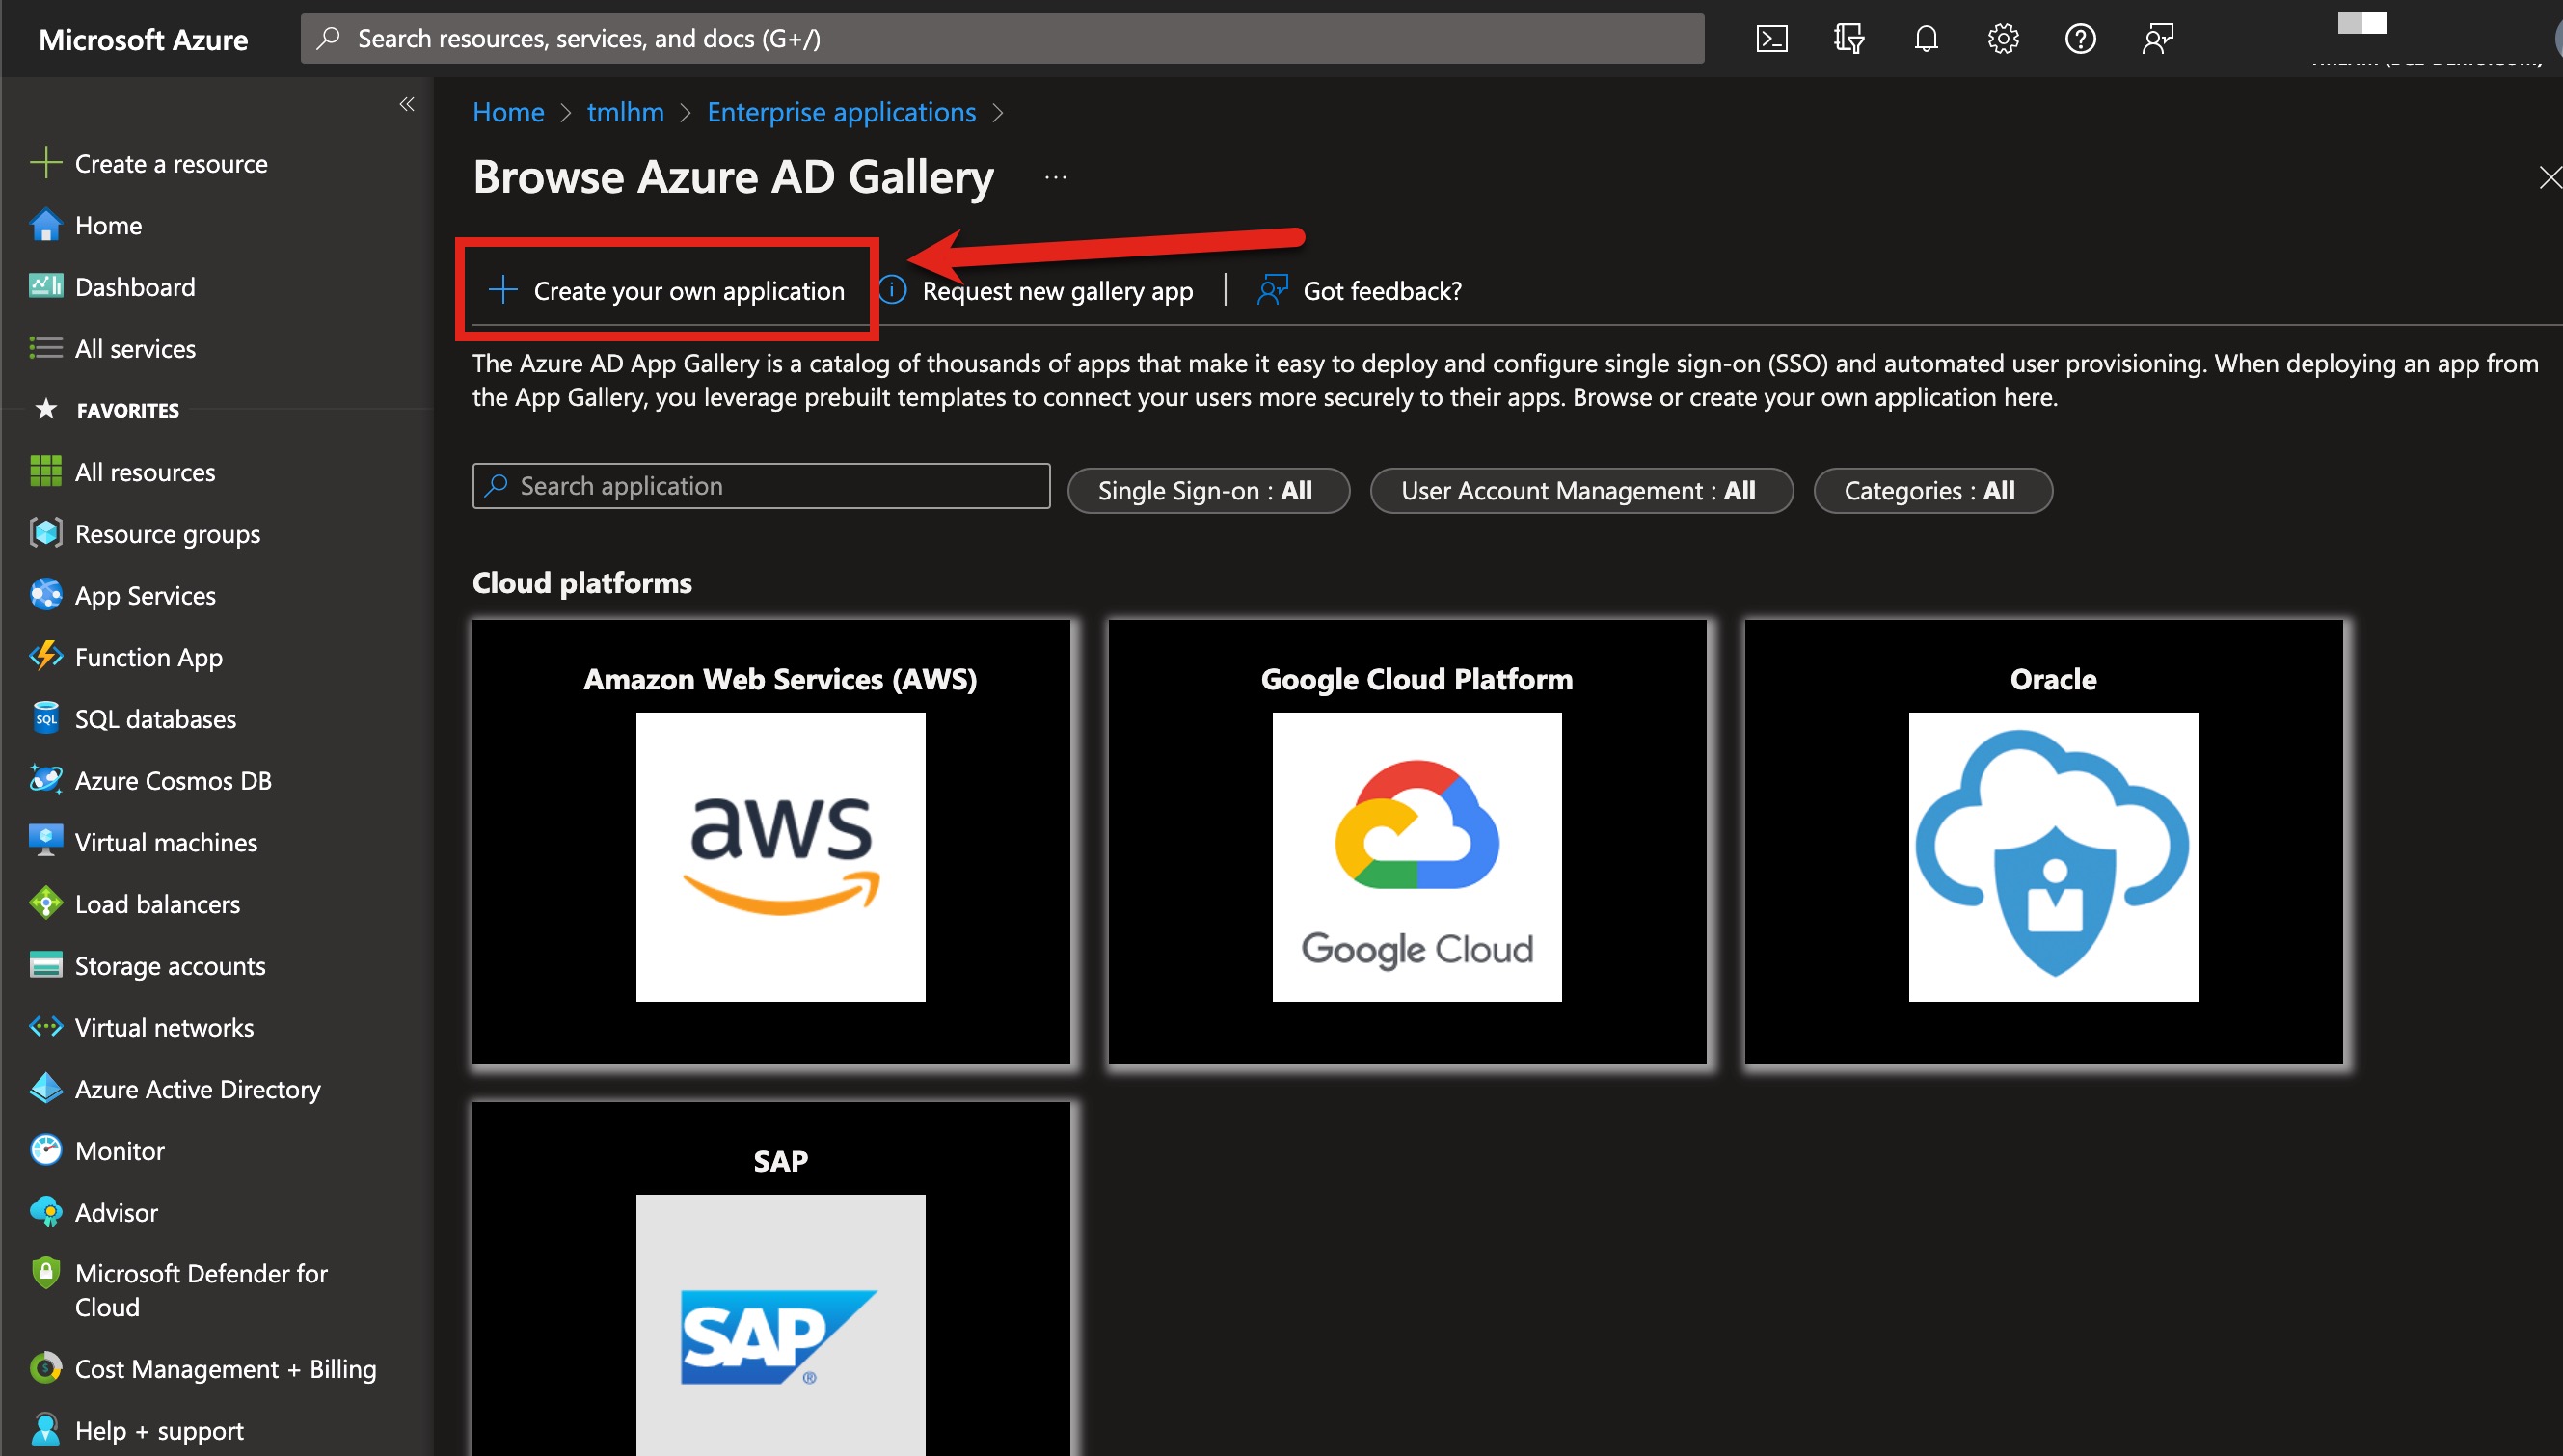
- Click + Create your own application:
- Name your application. The recommendation is to name this your ESA hostname or similar:
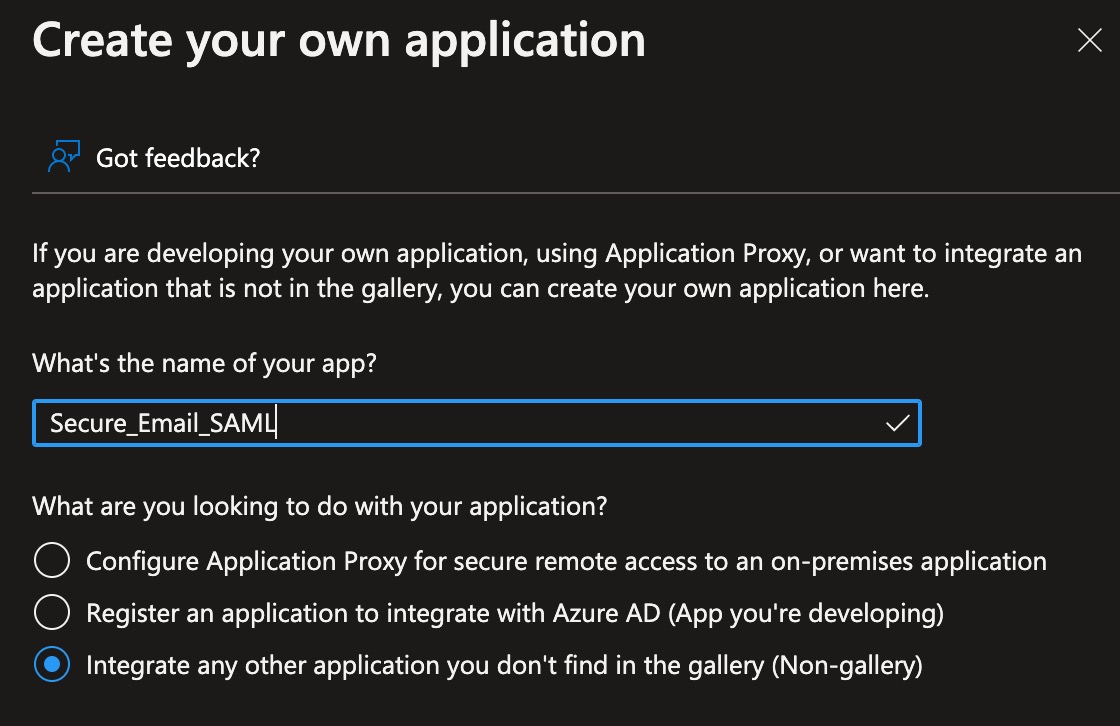
- Click Create at the bottom of the page to complete
Configure Single Sign-On w/ SAML
Follow the Getting Started steps to create the Azure AD Enterprise Application configuration
- In 1. Assign users and groups, click Assign users and groups
- Click + Add user/group and assign users or groups as needed
- Click Select at the bottom of the page to complete
- Click Assign to finish assigning your users/groups
Note
Please make sure to record the Object ID for Groups and/or Users you assign. You can view the Object ID from Azure AD and your application by clicking on Users and Groups and then clicking on the Display Name of the Groups or Users you have assigned. The Object ID is needed for Cisco Secure Email Gateway configuration, System Administration > Users > External Authentication > Global Settings. This will be covered towards the end of this guide.
- Return to the Overview for your application
- In 2. Set up single sign on, click Get started
- Select SAML
- Click Upload metadata file and use the SP metadata file you created in the earlier section:

- Click Add
- Validate that the data shown matches what you configured from your Cisco Secure Email Gateway
Cluster Configuration Note
If you are configuring SAML for a cluster, please go ahead and add an additional Reply URL (Assertion Consumer Service URL) for each additional gateway this SAML should authenticate. Do this NOW to have ALL Reply URL in the Federation Metadata XML you are creating.
- Click Save to save the single sign-on configuration in Azure
- Use the X in the upper right-hand to close the Basic SAML Configuration pane
- If prompted "Test single sign-on...", click No, I'll test later
- In section 3 (SAML Signing Certificate), click on Download for Federation Metadata XML:
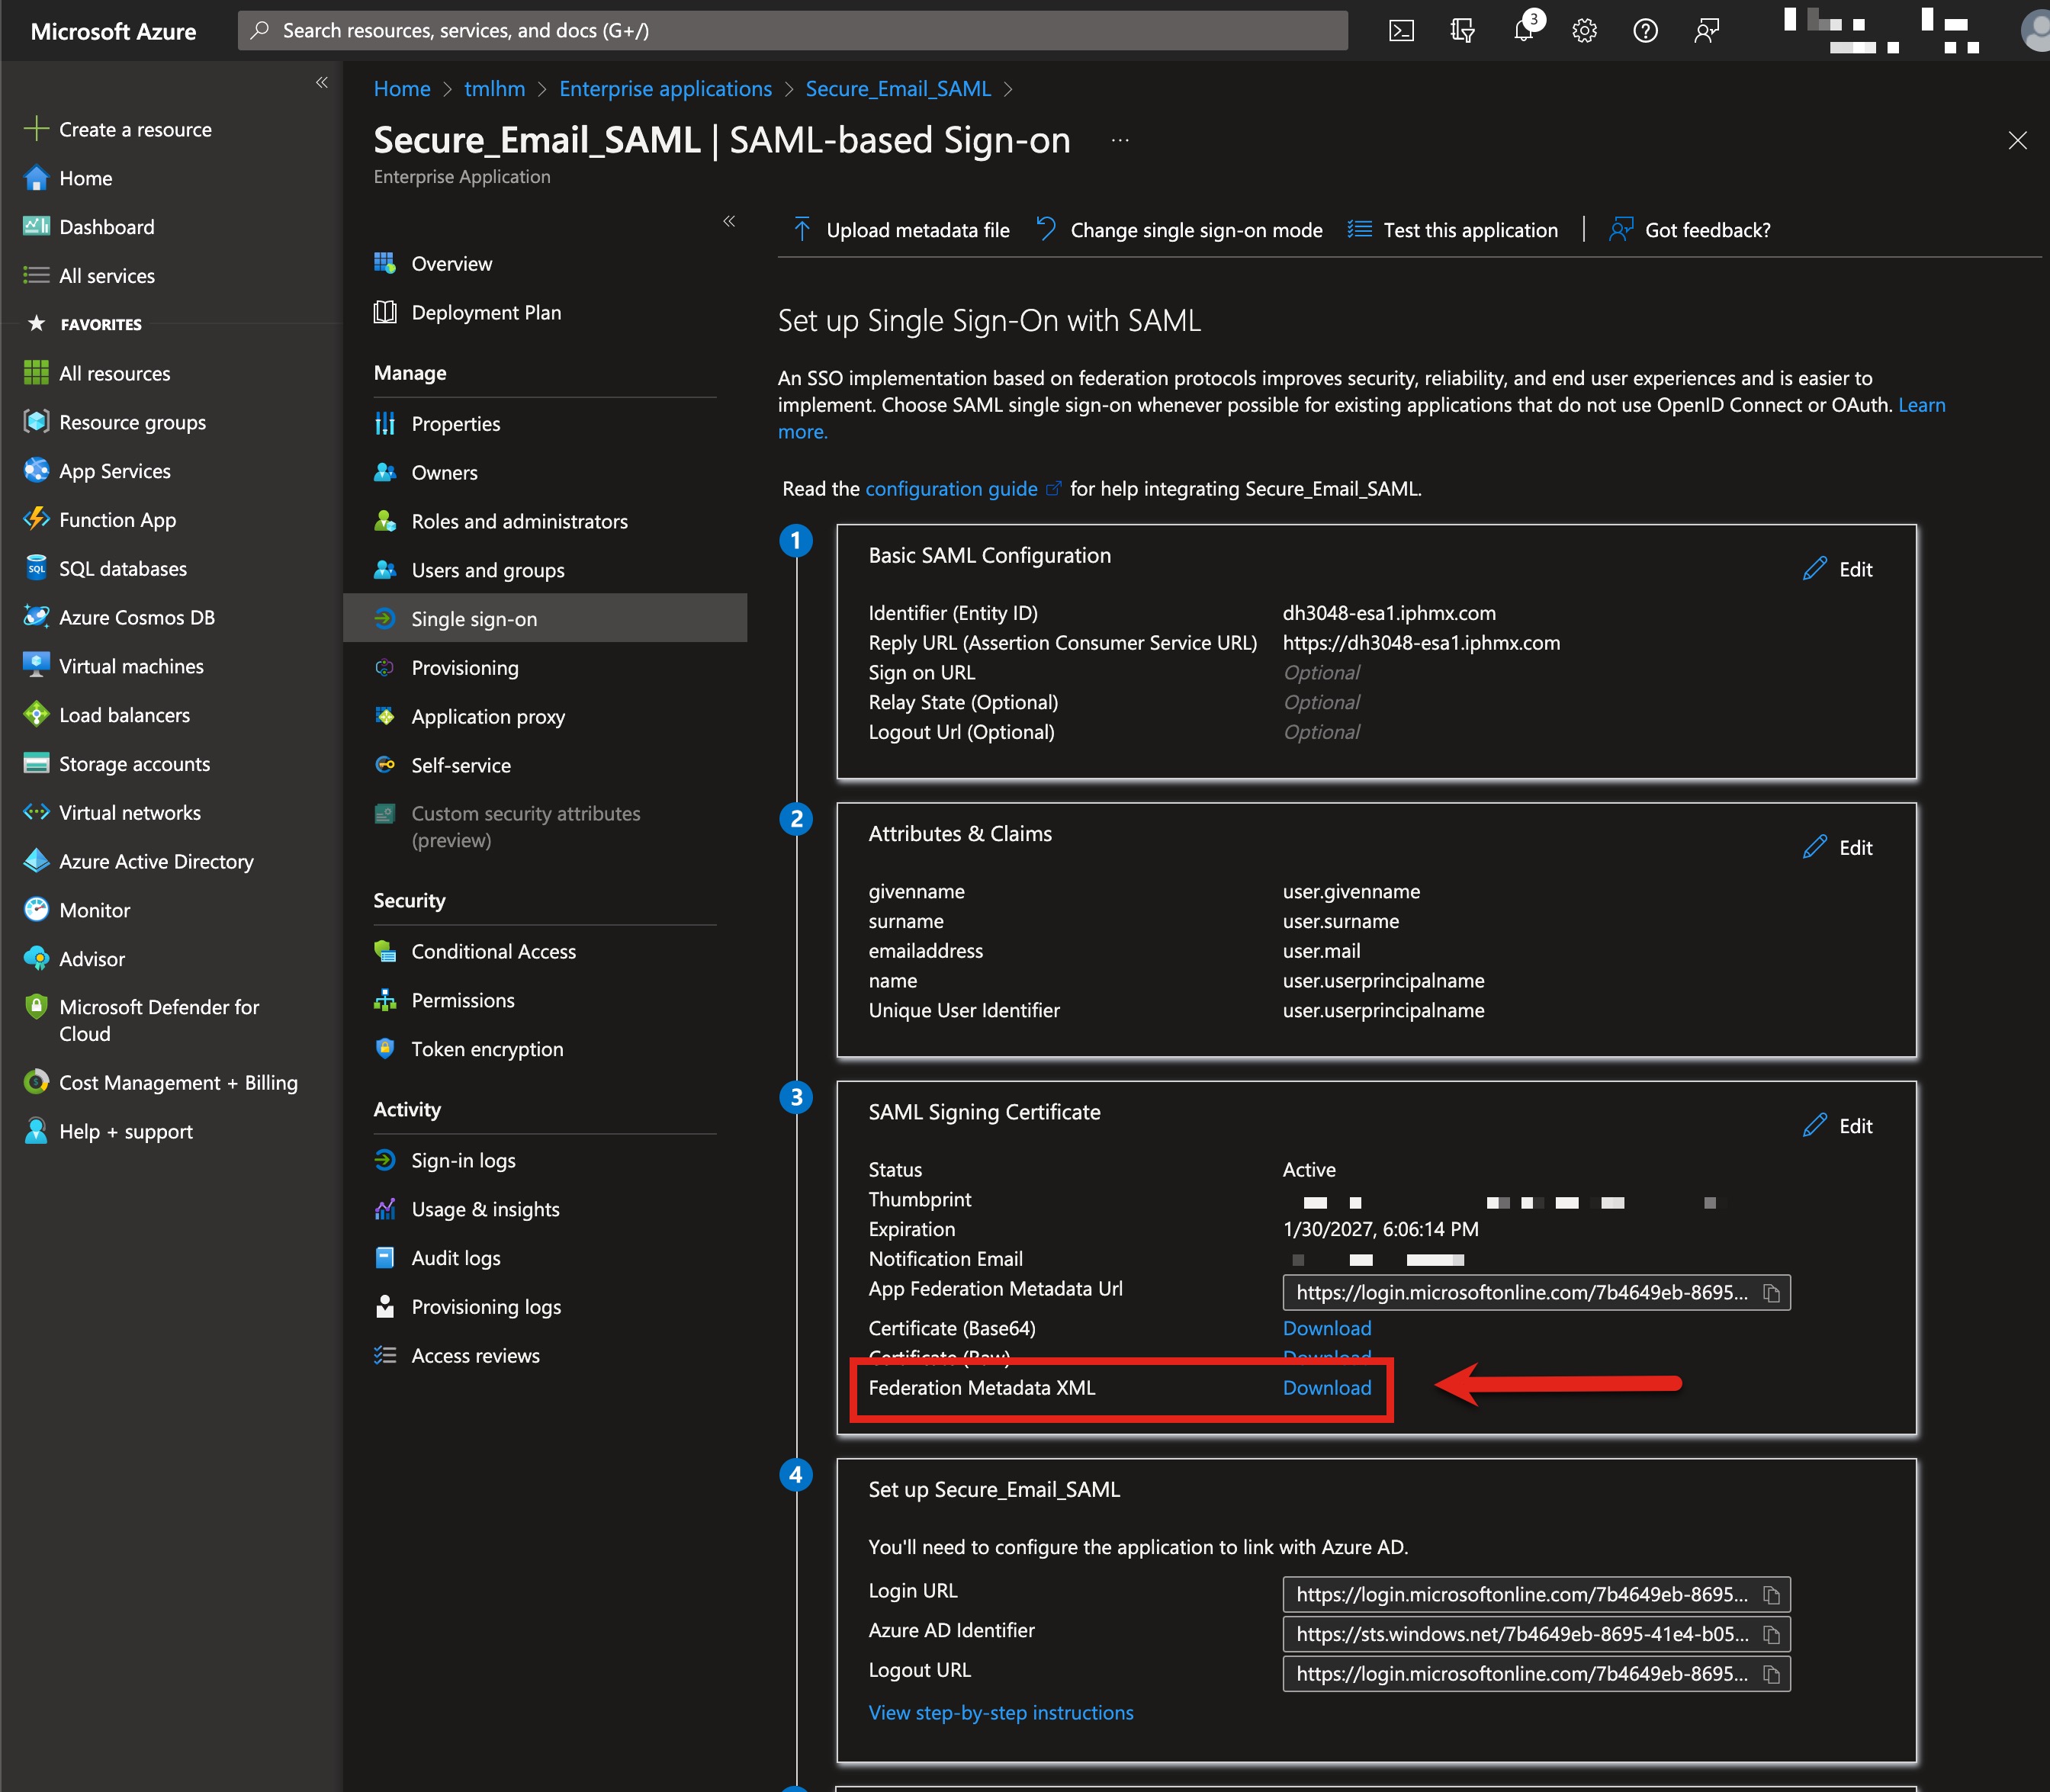
Note the filename and download location. You will use this XML file in the next section.
[ESA] Configure Service Provider (SP) settings on ESA
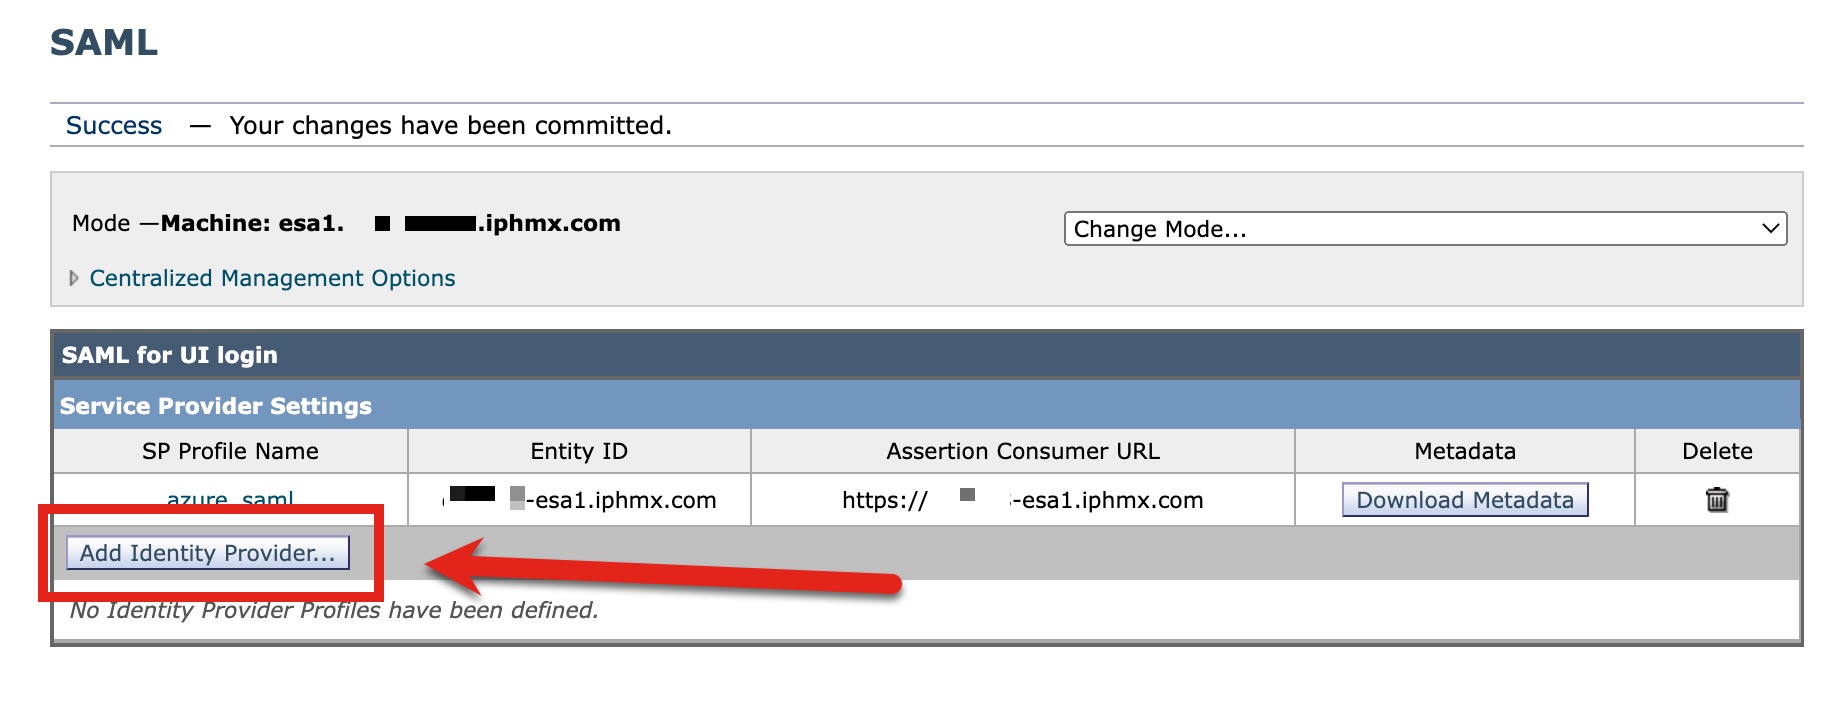
Return to your Gateway UI. We will create the Identity Provider (IDP) settings:
- Click Add Identity Provider...:
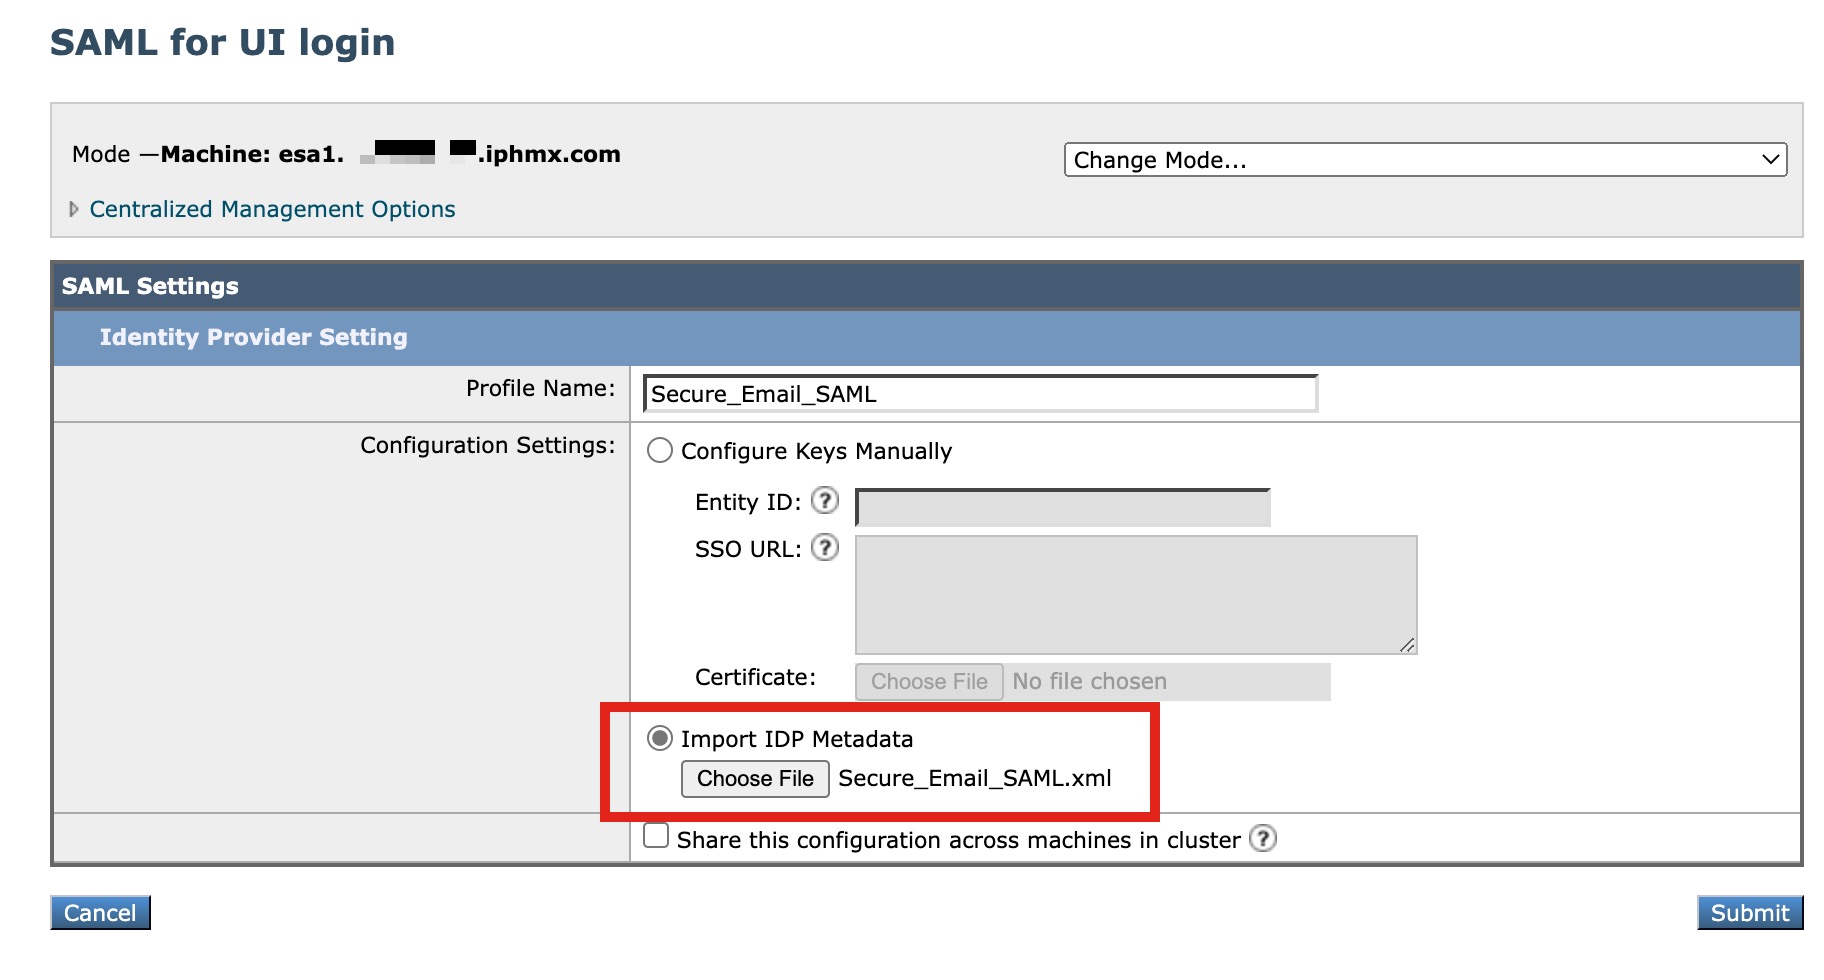
- Create a Profile Name, such as "Secure_Email_SAML"
- Select Import IDP Metadata
- Click Choose File and select the Federation Metadata XML you created in Azure:
Cluster Configuration Note
If you are configuring SAML for a cluster, please check "Share this configuration across machines in cluster." _Remember, if you had entered in the additional gateway _Reply URL* to the Azure configuration, this Federation Metadata XML will already include all gateway in the cluster.
- Click Submit and complete by committing your configuration changes
At this time, you should see similar to the following on-screen:

[ESA] Configure External Authentication and Attributes on ESA
Return to your Gateway UI. We will create the External Authentication settings needed for users to log in using Single Sign-On:
- Navigate to System Administration > Users
Cluster Configuration Note
If your gateway is clustered, you will need to "Change mode..." to cluster to proceed.
- In the External Authentication section, click Enable
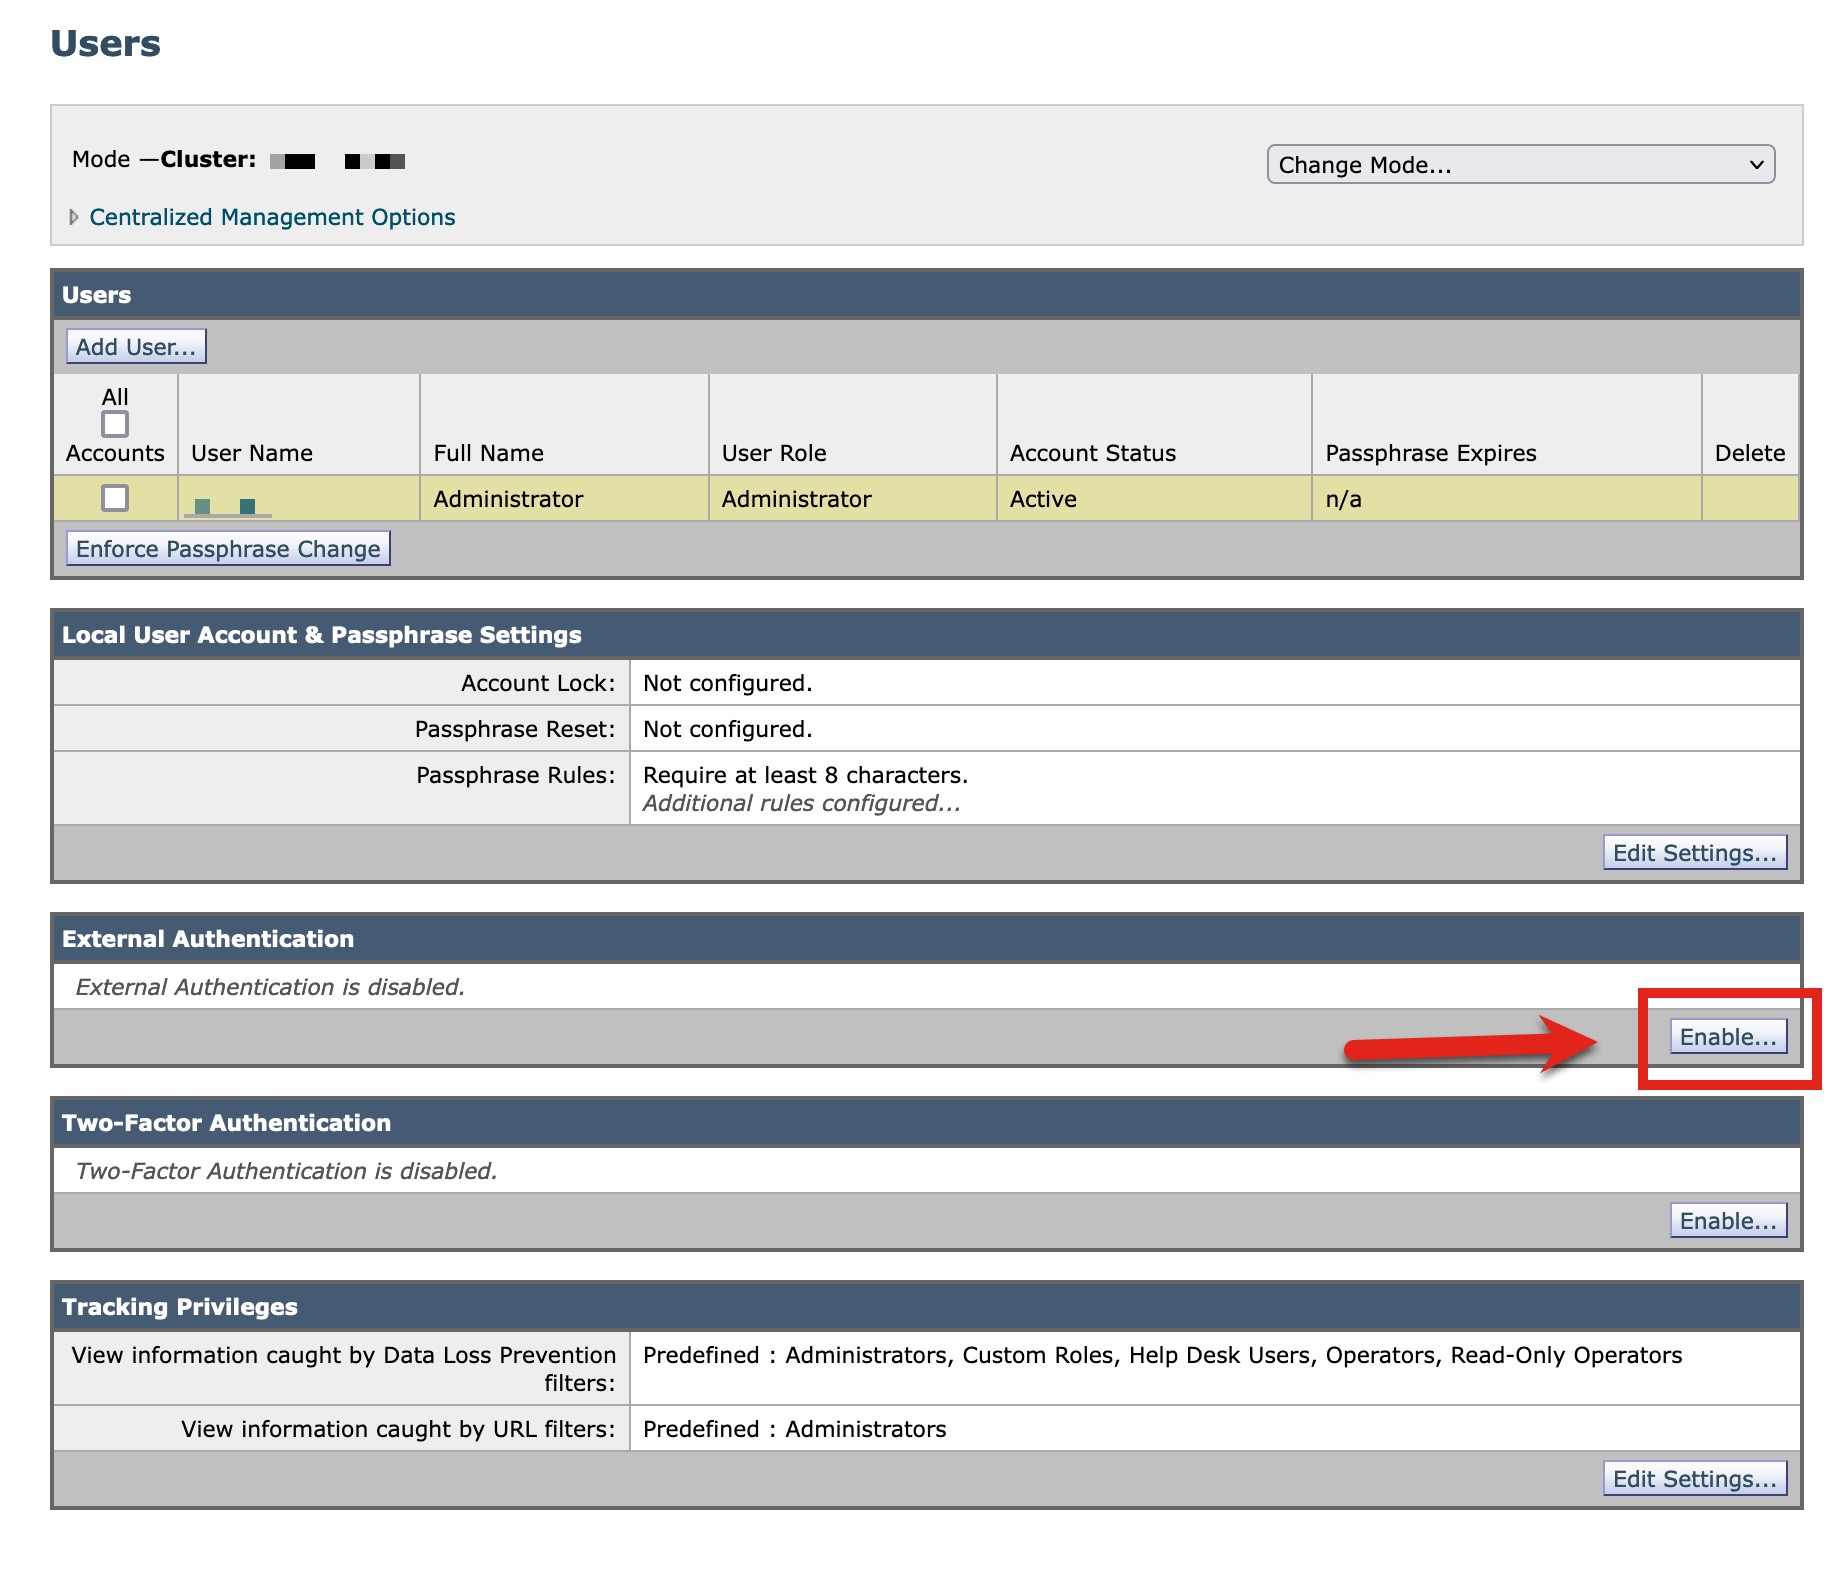
- Change the dropdown for Authentication Type to SAML
- For Group Mapping, paste in your Object ID
- If you have individual users (not in a Group), be sure to click Add Row and paste in the Object ID, select a Role to match the desired access/role
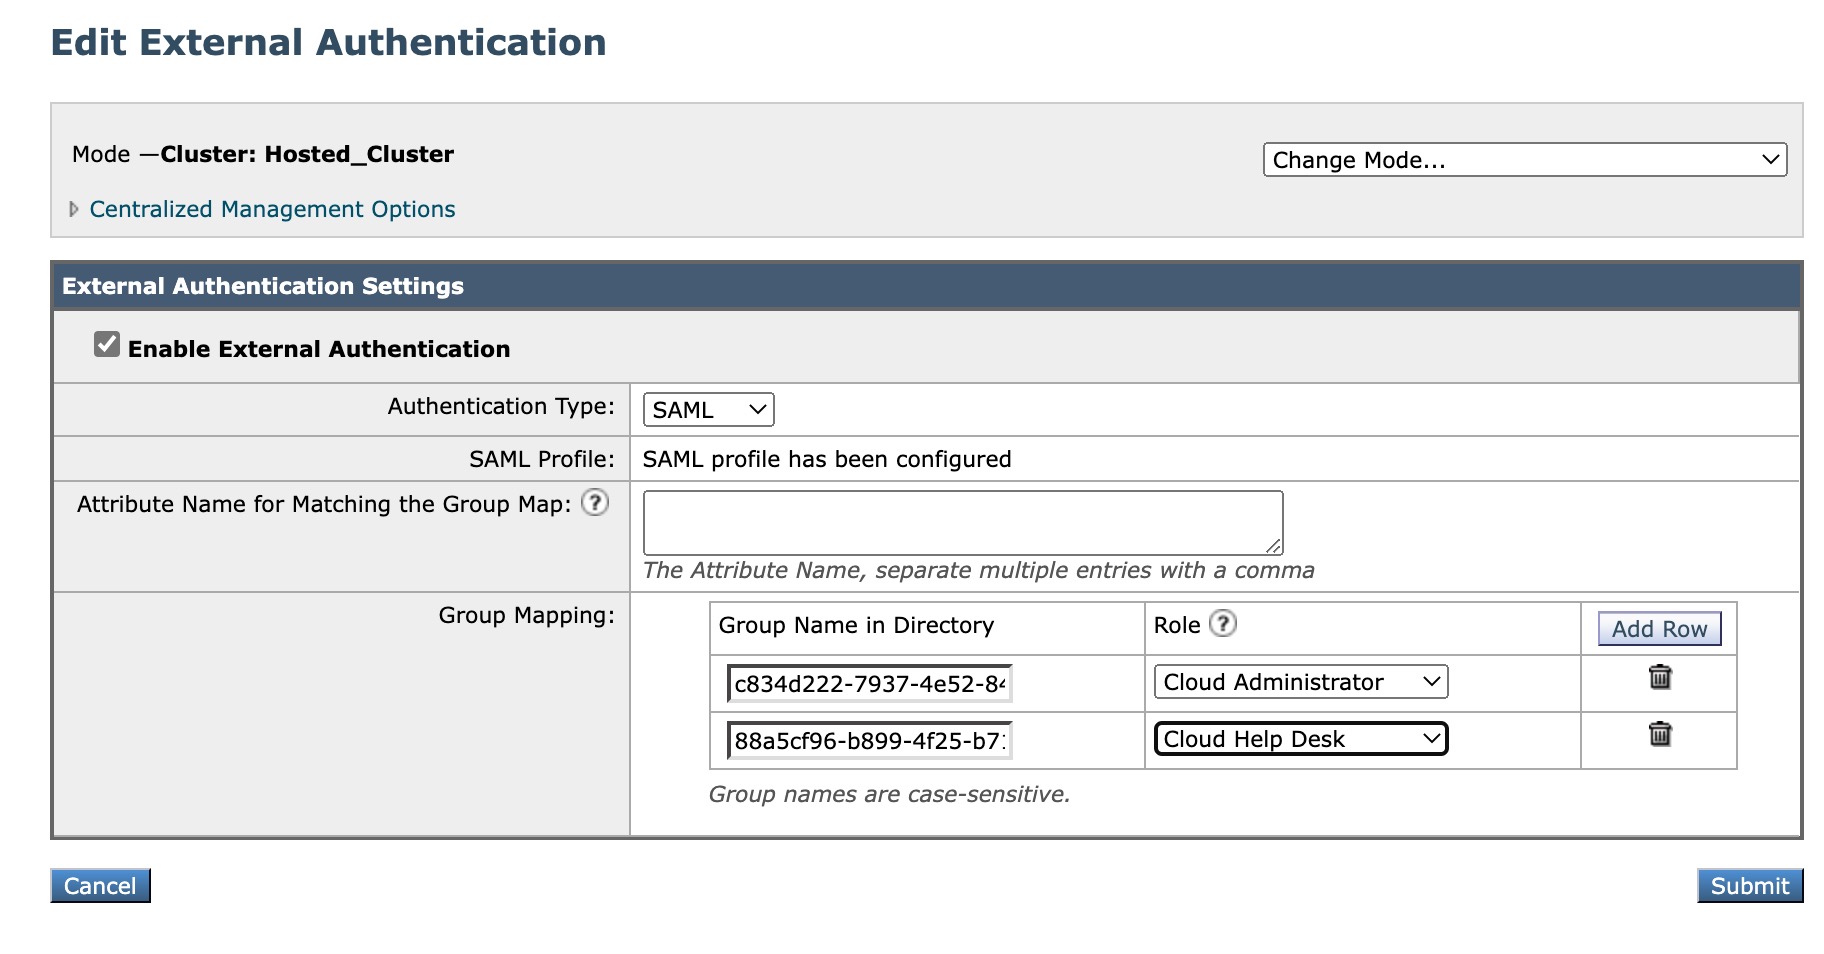
- Click Submit and complete by committing your configuration changes
You have completed the SAML configuration and Single Sign-On configuration!
Testing and Validation
- Log out of your Gateway UI
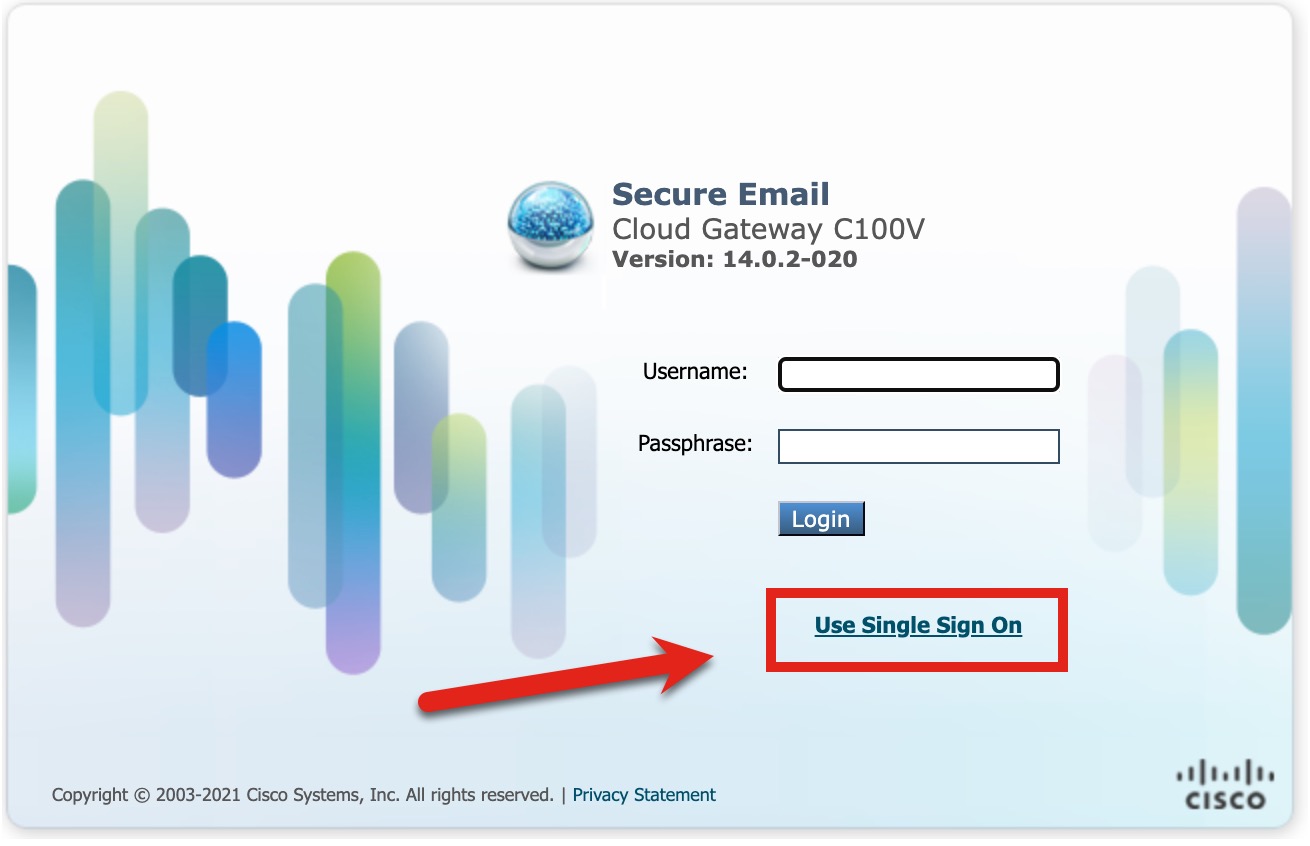
- Once the screen has taken you back to the login screen, notice the Use Single Sign On link at the bottom of the log-in box:
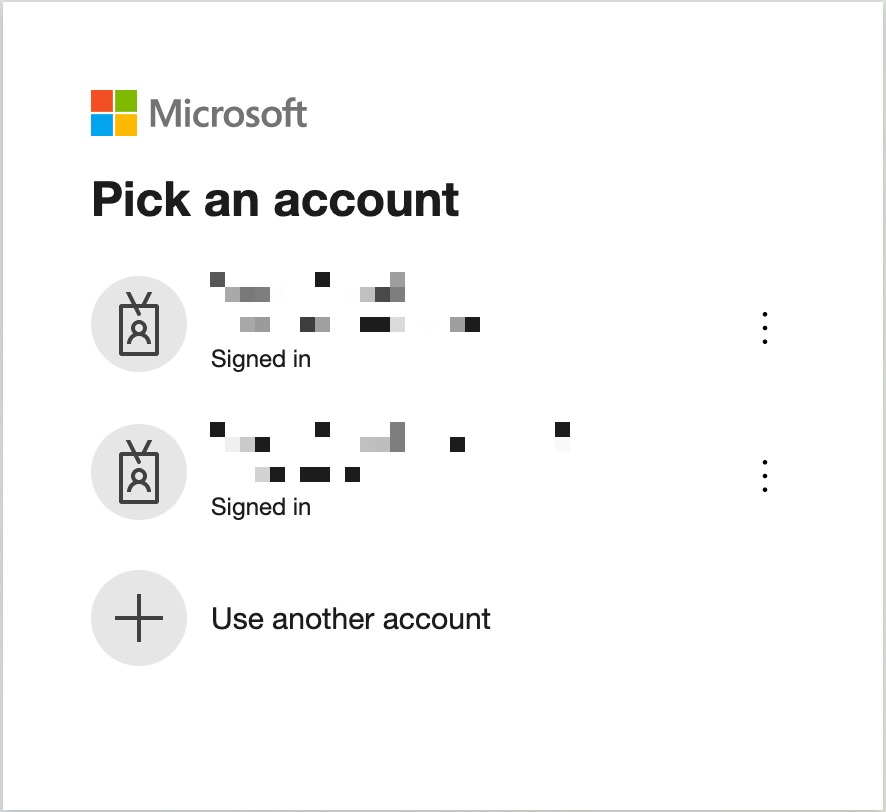
- Use your domain log-in when prompted after clicking the link:
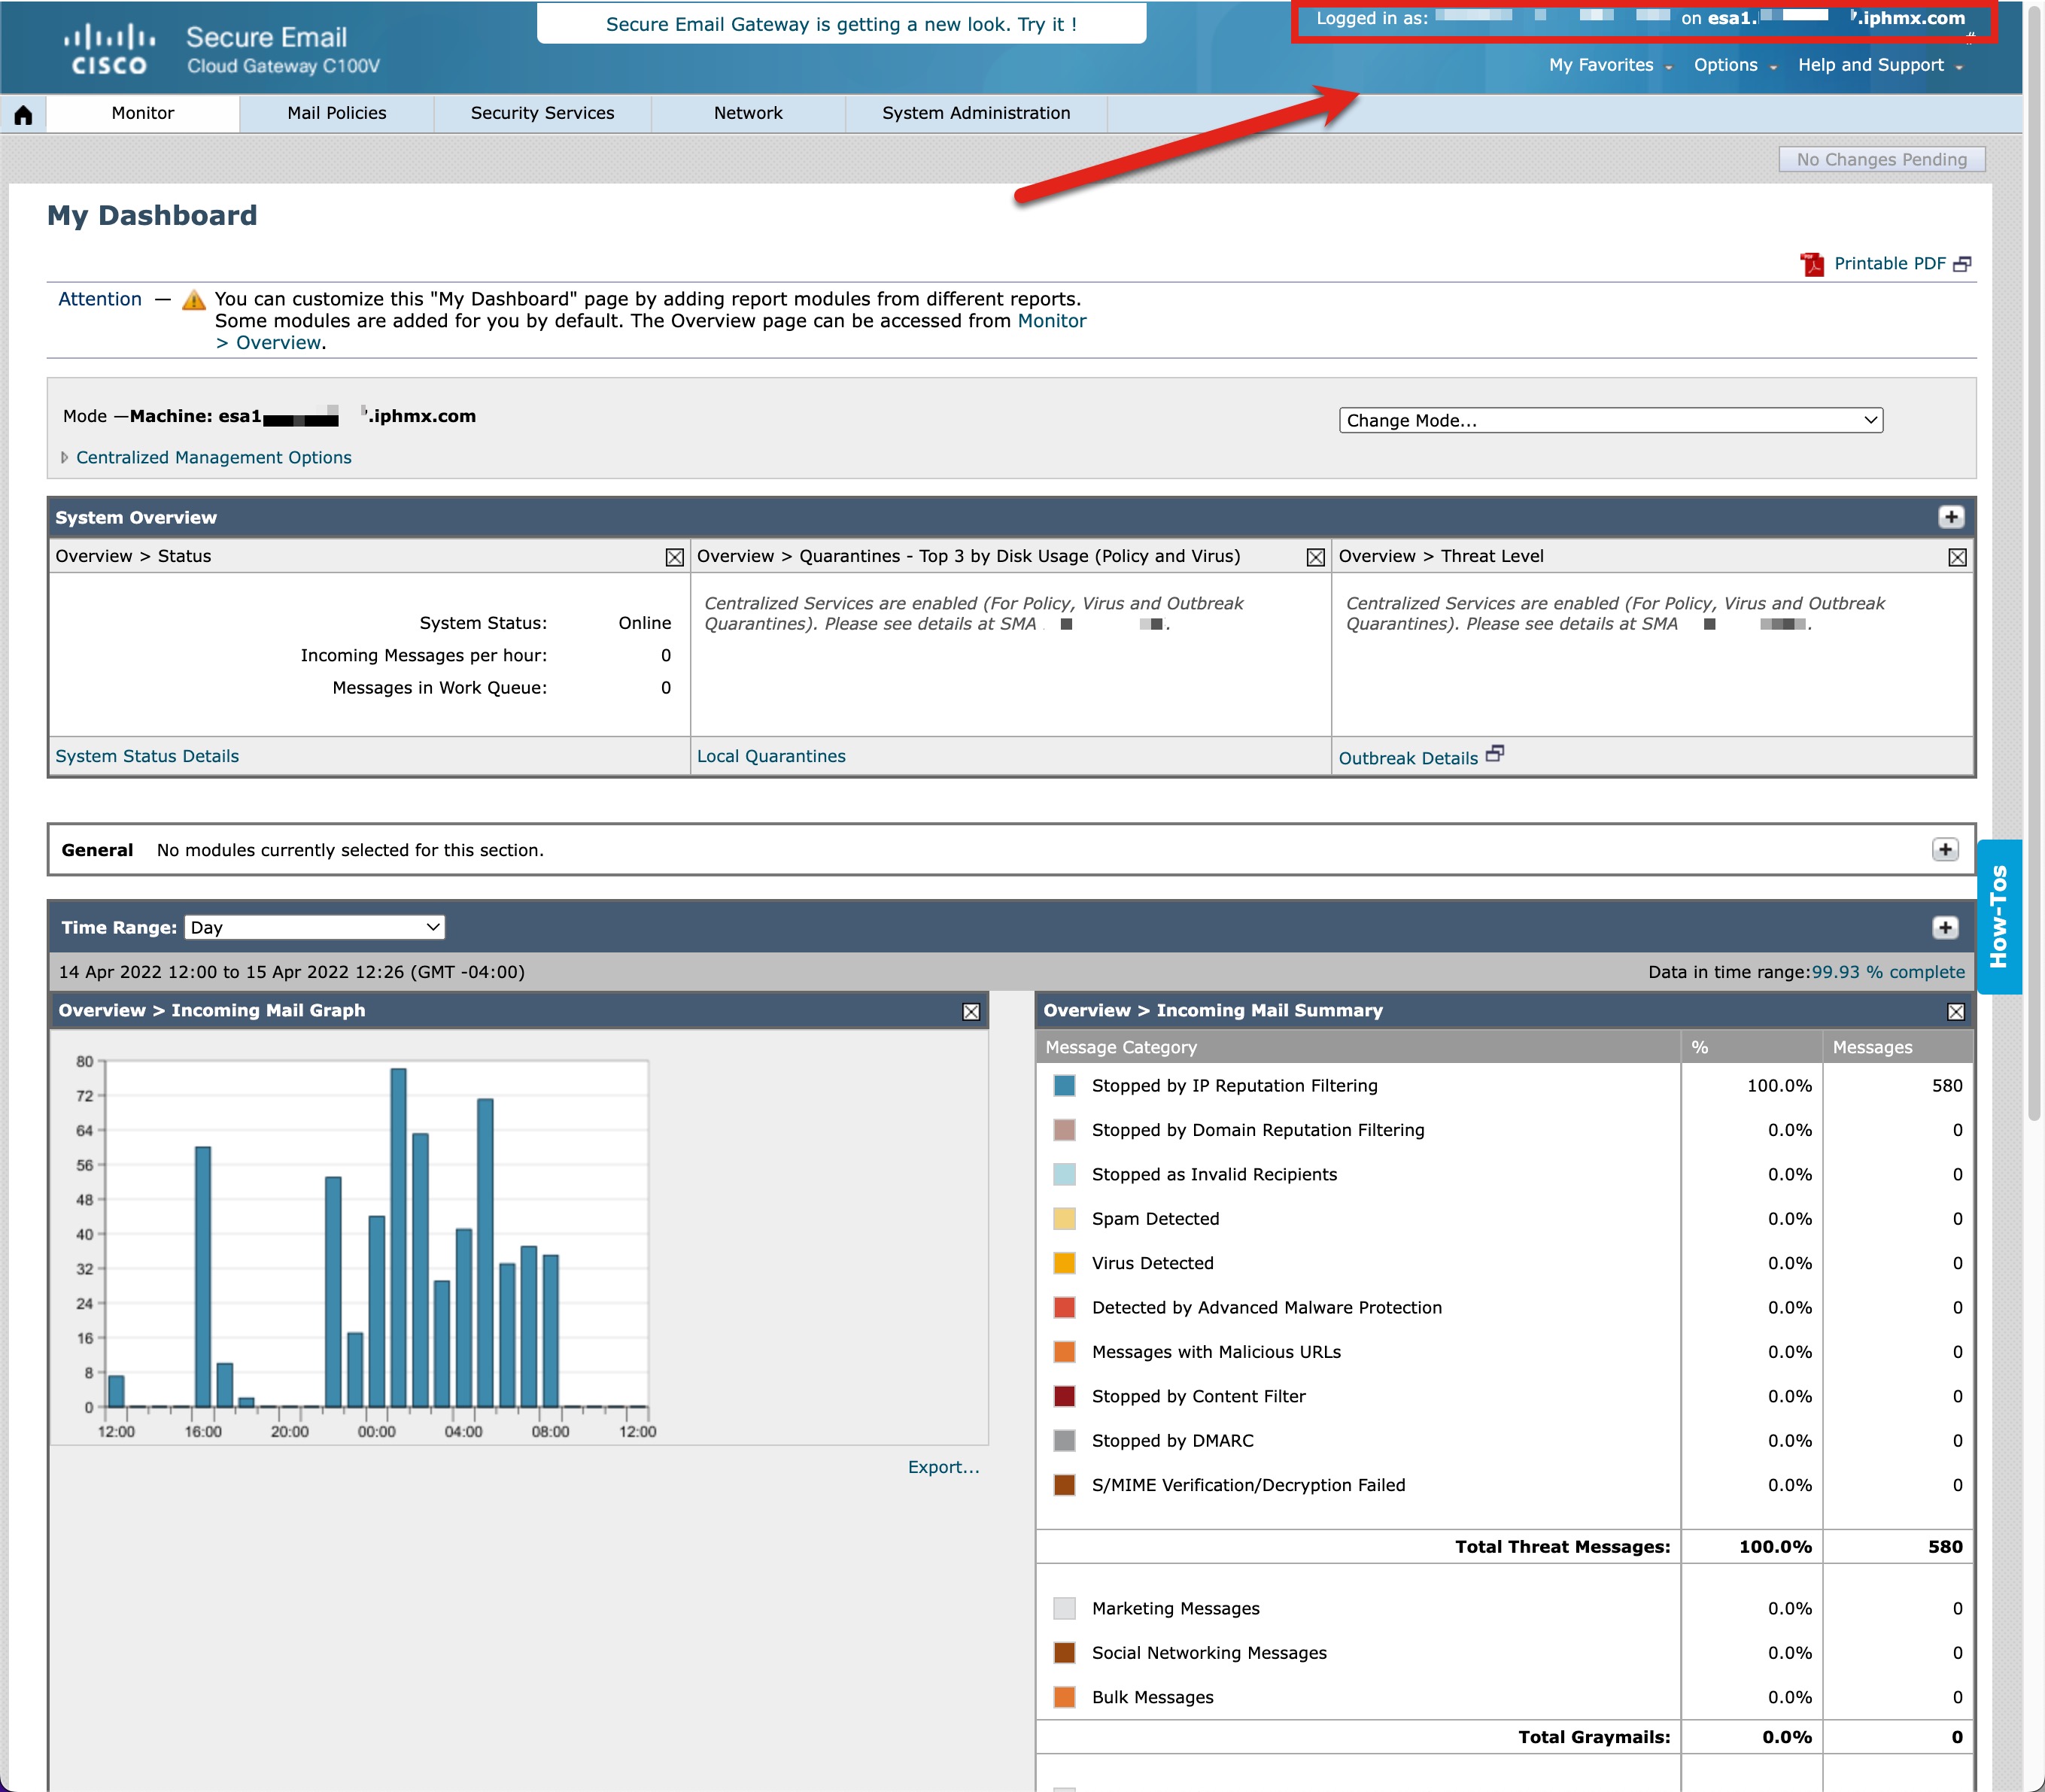
- Upon successful log-in, you should see the matching domain log-in credentials in the upper right-hand of the UI:
Alerts
The following is an example of Admin alert notifications once SAML is configured:
Subject: Info <SAML> esa1.hcXXYY-47.iphmx.com: An error occured during SSO authentication. Details: User: r...

The Info message is:

An error occurred during SSO authentication. Details: User: [email protected] Reauthorize failed on the appliance while fetching user privileges from group mapping.

Version: 13.0.0-252
Serial Number: 420D4F36AAEBC0093B4F-XXYY189XXYY
Timestamp: 06 Sep 2021 00:17:50 +0500
Troubleshooting
You can see log-in attempts recorded in the "gui_logs" viewable either by the CLI or from the UI (System Administration > Log Subscriptions).
Group/Claim issues during log-in?
If your SAML log-in is for a group, you may need to assign a "claim" to the Attributes & Claims.
This will be seen when viewing the "gui_logs" as the following:
Thu May  5 09:51:20 2022 Info: An error occurred during SSO authentication. Details: User: [email protected] Authorization failed on appliance While fetching user privileges from group mapping.
Thu May  5 09:51:20 2022 Info: An error occurred during SSO authentication. Details: Please check the configured Group Mapping values, it does not match the Attributes values from IDP response.
From your Azure AD Enterprise Application configuration:
- Click Edit in the 2. Attributes & Claims box
- Click + Add a group claim
- Select All groups
- Leave the rest as default and click Save
- Copy the Claim name URL that is created
Return to your Gateway UI. Complete the following:
- Navigate to System Administration > Users
- In the External Authentication section, click **Edit Global Settings..."
- Paste in the URL copied from the steps above to the *Attribute Name for Matching the Group Map" section.
- Click Submit and complete by committing your configuration changes
Now retry log-in with your SAML account.
Microsoft sign-in error
Seeing the following?
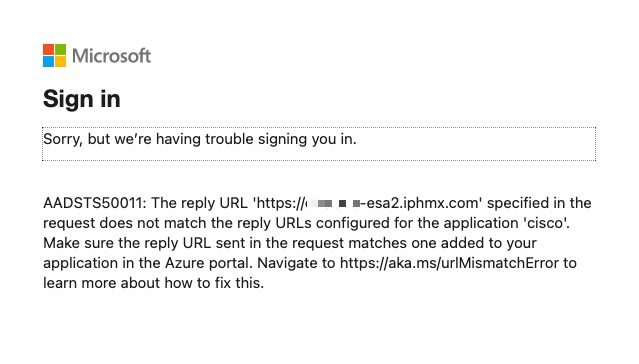
Review the Configure Single Sign-On w/ SAML section. You most likely did not configure the Reply URL (Assertion Consumer Service URL) for an additional gateway. Update the Basic SAML Configuration section to include ALL your gateway, save the file, and load that updated XML to the gateways.
Now retry log-in to your gateway again.
When logging into ESA2 (https://dhXXYY-esa2.iphmx.com) it is logging me into ESA1
You most likely did not update the Assertion Consumer URL on ESA2. Revisit the following:
- Navigate to System Administration > SAML
- Click on your SP Profile Name
- Assure that your Assertion Consumer URL is listed as https://dhXXYY-esa2.iphmx.com
- Click Submit and complete by committing your configuration changes
Now retry log-in to ESA2 again.
Seeing the following?
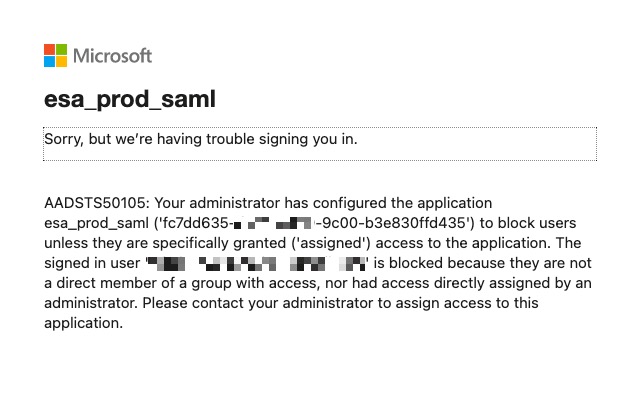
You most likely did not assign the user or group to Azure AD Enterprise Application. Revisit Configure Single Sign-On w/ SAML and step through the "Assign users and groups" section.
Updated about 2 years ago
