On-premise Exchange for Mailbox Auto Remediation and Search & Remediate
User Guide
The basis of this document is the User Guide (Chapter: Remediating Messages in Mailboxes). These steps listed below should clarify the configuration process for "How to Configure Remedial Actions on Messages in Microsoft Exchange On-Premise Mailboxes."
Note
Cisco has validated remedial actions on messages only on Microsoft Exchange 2013, 2016, and 2019, and Microsoft Exchange Server Subscription Edition (SE) 2025
Introduction
You can configure the email gateway to remediate messages from a mailbox on an Exchange on-premise server. The messages can be remediated automatically by the email gateway or manually by the user using the Message Tracking filter.
The email gateway uses a user account with impersonator privileges to access the Exchange on-premise mailbox and perform remedial actions on the message. Therefore, you must create this user account with impersonator privileges on the mail exchange server to which the email gateway has to connect and remediate the message.
The process for on-premise Exchange is simple:
- Create an On-Premise profile for the user mailbox and define the mailbox settings on your email gateway.
Before you begin, make sure that you have:- The impersonator user account details
- The hostname of the local mail exchange server
- Add the domain to which the recipient mailbox belongs and map the domain to the On-premise account profile.
On-premise Exchange for Mailbox Auto Remediation and Search & Remediate
Create the Impersonator Permissions and Group on Exchange
Log in to your Exchange on-premise server and open the Exchange Admin Center:
- Click on permissions in the left-hand menu
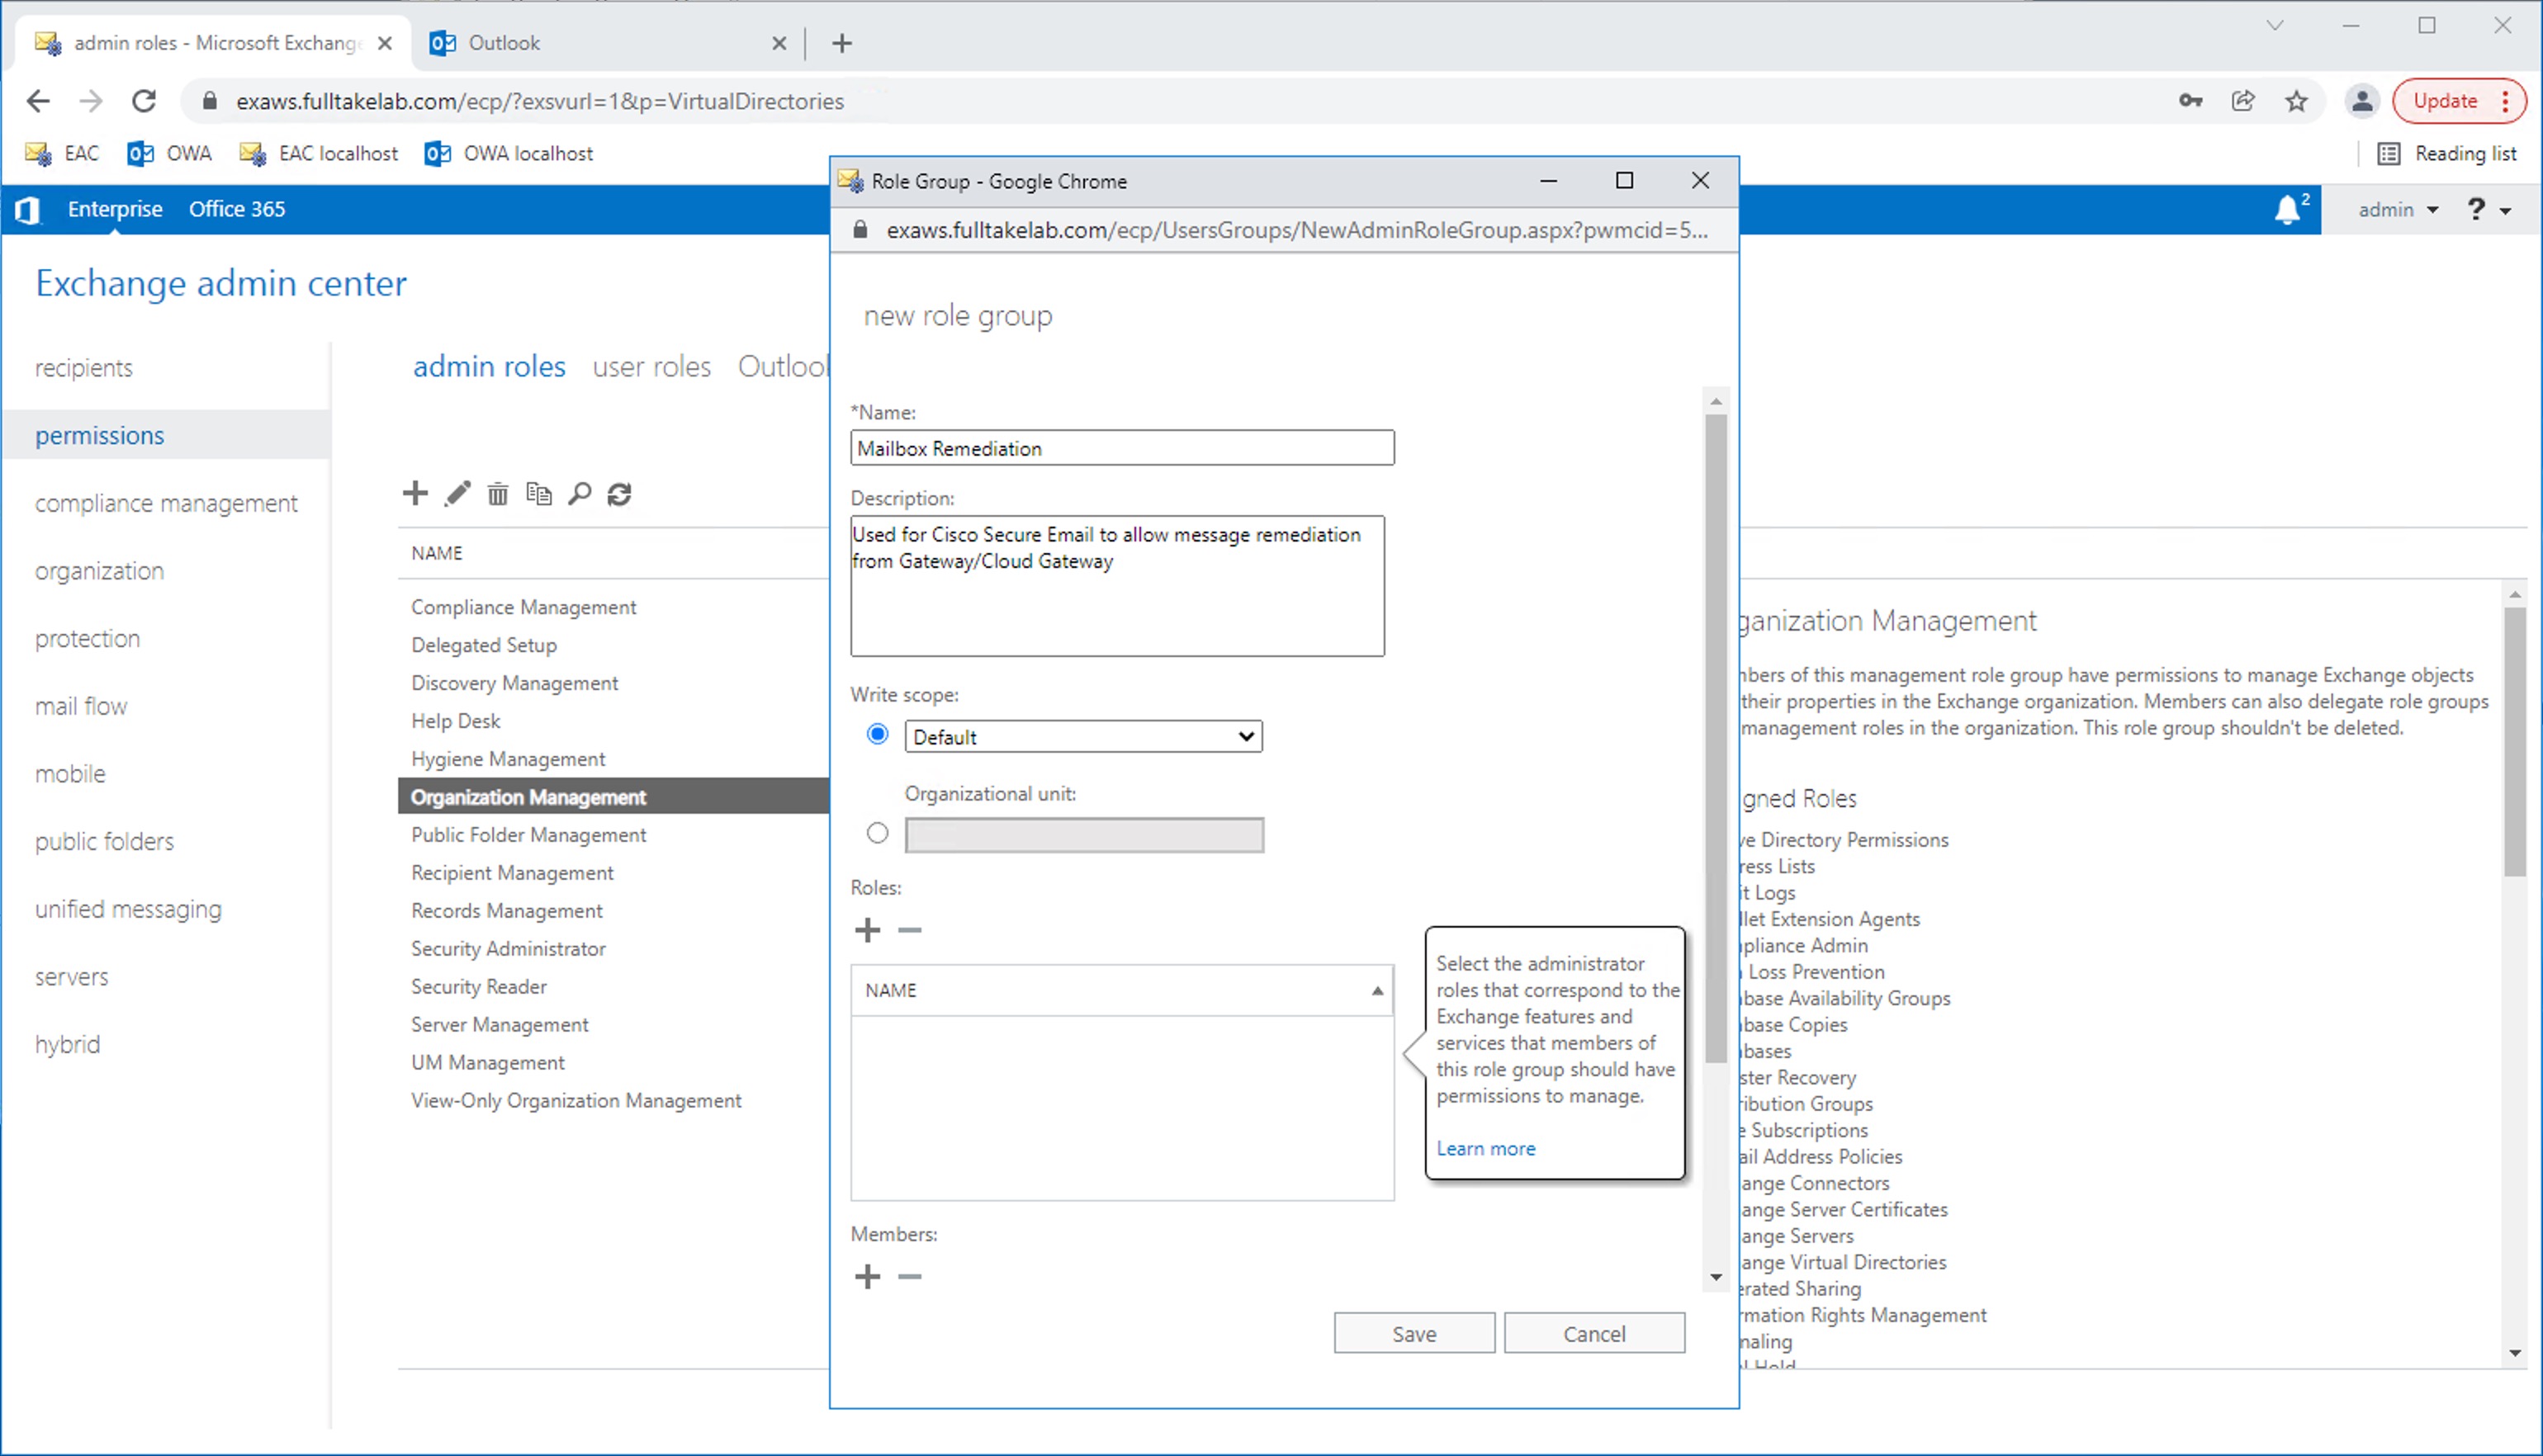
- Click the + to add a new admin role
- Provide a Name, Description (optional), and click the + for Roles
- In the new pop-up window, select ApplicationImpersonation and click add →
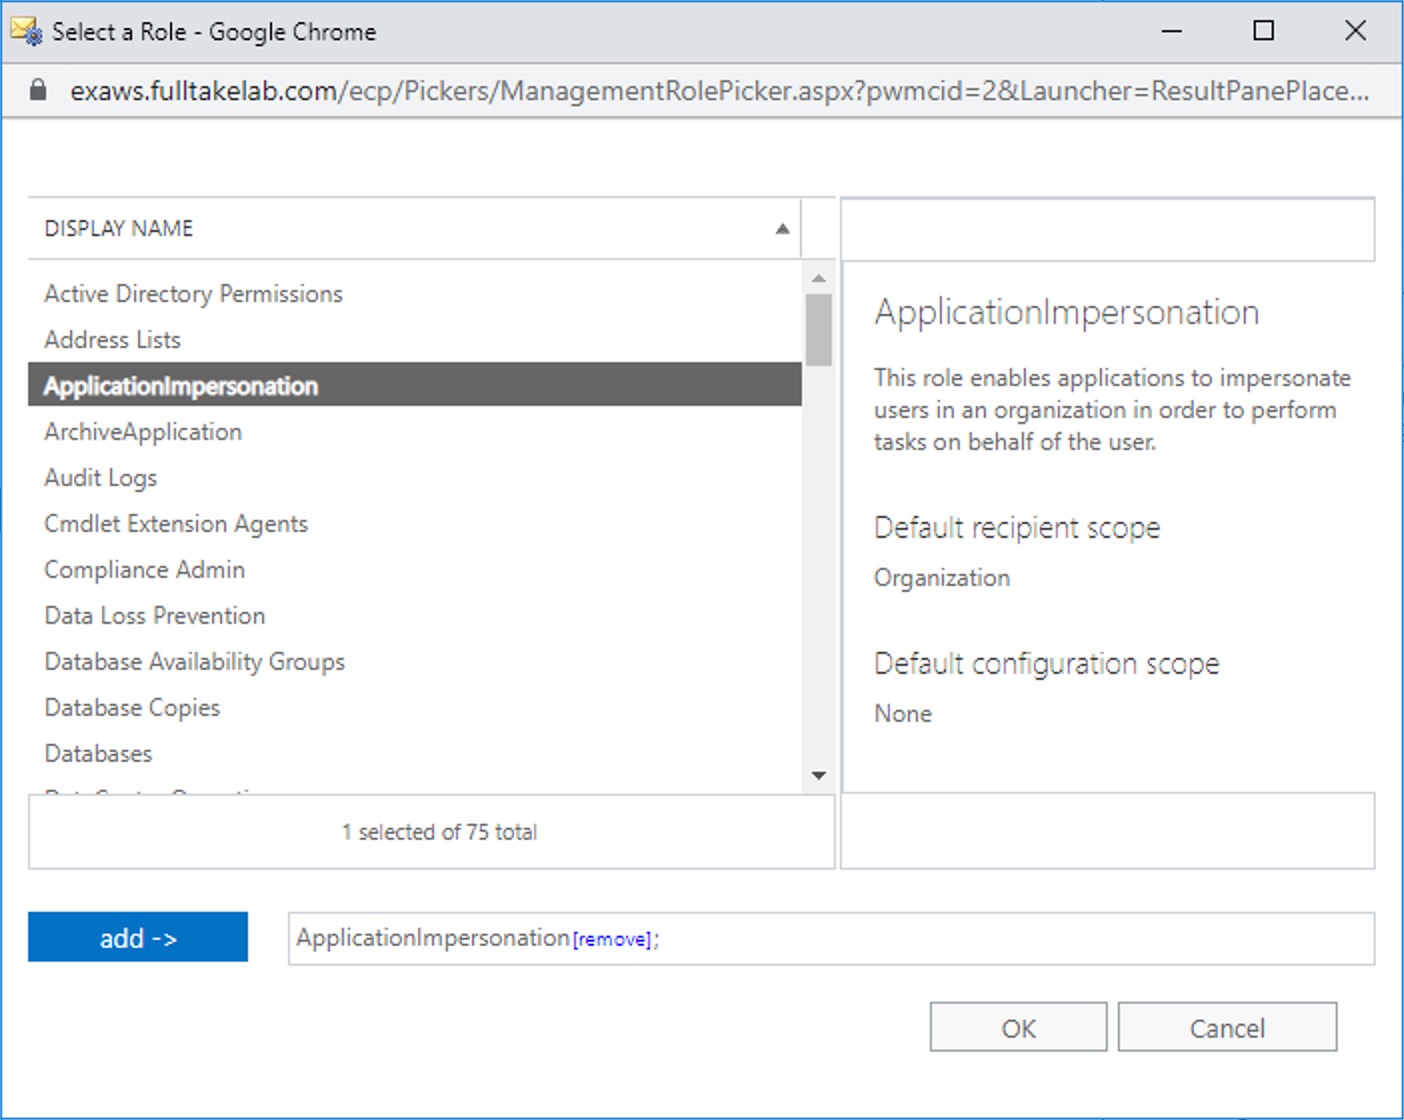
- Click OK
You have completed creating the impersonator role.
Create the User Account With Impersonator Privileges on Exchange
On your Exchange on-premise server, open the Active Directory Users and Computers:
- Click on the Users folder
- In the toolbar, click on the icon to Create a new user in the current container and step through the user creation wizard
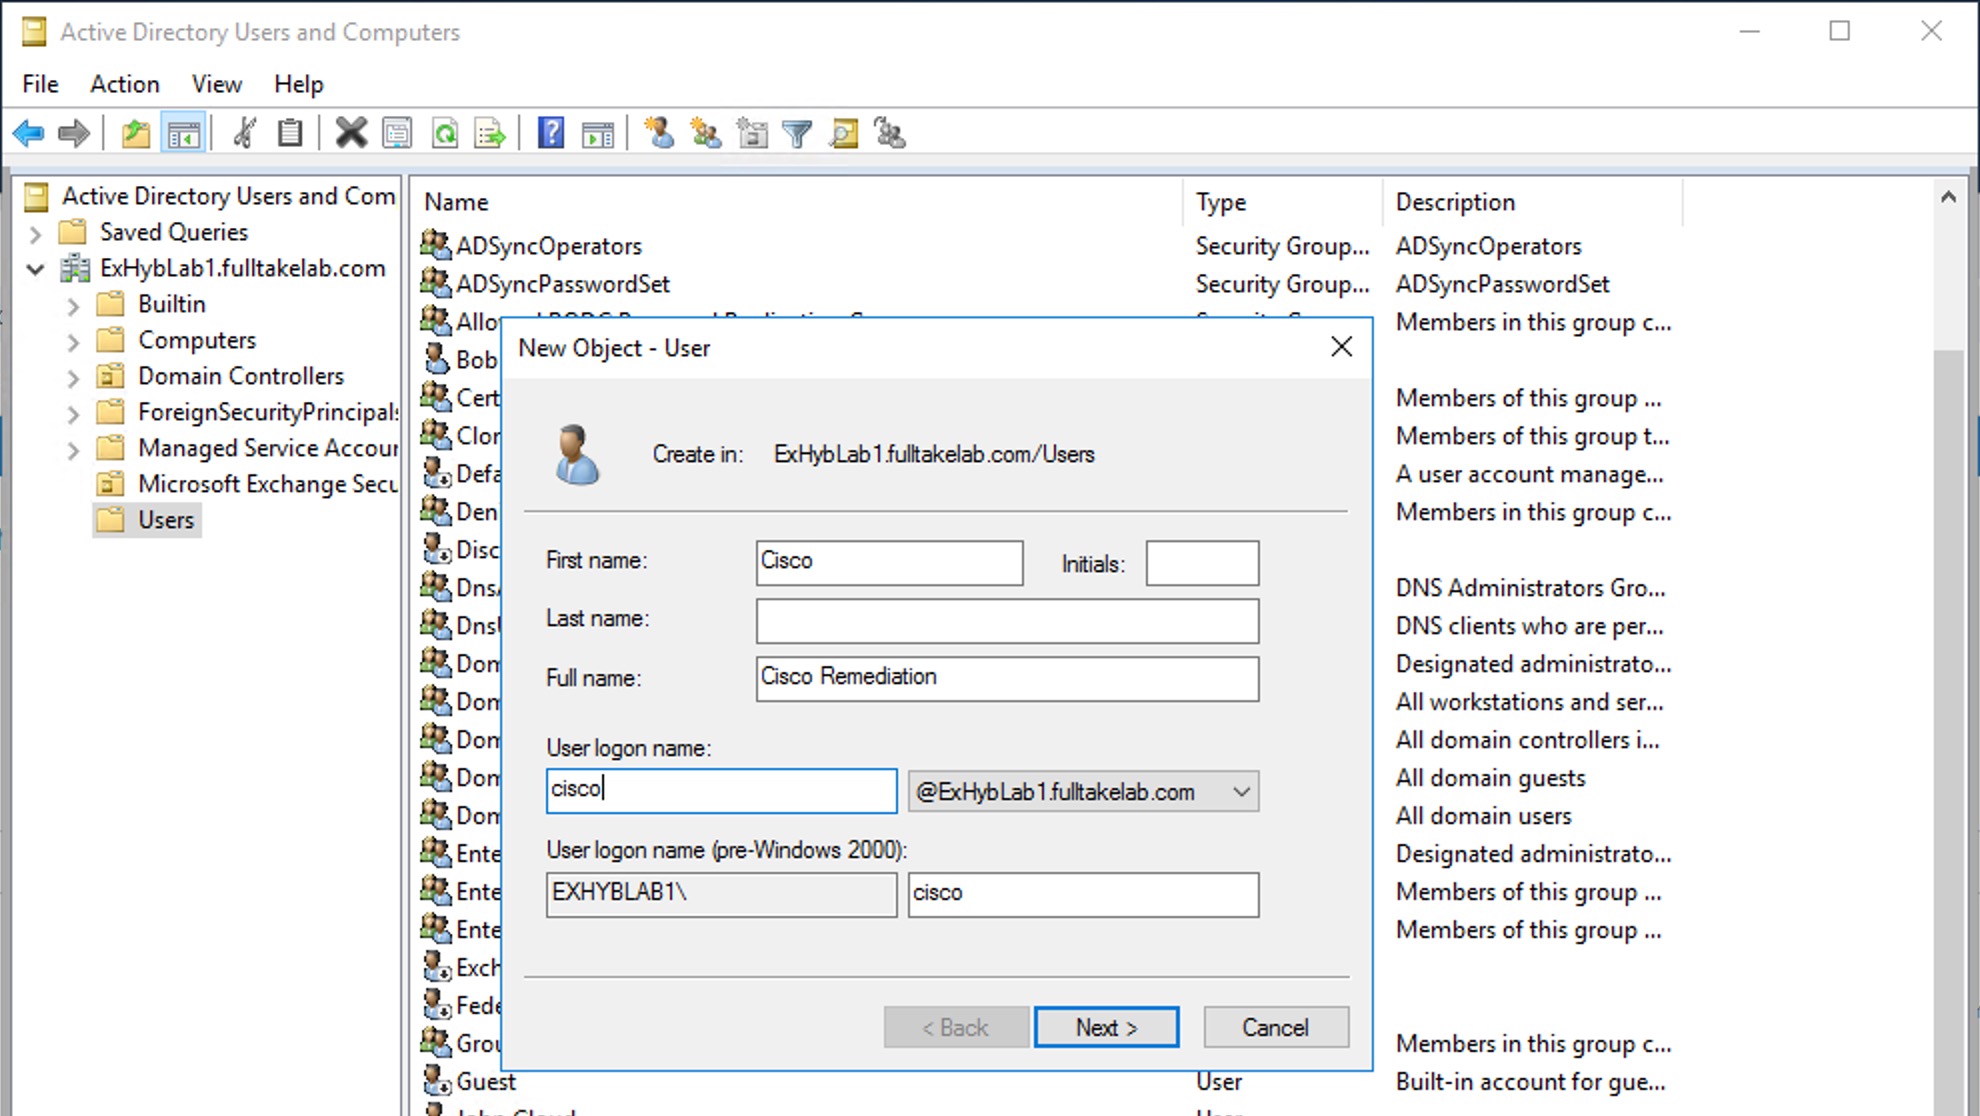
Adhere to any security policies your company has; the user should have a password known to you for configuration in the next section on the Cisco Secure Email Gateway or Cloud Gateway. Recommended, once you assign the password, uncheck the box for "User must change password at next logon" and check the box for "Password never expires".
- Next, right-click on the user you have just created and select Add to a group...
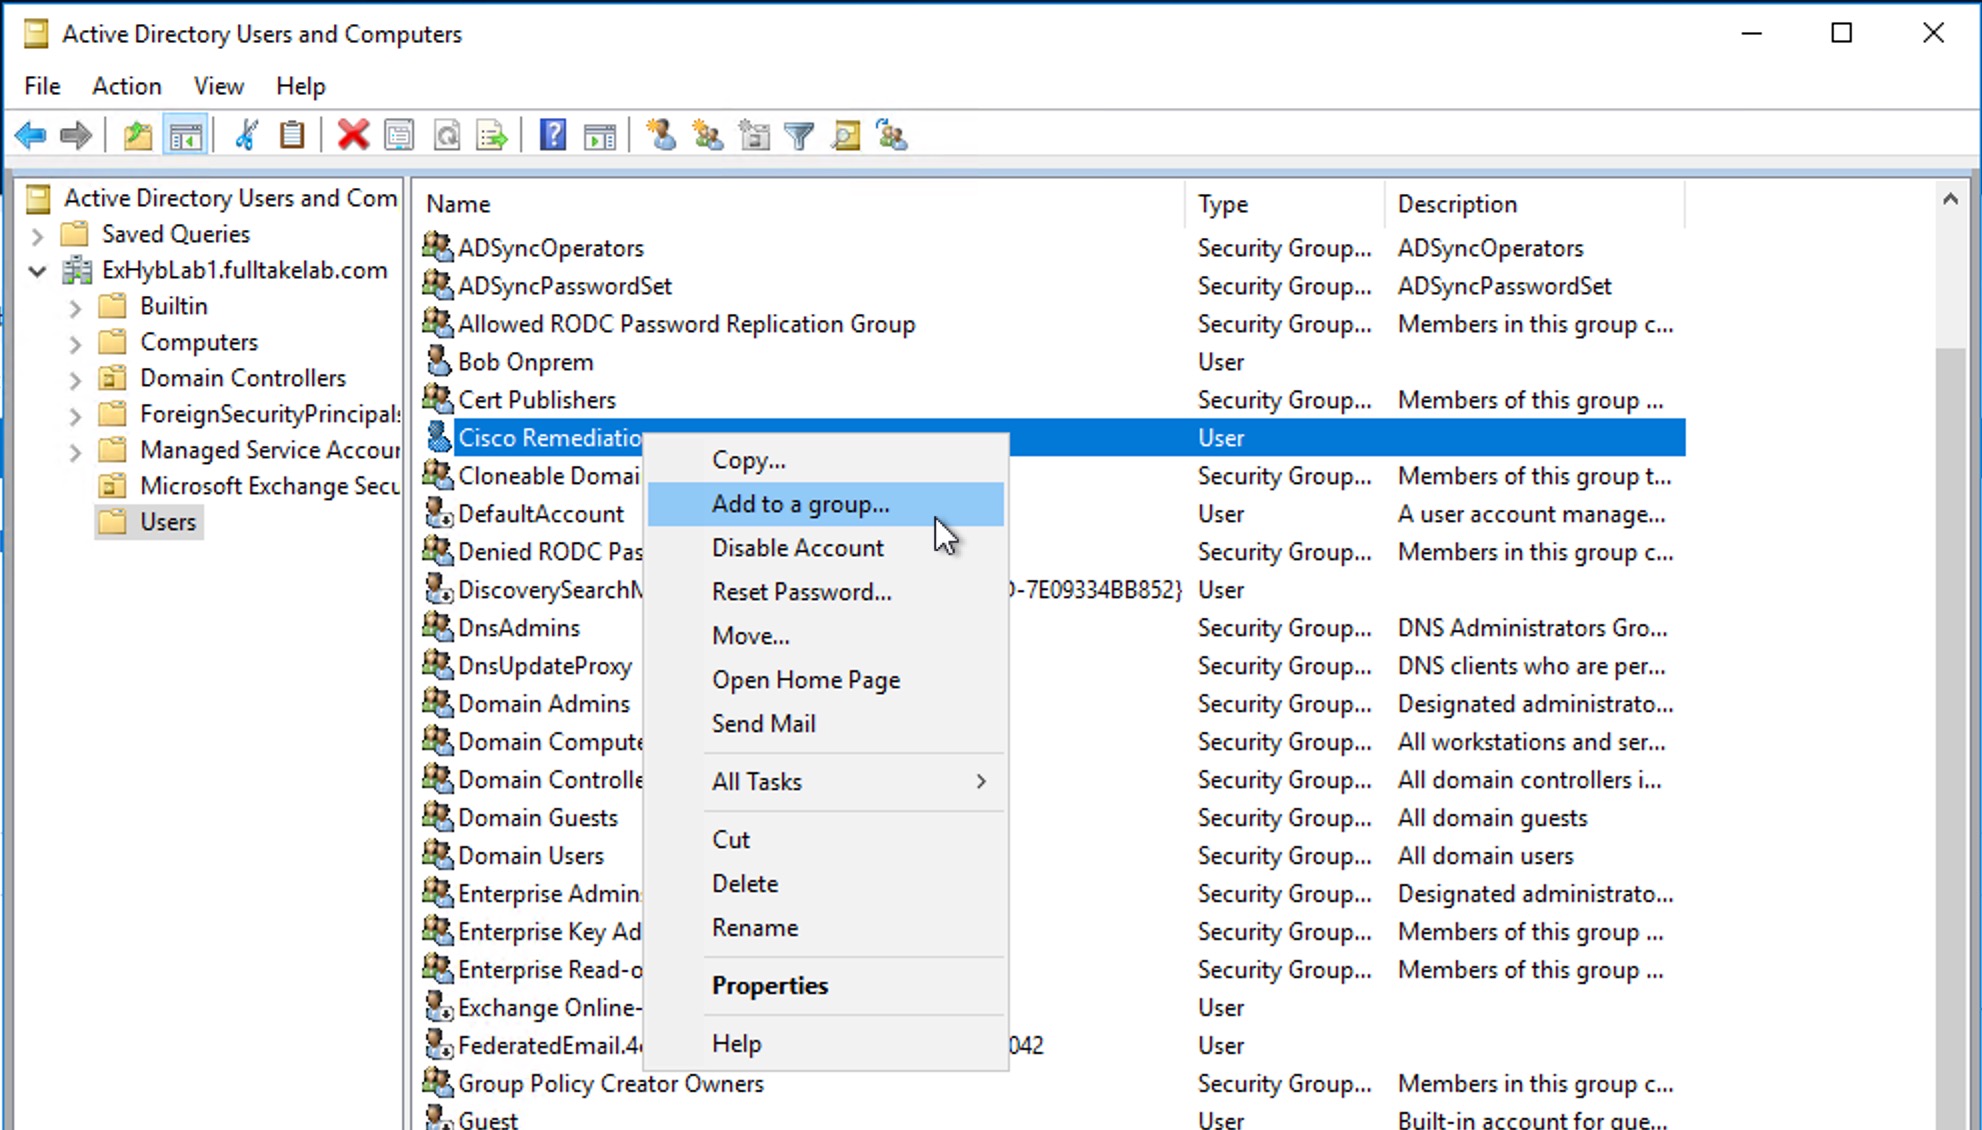
- In the Enter the object names to select box, enter the impersonator group name you created earlier and then click Check Names; this will underline when it is validated
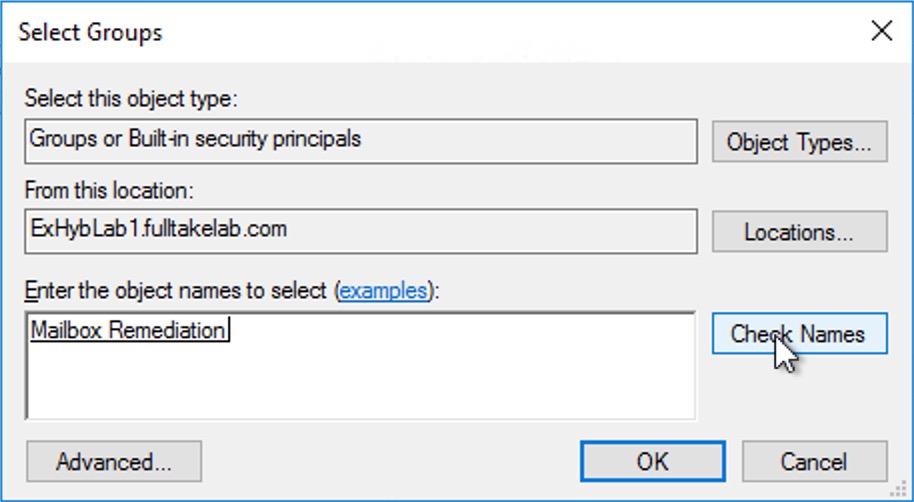
- Click OK
You are done with creating the user account that will be used for calling the remediation Exchange on-premise server.
Create the Account Settings and Account Details on Cisco Secure Email Gateway or Cloud Gateway
At this time you should know 1) the Username of the account you created and 2) the password set for that account.
- Log in to the GUI for your Cisco Secure Email Gateway or Cloud Gateway
- Navigate to System Administration > Account Settings
- If this is your first time setting this up, please click Enable and then click the checkbox for Enable Account Settings
- Click Submit
- Next, click Create Account Profile
- Provide a Profile Name and Description (optional)
- For the Profile Type select Exchange On Premise
- Enter in the Username and Password you created earlier
- Enter in the full hostname of your Exchange on-premise domain
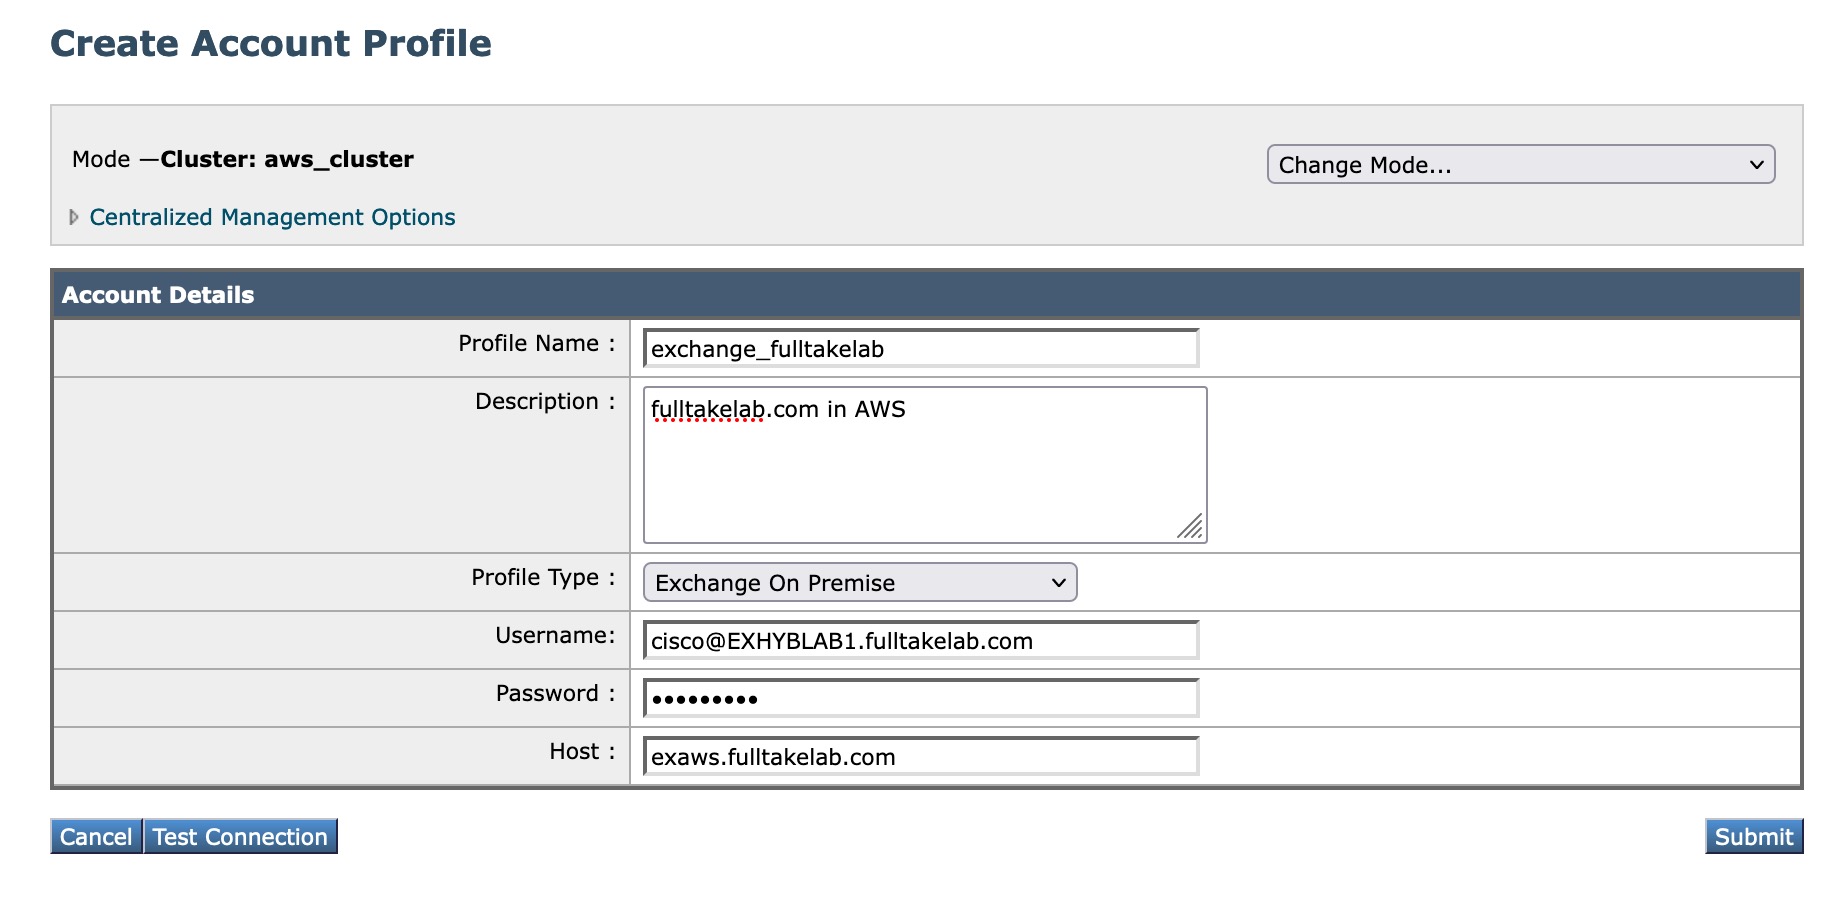
- Click Submit
- Click Commit Changes in the upper-right-hand corner and complete the configuration save
At this time the account profile should be set. We will test the account connection to validate:
- Click the Account Profile Name link you just created
- Click Test Connection
- In the Connection Check pop-up, enter a valid email address of the domain
- Click Test Connection
You should see similar output:
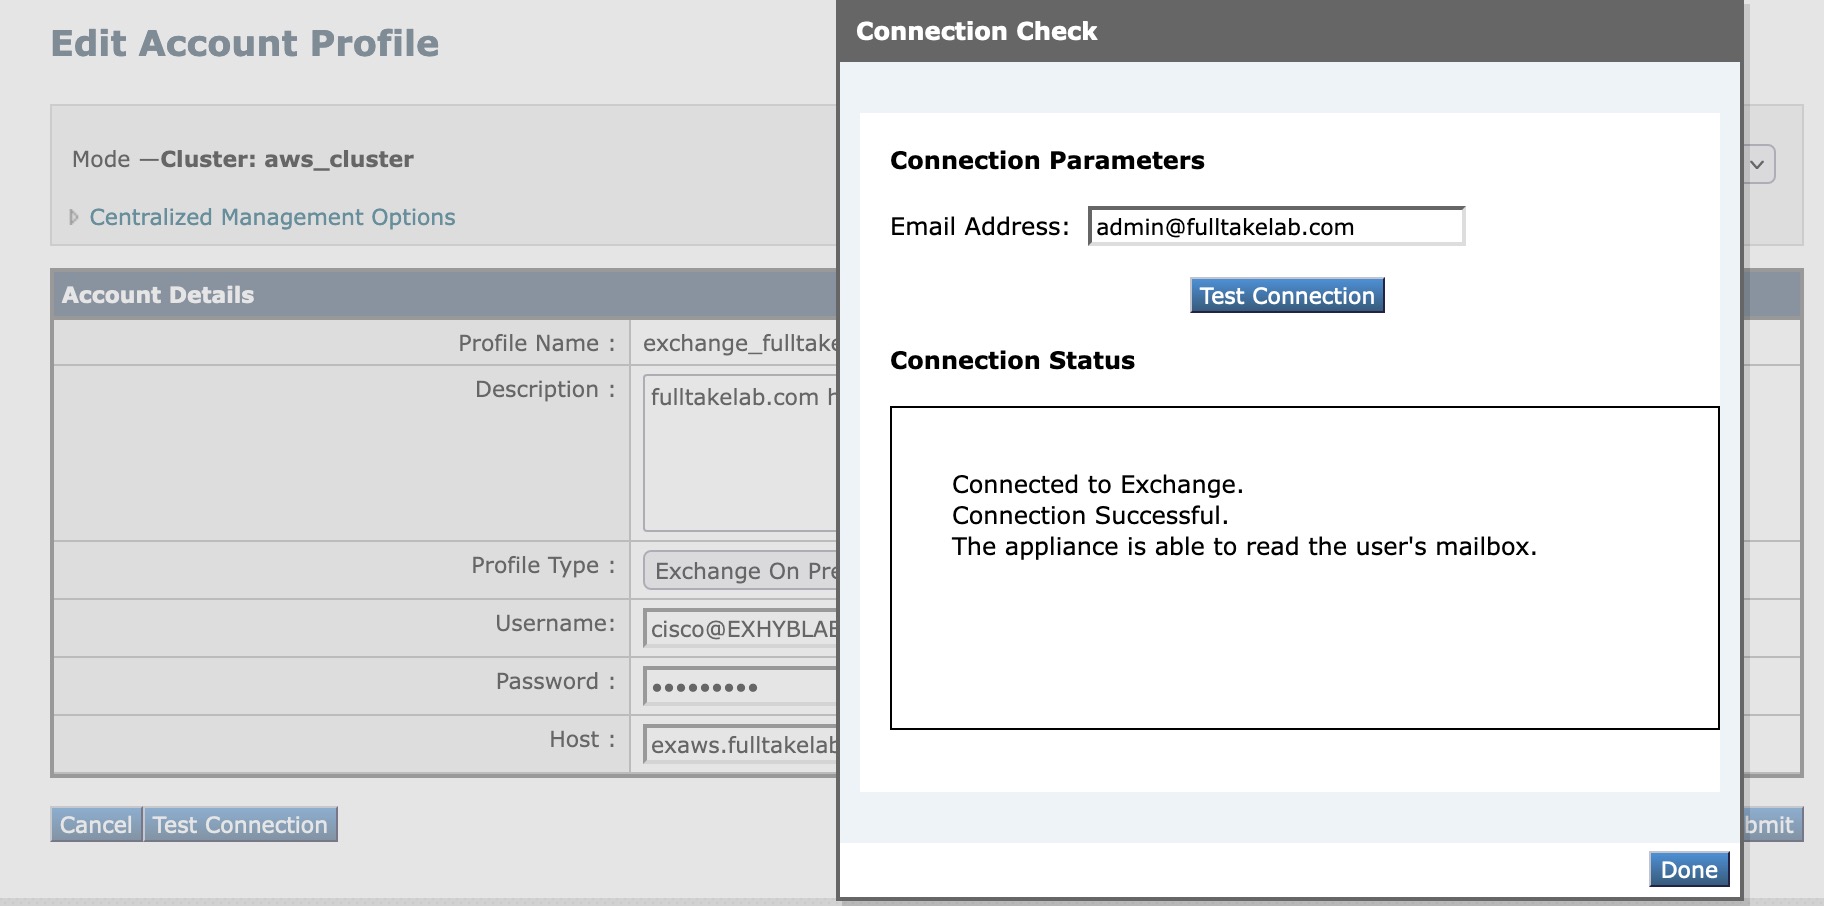
You have completed the configuration of the account access that will allow remediation on the Cisco Secure Email Gateway or Cloud Gateway.
Create Domain Mapping for Your Profile
- Click Create Domain Mapping
- Enter your Domain Name(s) as needed
- Click the Mapped Profile associated with the domain name
- Click Submit
- Click Commit Changes in the upper-right-hand corner and complete the configuration save
At this time, your Cisco Secure Email Gateway or Cloud Gateway is ready to remediate messages for your domain!
Testing and Validation
Before starting testing and validation, please send a test message through your Gateway and validate the receipt in your email inbox.
If you have CLI access to your Gateway, please log in and run tail remediation to start a live view of the Remediation Log.
- Log in to the Next-Generation User Interface (NGUI) of your Cisco Secure Email Gateway or Cloud Gateway --- or, if you have a Cisco Secure Email and Web Manager that is configured for Centralized Message Tracking, log in to the NGUI there
- Click on Tracking
- Perform a general search for messages processed Today and search for the Envelope Recipient and Subject of the test message you sent earlier.
- Once you have located the message in the Message Details listing, click the check box for that message
- Click Remediate at the top right hand of the Message Tracking area of the screen
- In the Confirm Remediation Action pop-up, enter in a Remediation Batch Name and Description
- Select the action you wish to have performed against the message: Delete Email(s), Forward Email To:, or Delete Email and Forward Email to:
- Click Apply
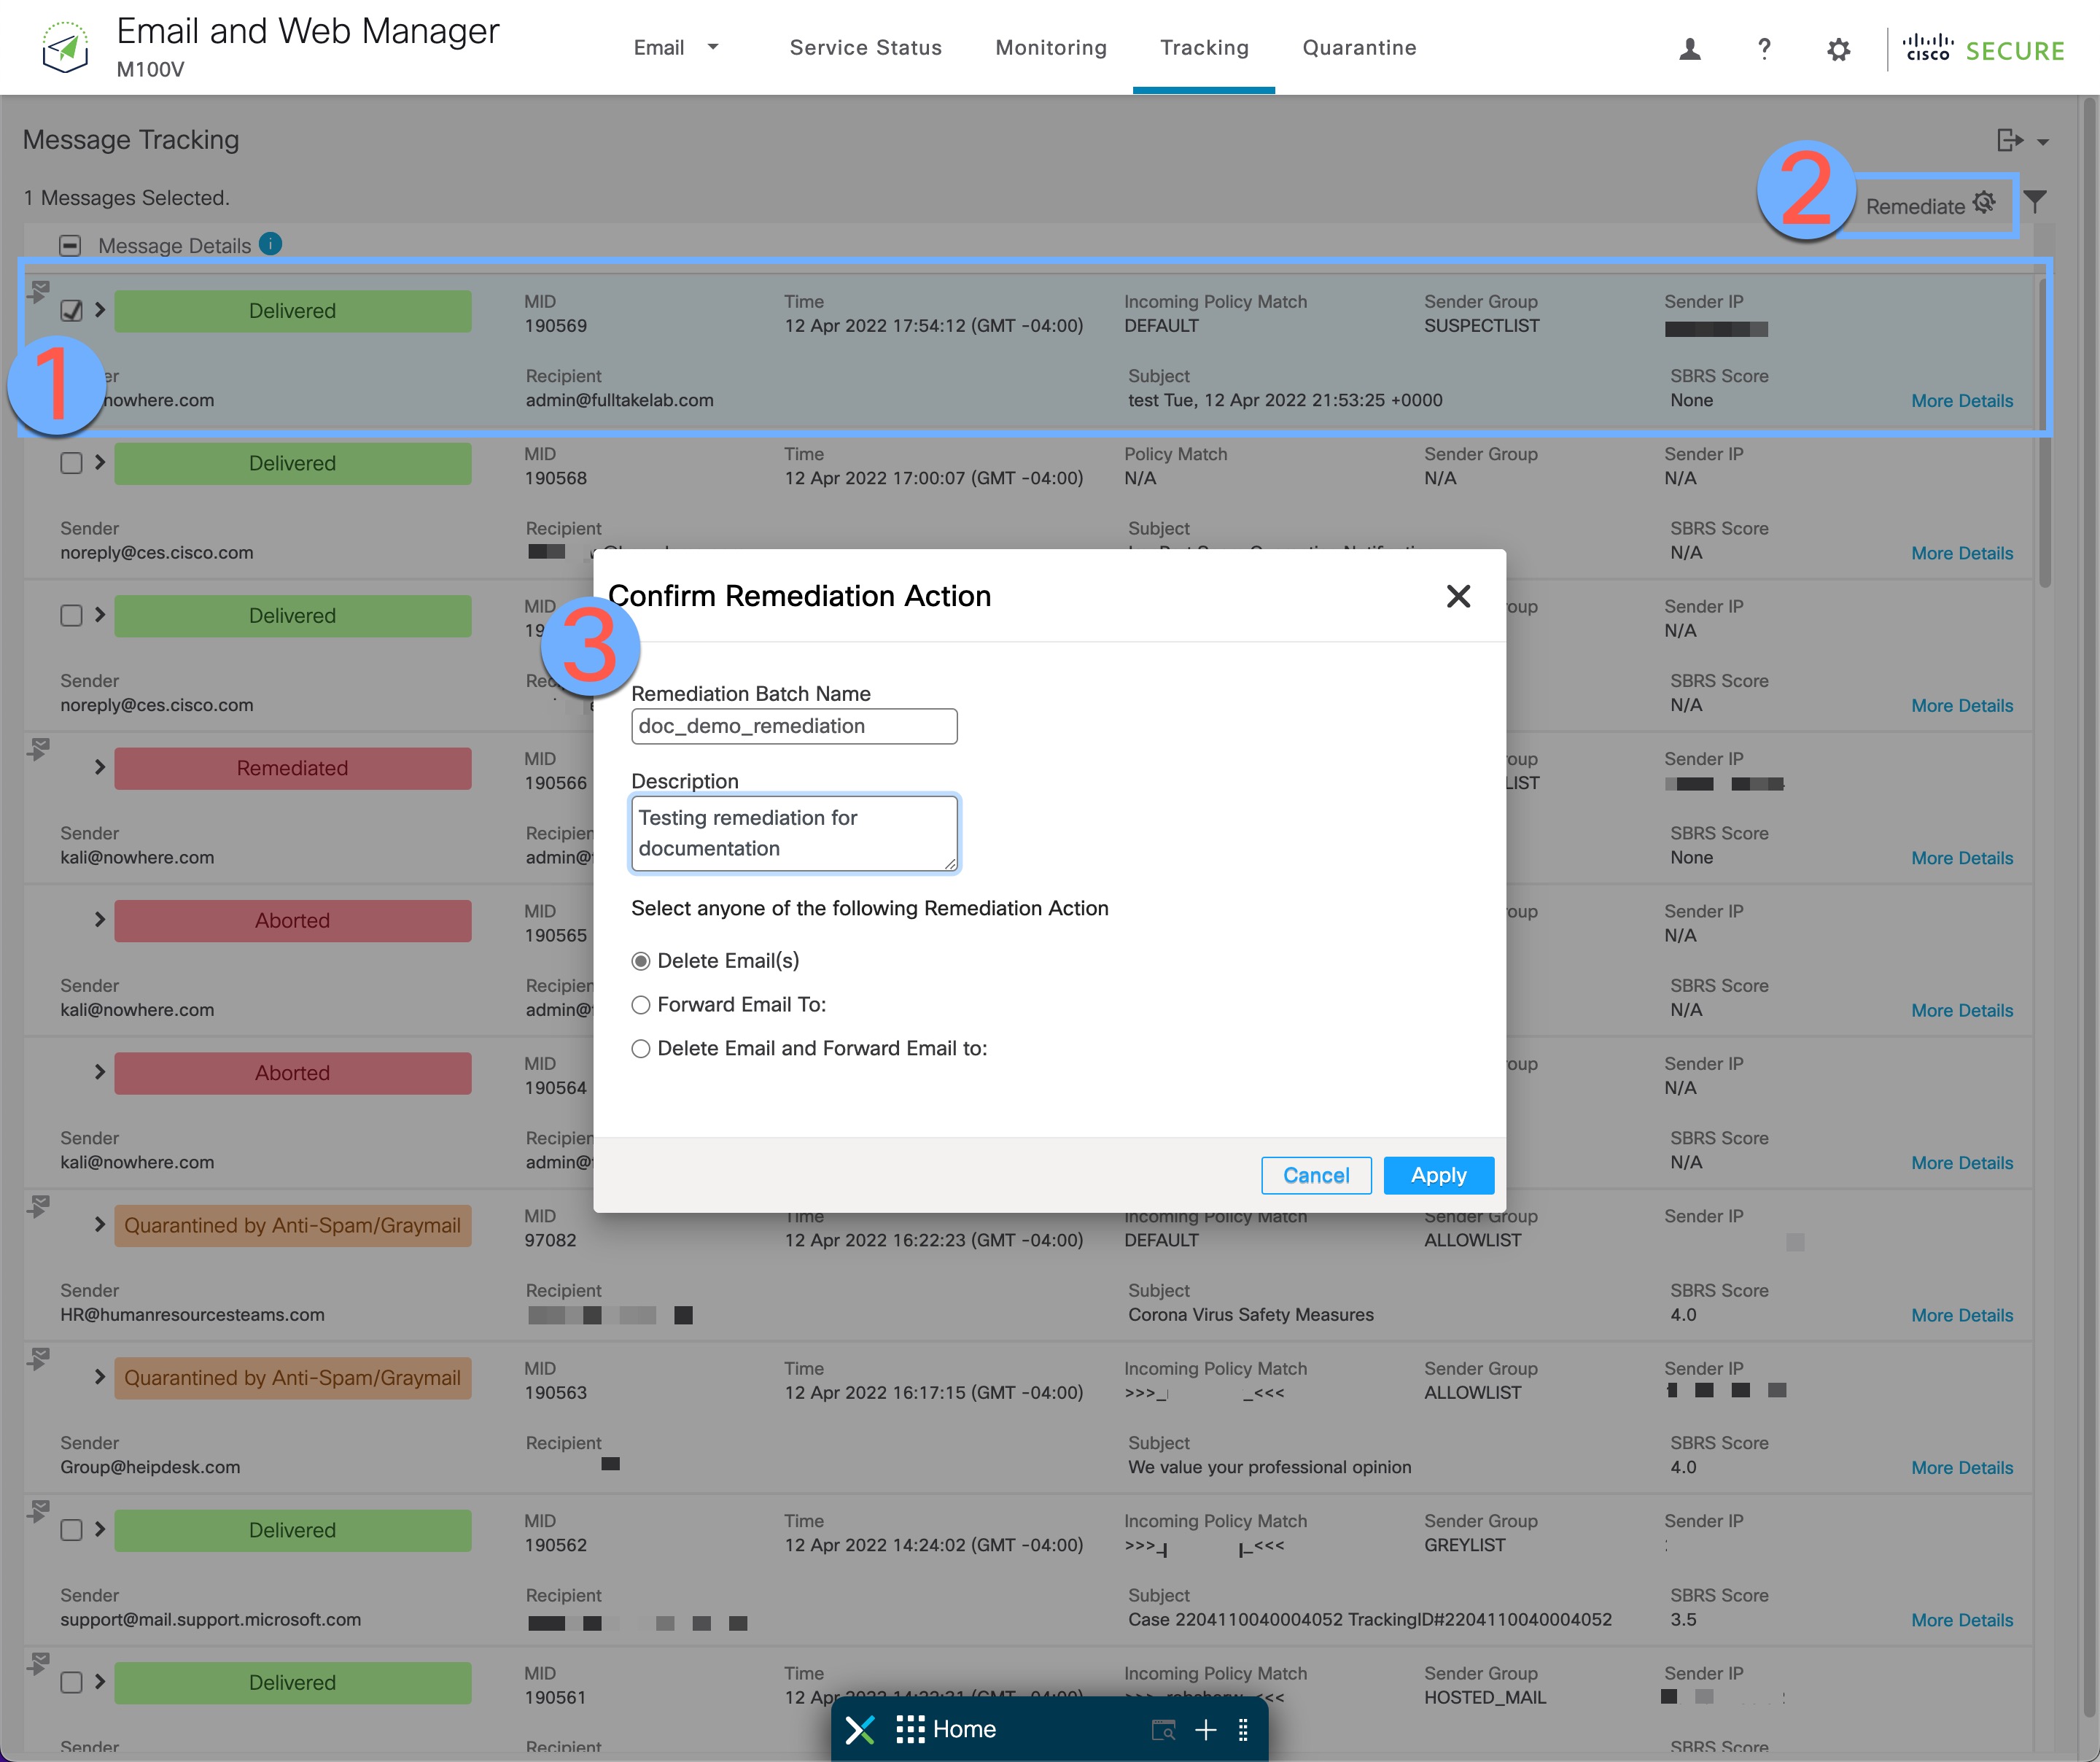
If you have logged in to the CLI, view that window to see the live call through the Gateway of the message remediation action.
Within a few moments, you should see similar to the following in the Remediation Log:
Tue Apr 12 17:59:05 2022 Info: MID: 190569 Attempting to remediate using `exchange` profile for recipient [email protected]. Attempt number : 1
Tue Apr 12 17:59:05 2022 Info: MID: 190569 Trying to perform the delete action on On Premises exchange for recipient's ([email protected]) mailbox for batch 'doc_demo_remediation'.
Tue Apr 12 17:59:07 2022 Info: MID: 190569 Message deleted successfully from [email protected] mailbox.
Tue Apr 12 17:59:07 2022 Info: MID: 190569 Remediation succeeded with `exchange` profile for recipient [email protected].
If you refresh the Message Tracking results in the NGUI, you will see the message has changed from Delivered to Remediated:

Updated 3 days ago
