Configuring Azure AD DS
Cisco Secure Email Cloud Gateway
Note
Cisco Secure Email Cloud Gateway supports the following:
- LDAPS: Using secure LDAP services over the internet on CES devices
- CES VPN: Creating a direct S2S VPN to the Cisco CES infrastructure
Note
Please note that Azure Active Directory Domain Service (AD DS) can be utilized for LDAP lookups. Azure AD alone cannot. When maintaining sessions, Azure AD will close sessions without warning. Please be sure that you are using Azure AD DS.
About
Cisco Email Security administrators can enable LDAP lookups against their Microsoft Office 365-managed domains by utilizing Azure. If you store user information within LDAP directories in your network infrastructure — for the purposes of this document, in Microsoft Azure Active Directory Domain Service — you can configure the appliance to query your LDAP servers to accept, route, and authenticate messages. You can configure the appliance to work with one or multiple LDAP servers.
We will be utilizing two LDAP queries in this document:
- Acceptance Queries. You can use your existing LDAP infrastructure to define how the recipient email address of incoming messages (on a public listener) should be handled.
- Group Queries. You can configure the appliance to perform actions on messages based on the groups in the LDAP directory. You do this by associating a group query with a message filter. You can perform any message action available for message filters on messages that match the defined LDAP group.
For additional LDAP queries and advanced LDAP setup, please refer to the User Guide for the version of AsyncOS that your Email Security Appliance (ESA) is currently running.
This document will walk you through the following:
- Configure Azure AD DS
- Configure Azure AD DS to use Secure LDAP
- Lockdown Secure LDAP access over the internet
- Verify your Azure AD DS (LDAP)
- Configure LDAP Server Profile(s) for Cisco Email Security
- Configure Listener to use LDAP Queries for Cisco Email Security
- Verify LDAP usage on Cisco Email Security
Prerequisites
Please review the following from Microsoft regarding Azure Active Directory Domain Services (AD DS):
- Azure Active Directory Domain Services
- Tutorial: Create and configure an Azure Active Directory Domain Services instance
- Tutorial: Configure secure LDAP for an Azure Active Directory Domain Services managed domain
💵 Microsoft does charge for Azure AD DS. Please be sure that you read the pricing structure associated with your Azure services.
✏️ This article is a proof-of-concept and provided as an example basis. While these steps have been successfully tested, this article is intended primarily for demonstration and illustration purposes. Cisco TAC and Cisco Support are not entitled to troubleshoot customer-side issues with Microsoft Exchange, Microsoft Azure AD, or Office 365.
Configure Azure AD DS
In order to get started with Cisco Email Security communicating to Azure for LDAP resources, you will need to have AD DS enabled in Azure.
Log in to your Azure portal: https://portal.azure.com
- On the Azure portal menu or from the Home page, select Create a resource.
- Enter Domain Services into the search bar, then choose Azure AD Domain Services from the search suggestions.

If you have already configured Azure AD DS, you will see a similar message when trying to create your resource.
- On the Azure AD Domain Services page, select Create. The Enable Azure AD Domain Services wizard is launched.
- Select the Azure Subscription in which you would like to create the managed domain.
- Select the Resource group to which the managed domain should belong. Choose to Create a new or select an existing resource group.
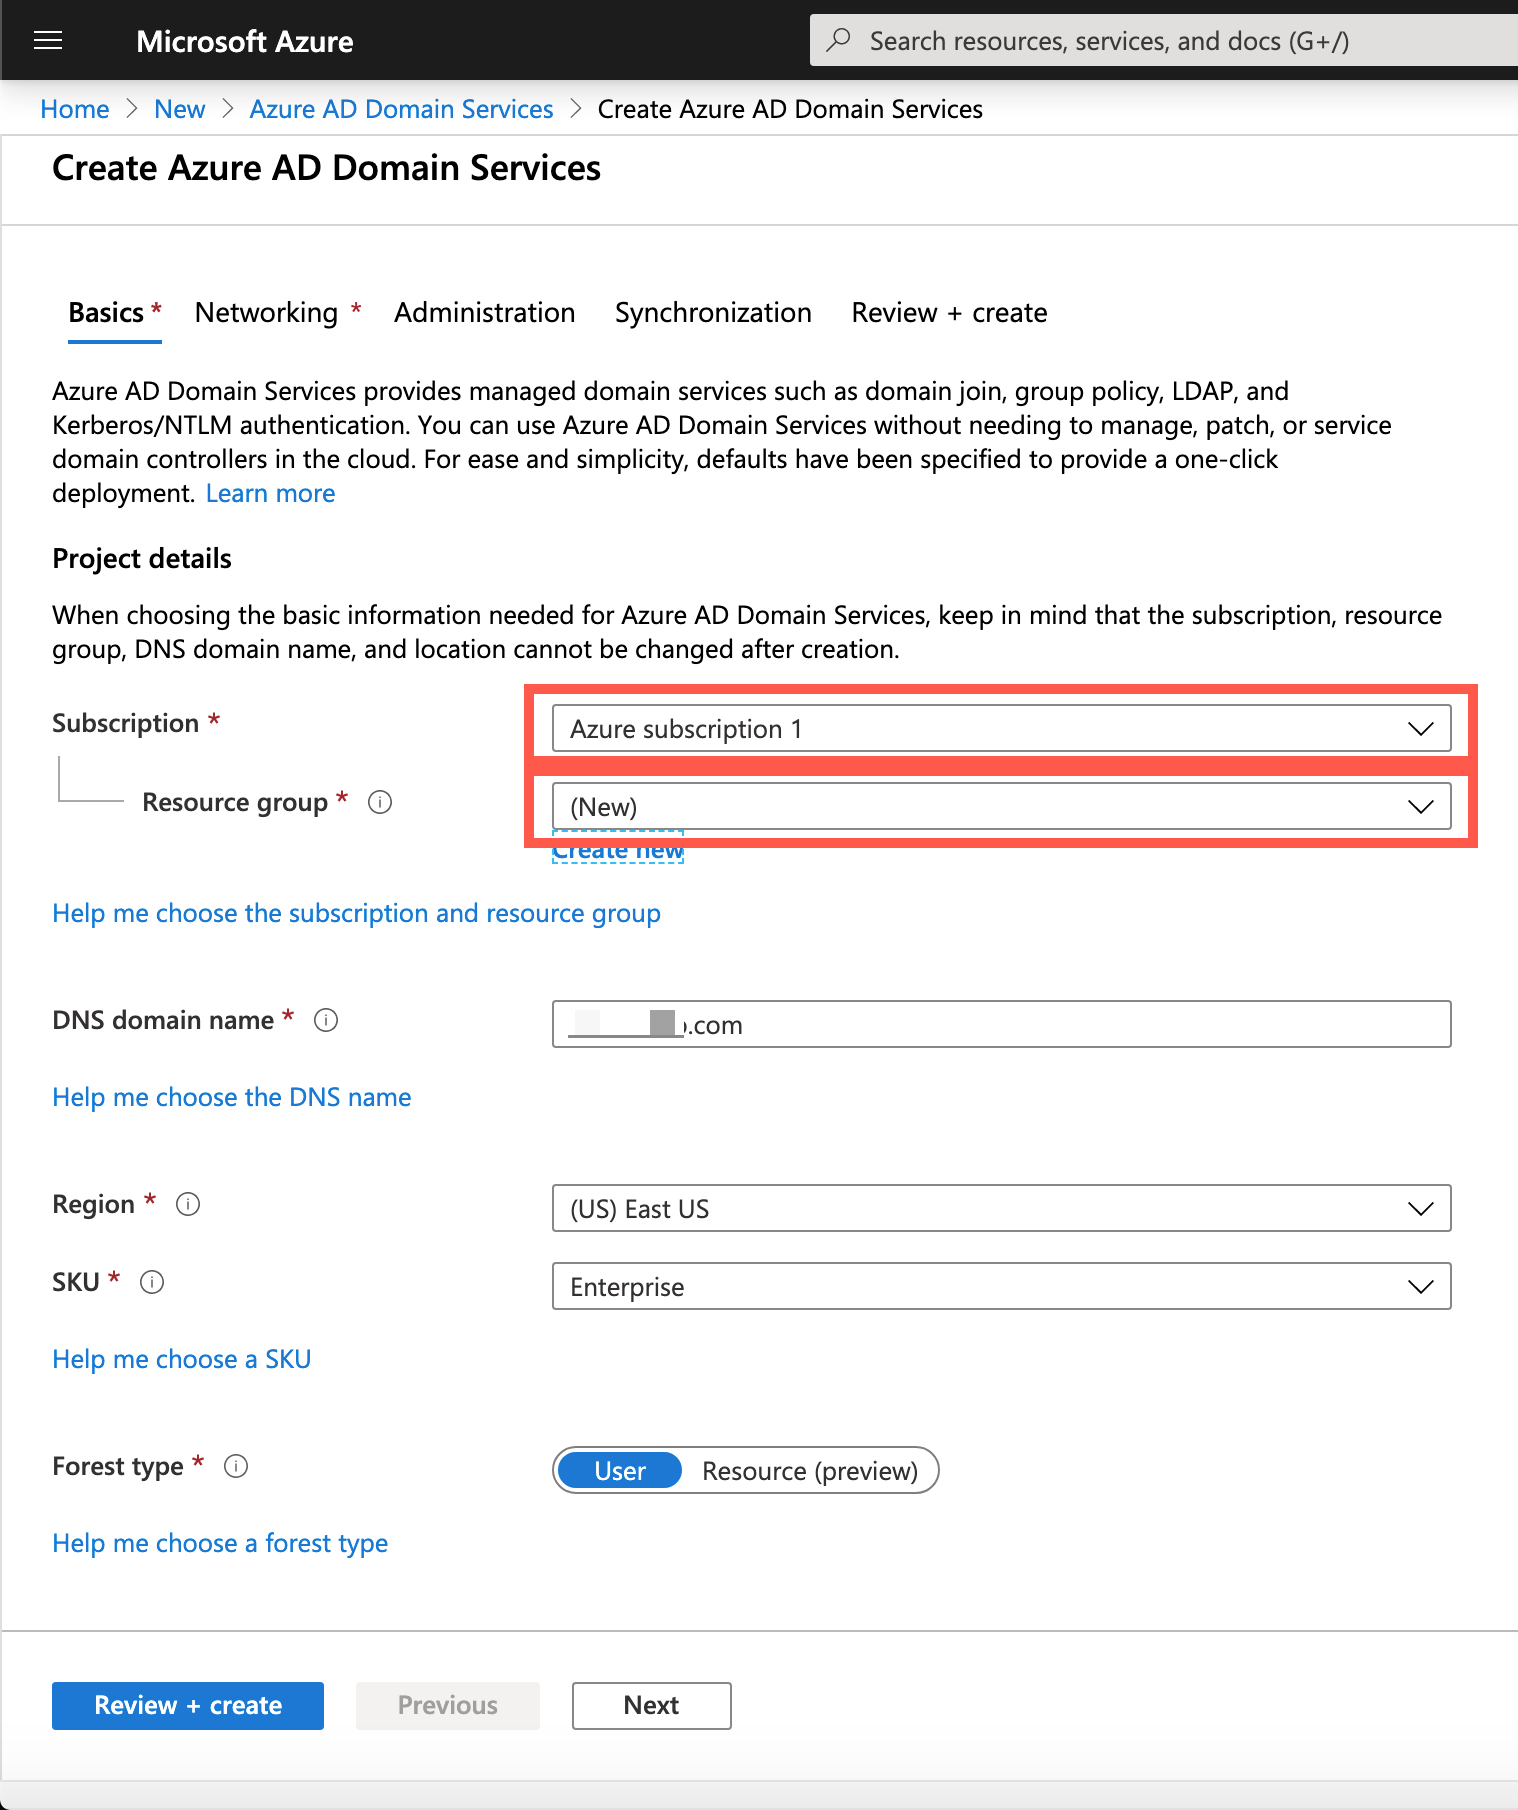
Azure portal > Basics window for Azure AD DS
Complete the fields in the Basics window of the Azure portal to create an Azure AD DS instance:
- Enter a DNS domain name for your managed domain. Please review the considerations from Microsoft's Tutorial for DNS domain names.
- Choose the Azure Location in which the managed domain should be created. If you choose a region that supports Availability Zones, the Azure AD DS resources are distributed across zones for additional redundancy.
- The SKU determines the performance, backup frequency, and the maximum number of forest trusts you can create. You can change the SKU after the managed domain has been created if your business demands or requirements change.
✏️ A forest is a logical construct used by Active Directory Domain Services to group one or more domains. By default, an Azure AD DS managed domain is created as a User forest. This type of forest synchronizes all objects from Azure AD, including any user accounts created in an on-premises AD DS environment. A Resource forest only synchronizes users and groups created directly in Azure AD.
To quickly create an Azure AD DS managed domain, you can select Review + create to accept additional default configuration options. The following defaults are configured when you choose this create option:
- Creates a virtual network named aadds-vnet that uses the IP address range of 10.0.2.0/24.
- Creates a subnet named aadds-subnet using the IP address range of 10.0.2.0/24.
- Synchronizes All users from Azure AD into the Azure AD DS managed domain.
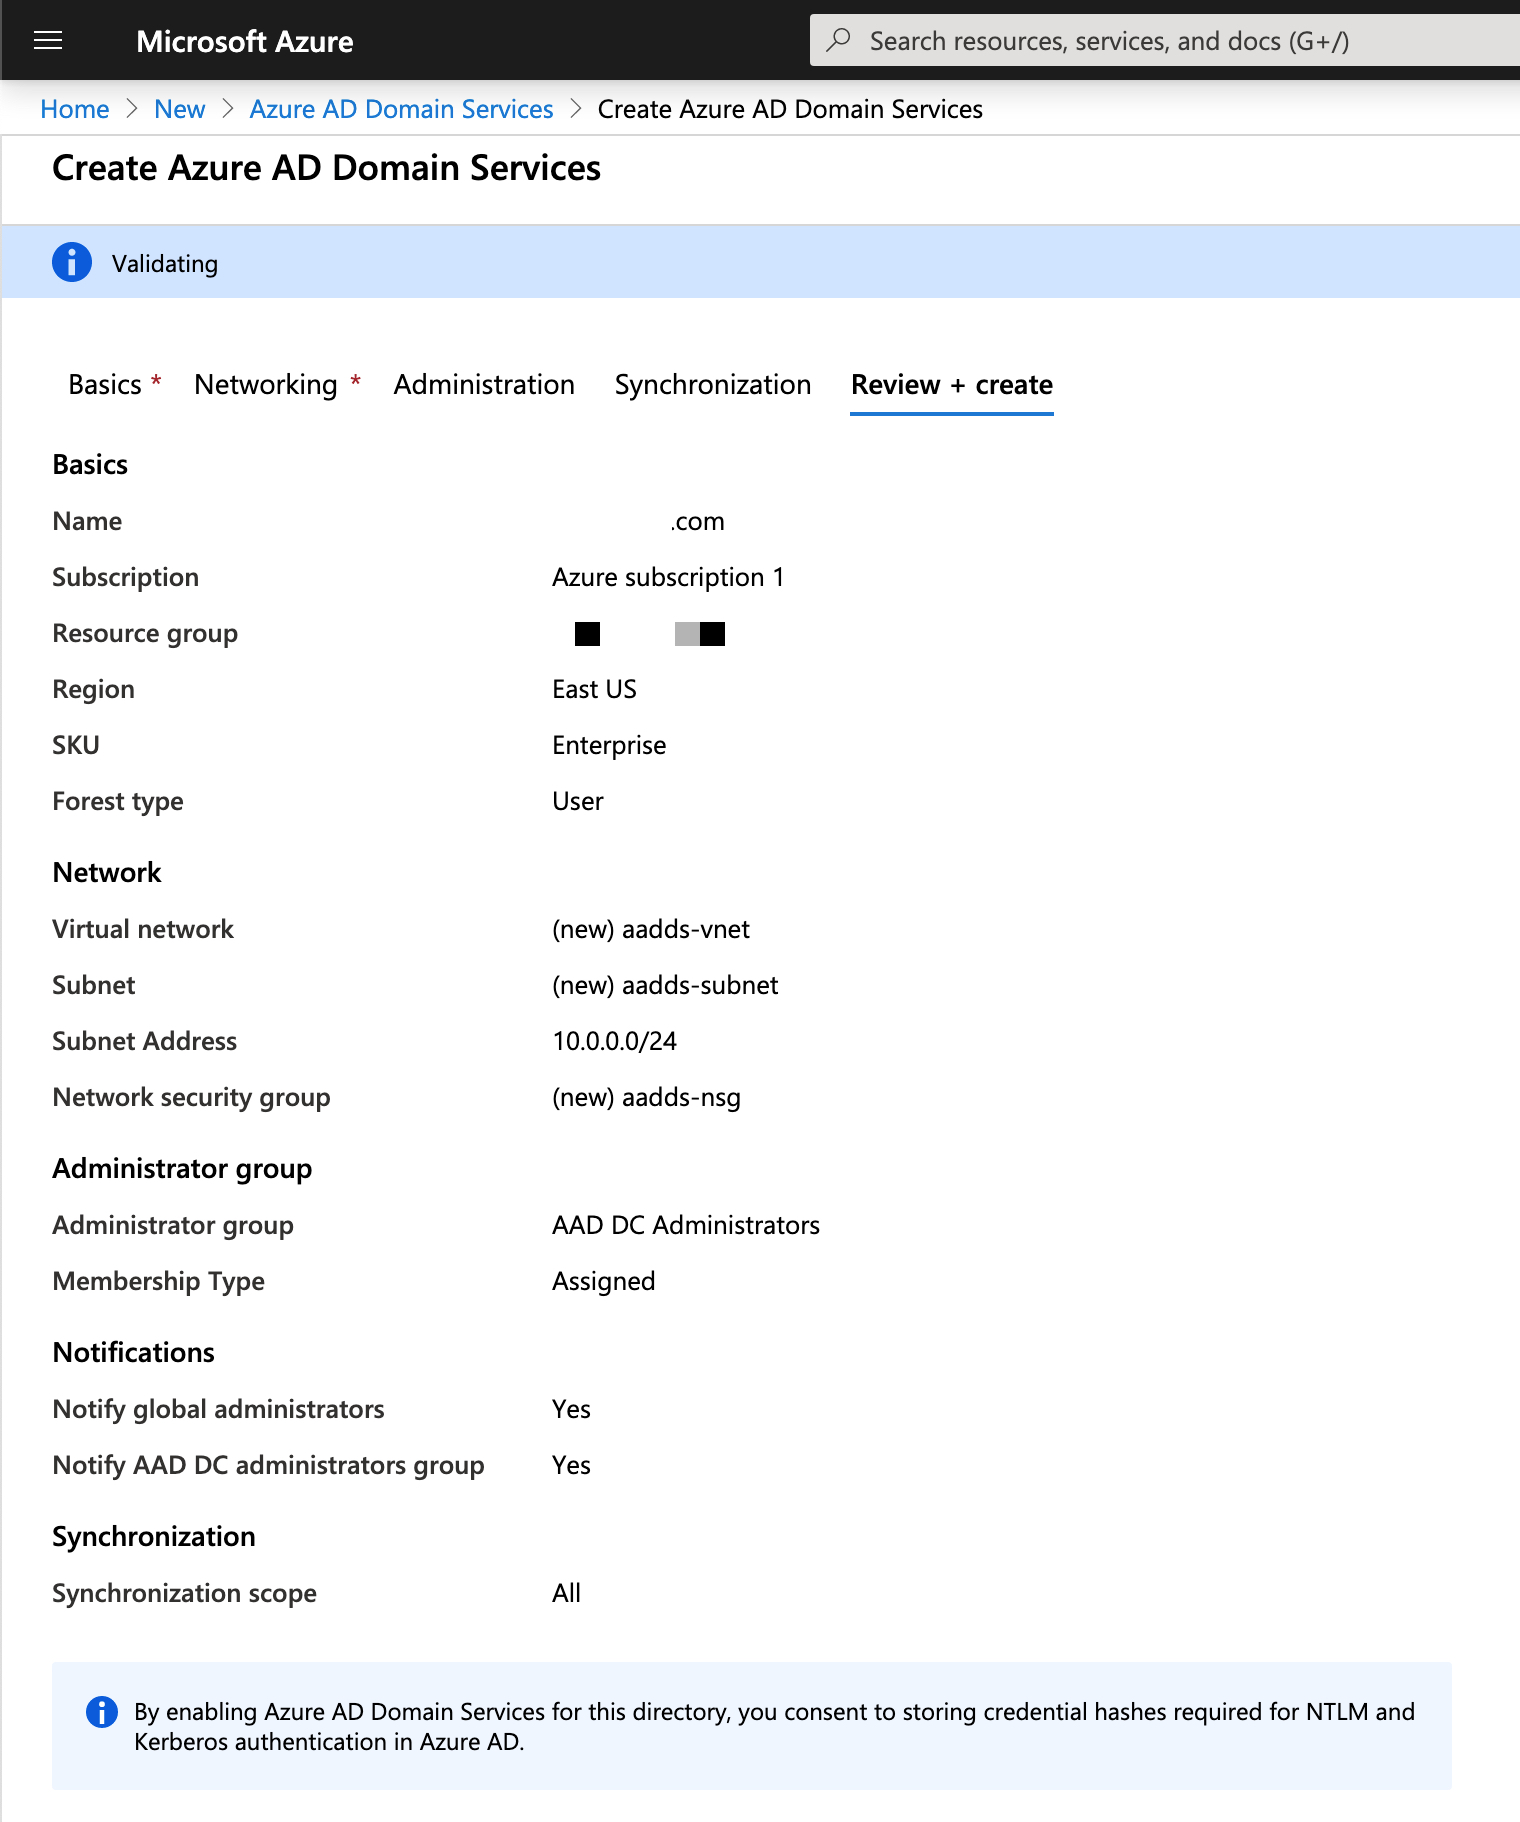
Azure portal > Review + create window for Azure AD DS
Select Review + create to accept these default configuration options.
Per Microsoft, you will also need to complete the Enable user accounts for Azure AD DS steps in order to successfully log in and authenticate against your Azure AD DS instance.
At this time we have completed the following:
- Configure Azure AD DS
- Configure Azure AD DS to use Secure LDAP
- Lockdown Secure LDAP access over the internet
- Verify your Azure AD DS (LDAP)
- Configure LDAP Server Profile(s) for Cisco Email Security
- Configure Listener to use LDAP Queries for Cisco Email Security
- Verify LDAP usage on Cisco Email Security
Configure Azure AD DS to use Secure LDAP
Note
You will need to have a certificate (PFX) created for this step. You can use a self-signed certificate for LDAPS or if you already have a domain-level certificate you may export PEM to PFX. For creating a self-signed certificate, please review Microsoft's Tutorial: Create a certificate for secure LDAP.
❗ Self-signed certificates will require one additional step during ESA configuration. (See Configure LDAP Server Profile(s) for Cisco Email Security.)
Now that you have created your Azure AD DS resource, you will need to configure Secure LDAP in order for Cisco Email Security to communicate to your LDAP.
Log in to your Azure portal: https://portal.azure.com/
- On the Azure portal menu or from the Home page, search for and select Azure AD Domain Services
- Choose your managed domain.
- On the left-hand side of the Azure AD DS window, choose Secure LDAP.
- By default, secure LDAP access to your managed domain is disabled. Toggle Secure LDAP to Enable.
✏️ Secure LDAP access to your managed domain over the internet is disabled by default. When you enable public secure LDAP access, your domain is susceptible to password brute force attacks over the internet. In the next section, a network security group is configured to lock down access to only the required source IP address ranges.
- Toggle Allow secure LDAP access over the internet to Enable.
- Select the folder icon next to the PFX file with a secure LDAP certificate.
- Enter the password to decrypt the PFX file set in a previous step when the certificate was exported to a PFX file.
- Select Save to enable Secure LDAP.
At this time we have completed the following:
- Configure Azure AD DS
- Configure Azure AD DS to use Secure LDAP
- Lockdown Secure LDAP access over the internet
- Verify your Azure AD DS (LDAP)
- Configure LDAP Server Profile(s) for Cisco Email Security
- Configure Listener to use LDAP Queries for Cisco Email Security
- Verify LDAP usage on Cisco Email Security
Lockdown Secure LDAP access over the internet
When you enable secure LDAP access over the internet to your Azure AD DS managed domain, it creates a security threat. The managed domain is reachable from the internet on TCP port 636. It's recommended to restrict access to the managed domain to specific known IP addresses for your environment. An Azure network security group rule can be used to limit access to secure LDAP.
Let's create a rule to allow inbound secure LDAP access over TCP port 636 from a specified set of IP addresses. A default DenyAll rule with a lower priority applies to all other inbound traffic from the internet, so only the specified addresses can reach your Azure AD DS managed domain using secure LDAP.
In the Azure portal,
- Select Resource groups on the left-hand side navigation.
- Choose a resource group, this should be the AD DS name you configured in the steps above.
- Select your network security group, such as "aaads-nsg".
✏️ If you are unsure of the network security group, you can validate which network security group is active for your subnet by viewing Home > Azure AD Domain Services > select your AD DS name > Secure LDAP. You would see a note there indicating the network security group:

The list of existing inbound and outbound security rules are displayed. On the left-hand side of the network security group windows, choose Settings > Inbound security rules.
Select Add, then create a rule to allow TCP port 636. For improved security, choose the source as IP Addresses and then specify your own valid IP address or range for your ESA that will be making the LDAP query, and also a localhost IP address if you are using a third-party external LDAP tool (see Verify LDAP).
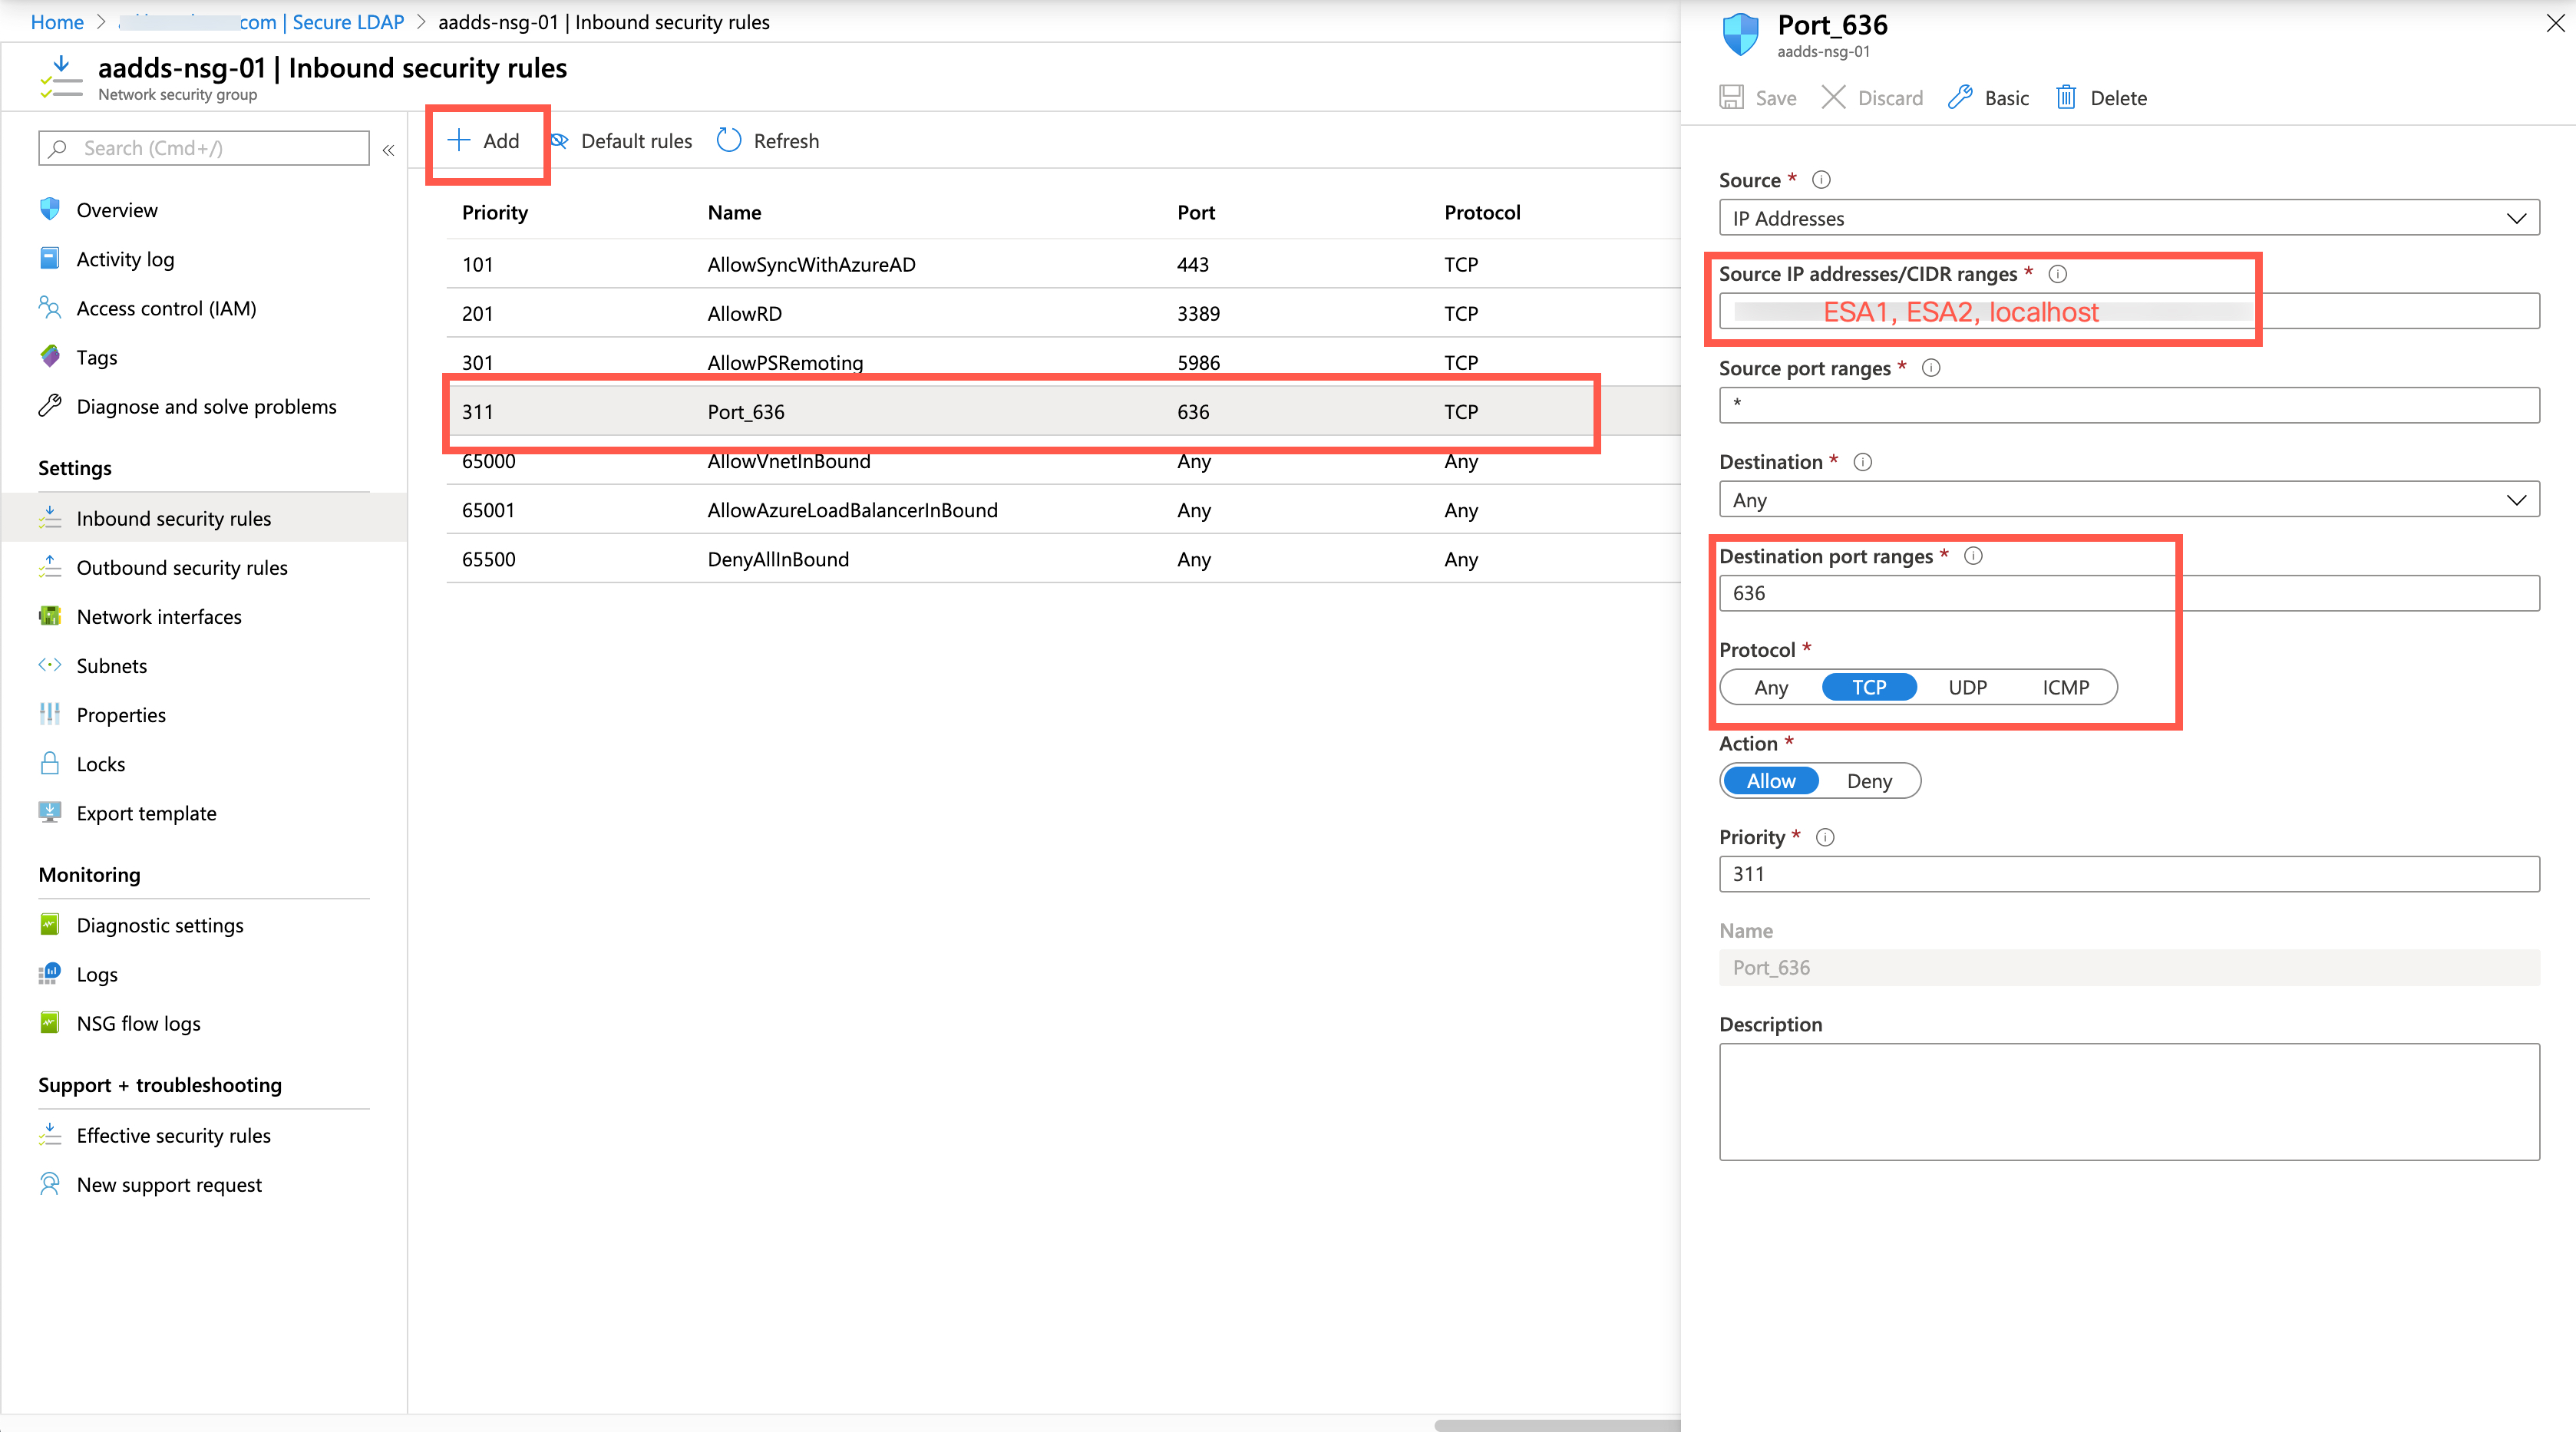
Finally, click Save at the top of the page to save your source IP address and protocol changes.
At this time we have completed the following:
- Configure Azure AD DS
- Configure Azure AD DS to use Secure LDAP
- Lockdown Secure LDAP access over the internet
- Verify your Azure AD DS (LDAP)
- Configure LDAP Server Profile(s) for Cisco Email Security
- Configure Listener to use LDAP Queries for Cisco Email Security
- Verify LDAP usage on Cisco Email Security
Verify your Azure AD DS (LDAP)
Now that you have Azure AD DS deployed and running, you can get the needed IP address and access to configure LDAP services on Cisco Email Security.
Log in to your Azure portal: https://portal.azure.com/
- On the Azure portal menu or from the Home page, search for and select Azure AD Domain Services
- Click on the name that you created for your Azure AD DS instance.
- Click on Properties.
- Scroll down until you see "Secure LDAP external IP address". This is the IP address that you will connect to for all LDAP queries from Cisco Email Security to your Azure AD DS instance.
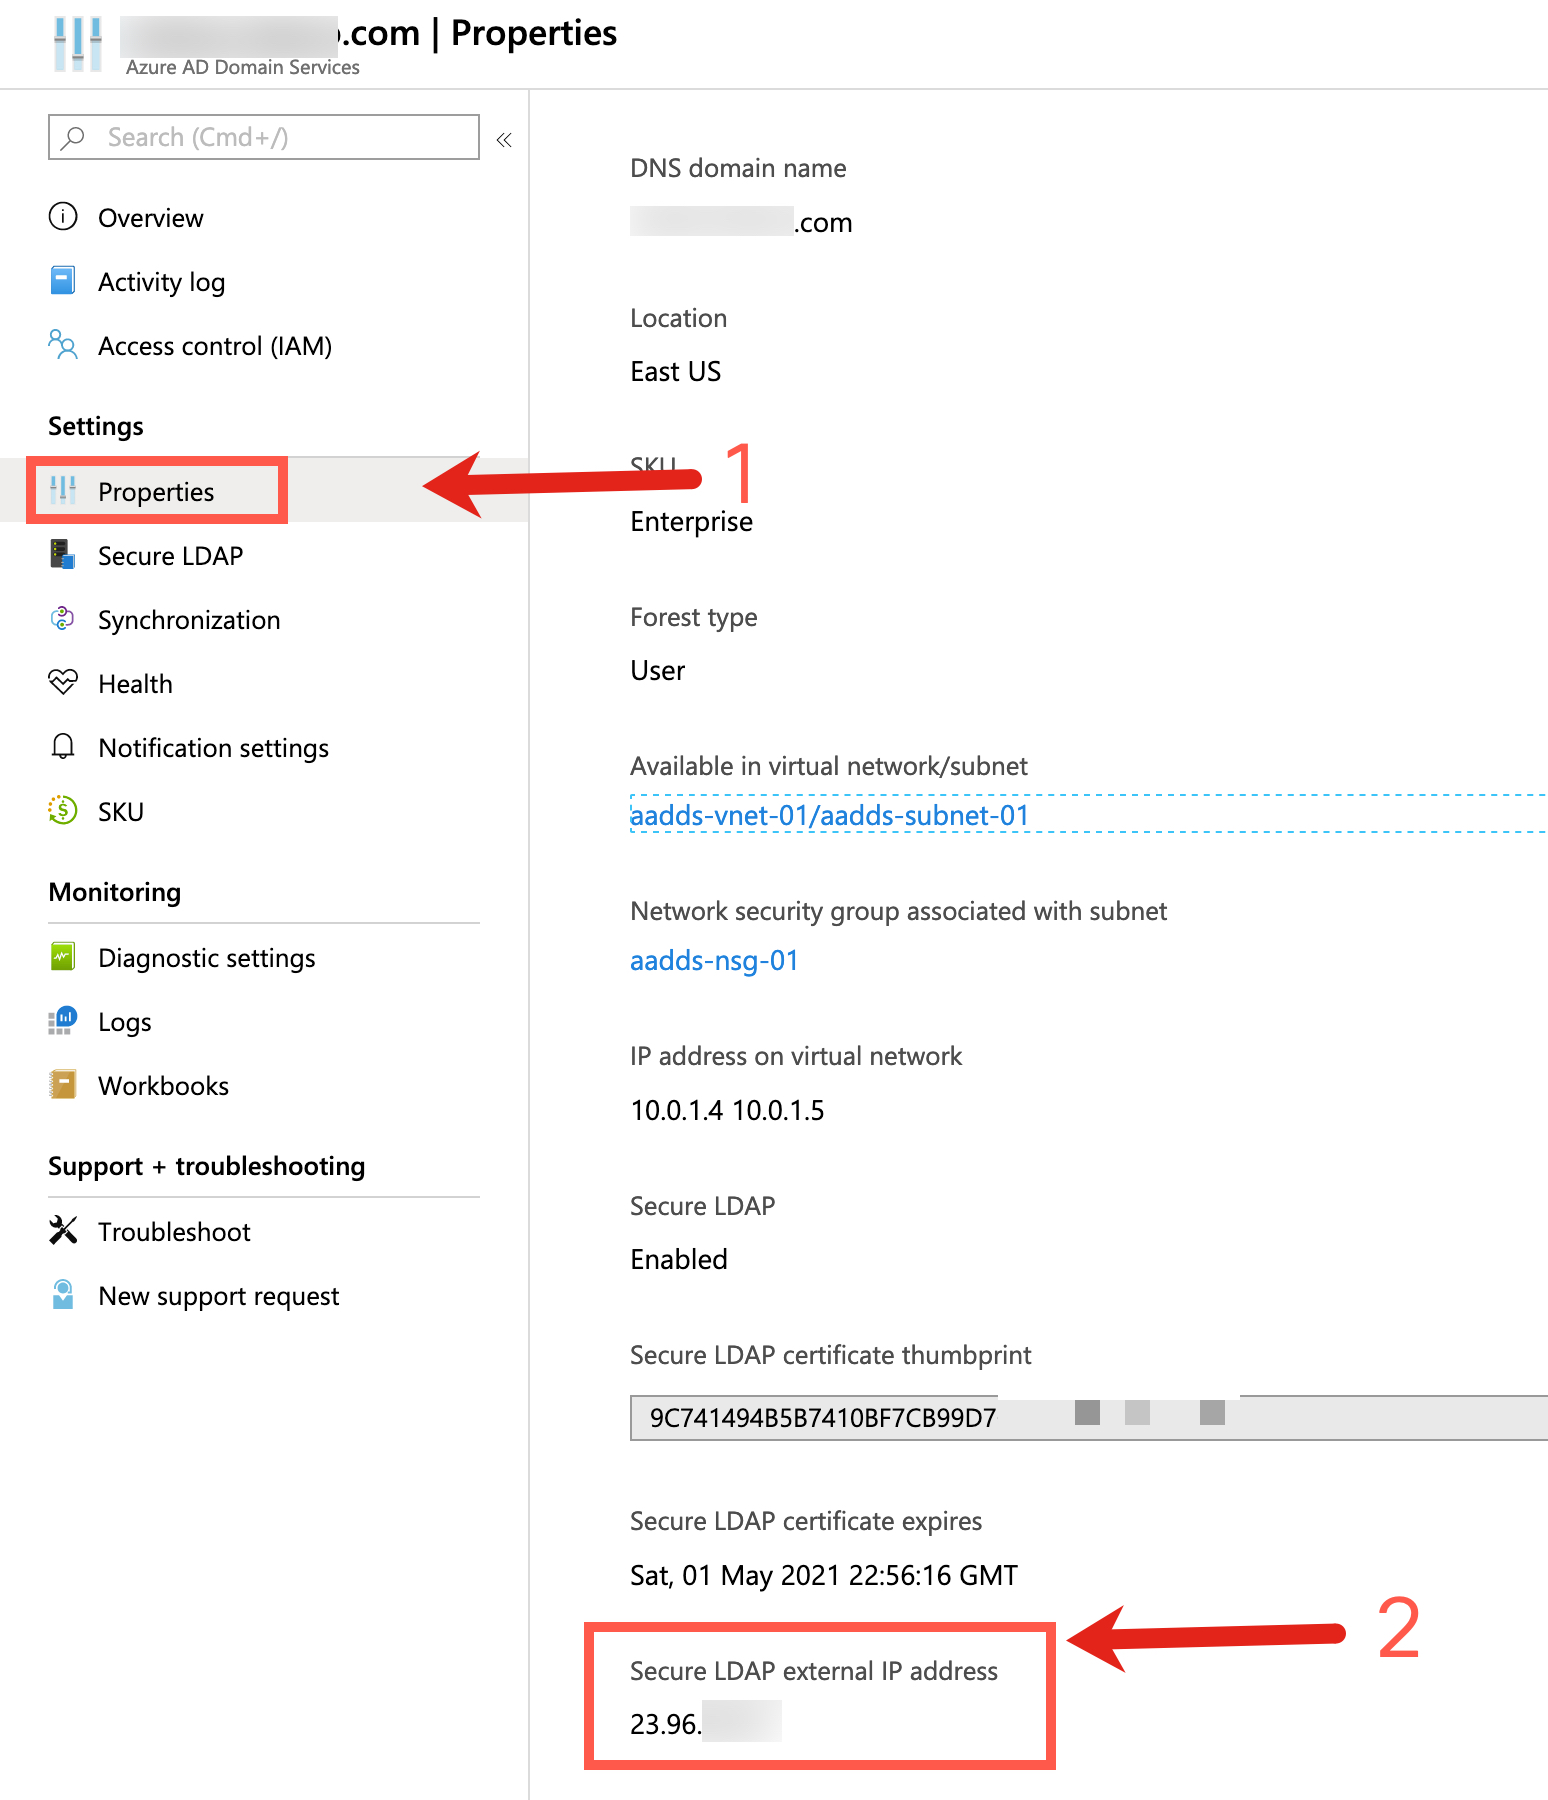
Example steps to show how to find the Secure LDAP external IP address for your Azure AD DS instance.
The Secure LDAP external IP address is a key piece for your ESA to communicate to Azure via the IP address. You may wish to take the assigned IP address and create a DNS CNAME entry for your domain DNS. This will alleviate some setup woes and provide for better design and clarity during setup.
Using a third-party external tool, you can connect to your instance and view Base DN (distinquishedName) and all other values for your LDAP/domain forest. For this document and the example below, we will be using Softerra LDAP Administrator for Windows.
Note
For the purpose of this documentation, we will not provide setup or support of the third-party external tool. The use of the tool will assume the administrator/reader of this document has knowledge and experience with LDAP, certificates, and all further steps related to the third-party tool you are using.
If you have already configured your inbound security rules for your Azure AD DS resource group, you will need to add in the IP address for your localhost that you are connecting from in order to query LDAP over port 636.
Using your third-party external LDAP tool, you can see the top-level information for your domain. Here, the important piece you will want to note is the Base DN for your LDAP domain:
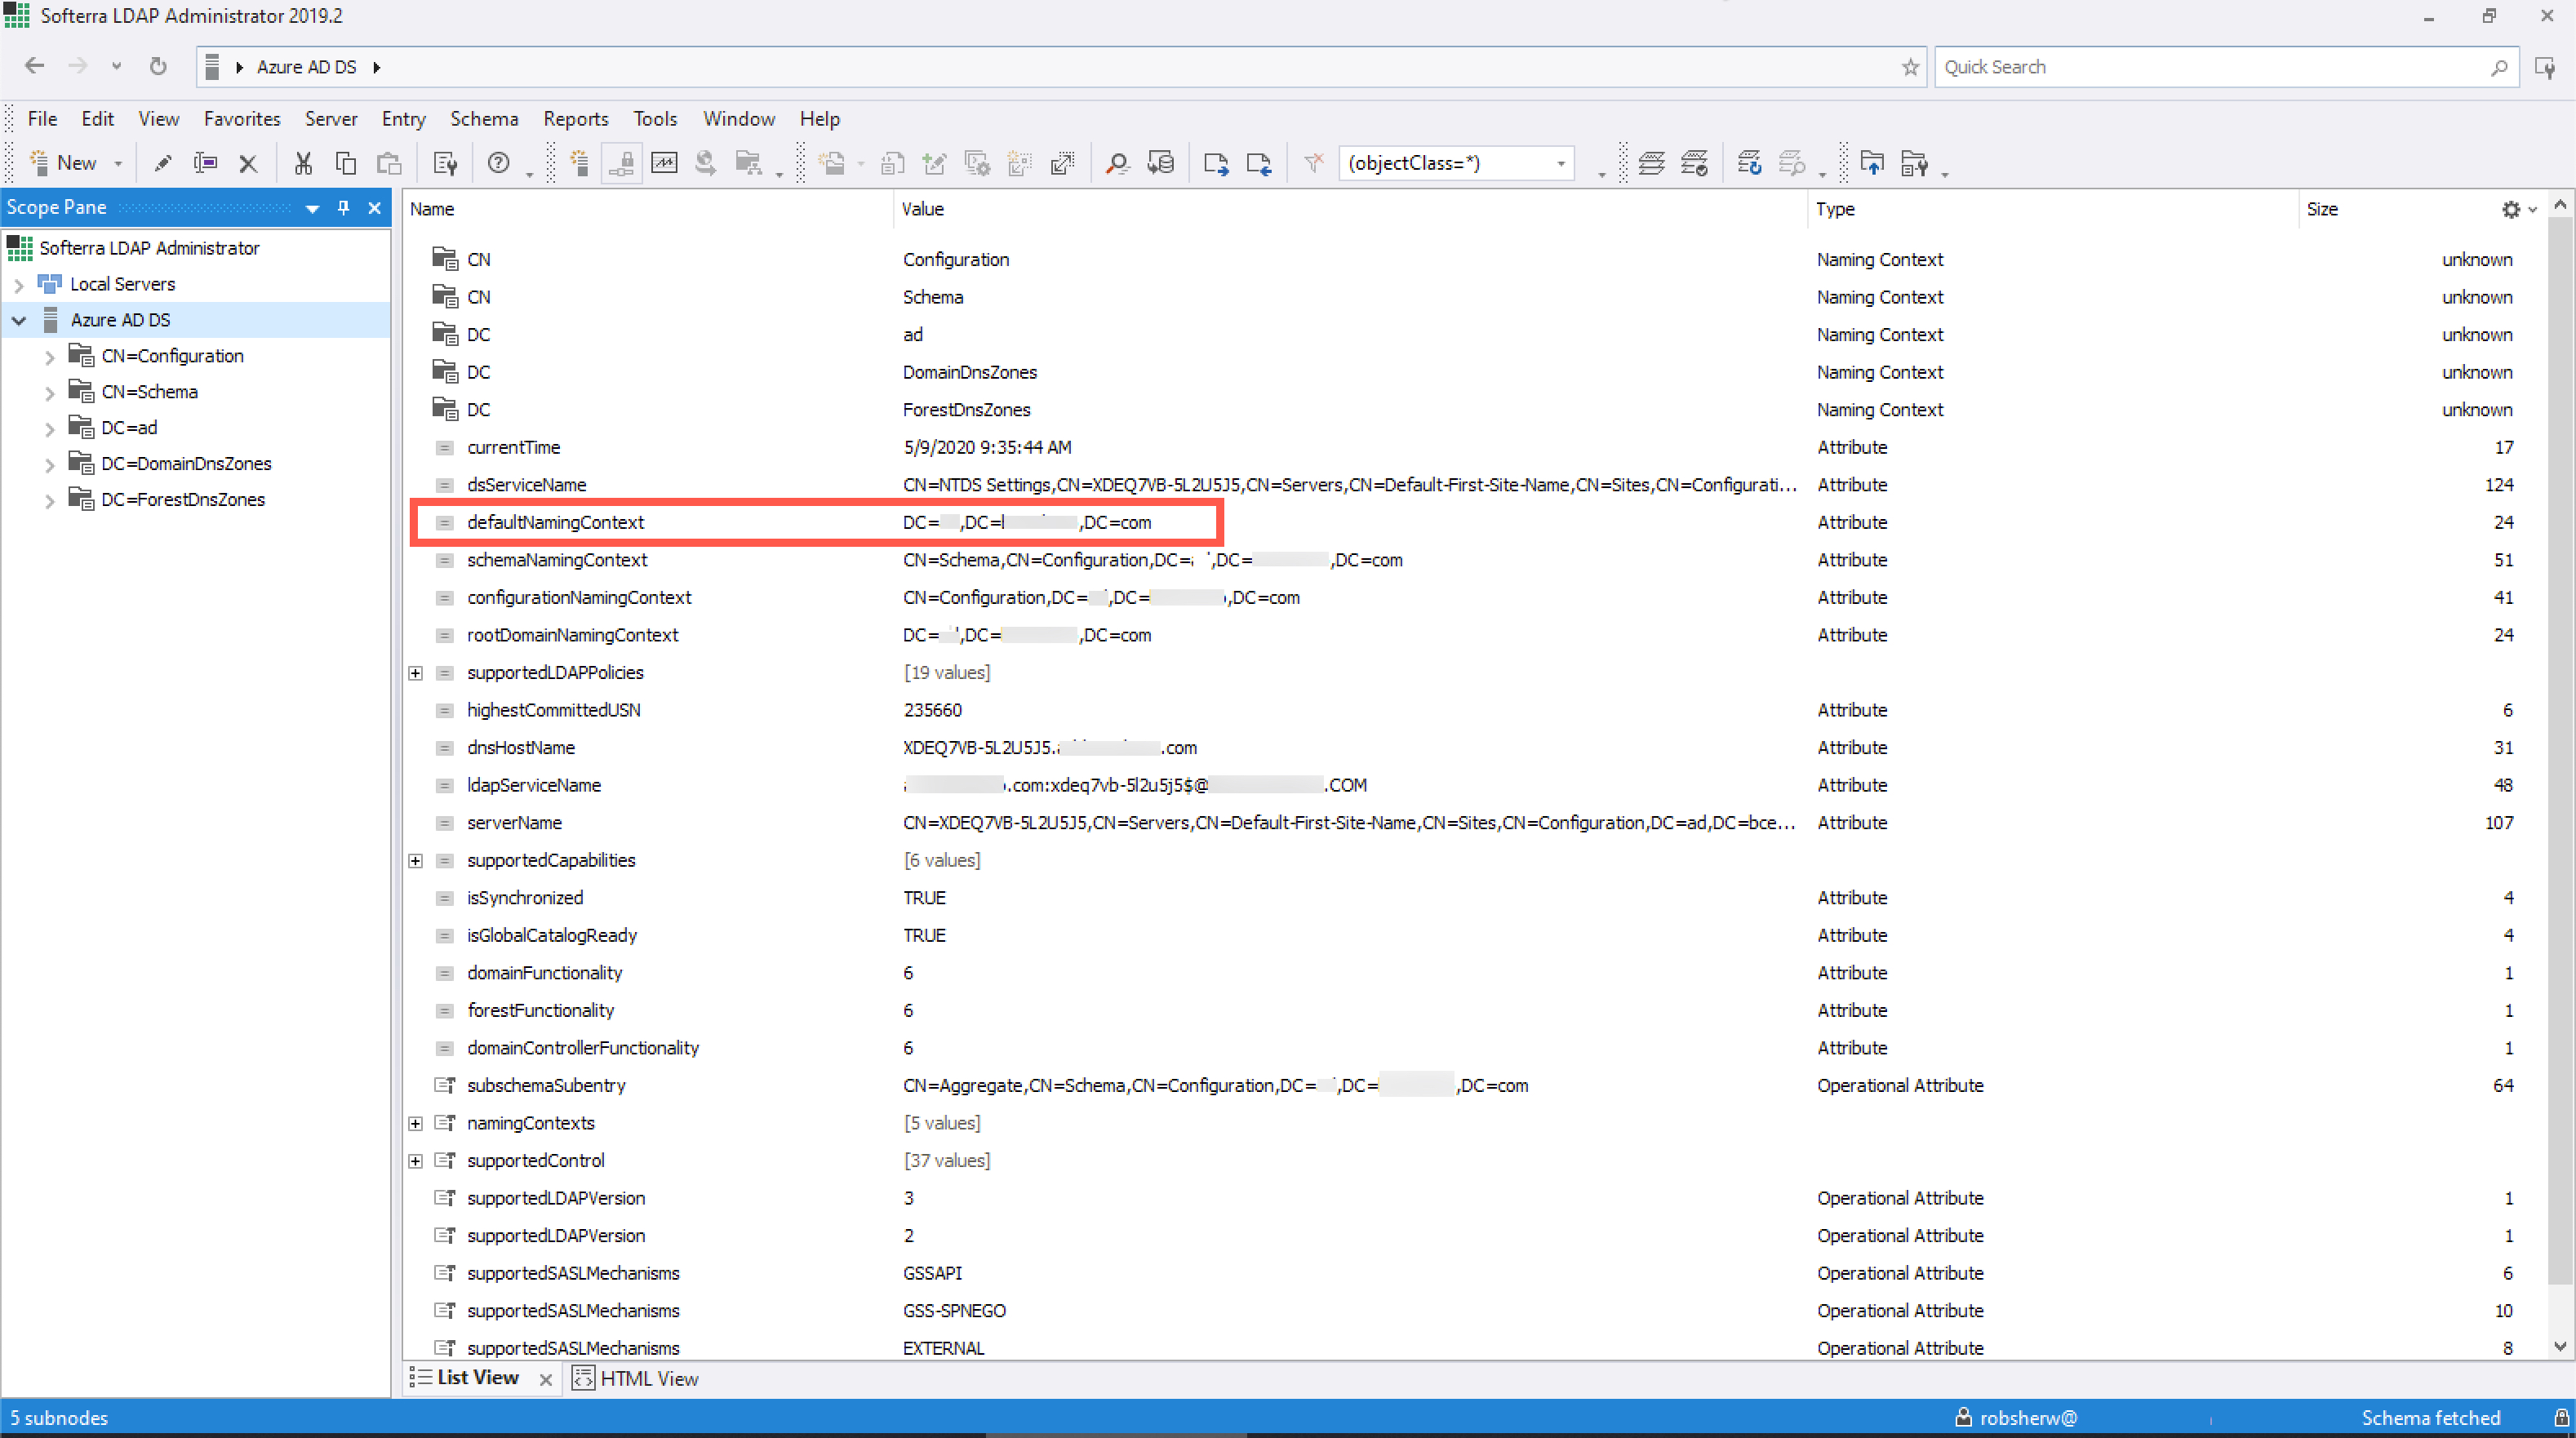
We now have the two needed pieces for configuration on Cisco Email Security for your LDAP server profile:
- Secure LDAP external IP address
- Base DN of your LDAP domain
At this time we have completed the following:
- Configure Azure AD DS
- Configure Azure AD DS to use Secure LDAP
- Lockdown Secure LDAP access over the internet
- Verify your Azure AD DS (LDAP)
- Configure LDAP Server Profile(s) for Cisco Email Security
- Configure Listener to use LDAP Queries for Cisco Email Security
- Verify LDAP usage on Cisco Email Security
Configure LDAP Server Profile(s) for Cisco Email Security
❗ Before creating your LDAP server profile, remember back in Configure Azure AD DS to use Secure LDAP we noted that there is an extra step for using a self-signed certificate when you created your Secure LDAP AD DS. In order to utilize your LDAPS connection using a self-signed certificate, do the following:
- From your ESA UI, click on System Administration > LDAP.
- In LDAP Global Settings, click on Edit Settings.
- For Validate LDAP Server Certificate, select No.
- Click Submit.
✏️ If you are using a signed certificate (PFX) with your LDAPS, you can skip the above steps.
Next, to get started with setting up your LDAP Server Profile, do the following:
- From your ESA UI, click on System Administration > LDAP.
- Click on “Add LDAP Server Profile..."

- Provide a name for the profile.
- Enter your hostname or IP address to your Azure AD DS instance (as found above in the Verify LDAP section).
- Enter your Base DN (as found above in the Verify LDAP section).
- Select the Authentication Method as Use Passphrase, entering your Azure user ID and password.
- Select Active Directory as the Server Type.
- Finally, click the checkbox for “Use SSL”.
✏️ The SSL Cipher(s) to use for the example below is:
ECDHE-RSA:ECDHE-ECDSA:DHE-DSS-AES:AES128:AES256:!aNULL
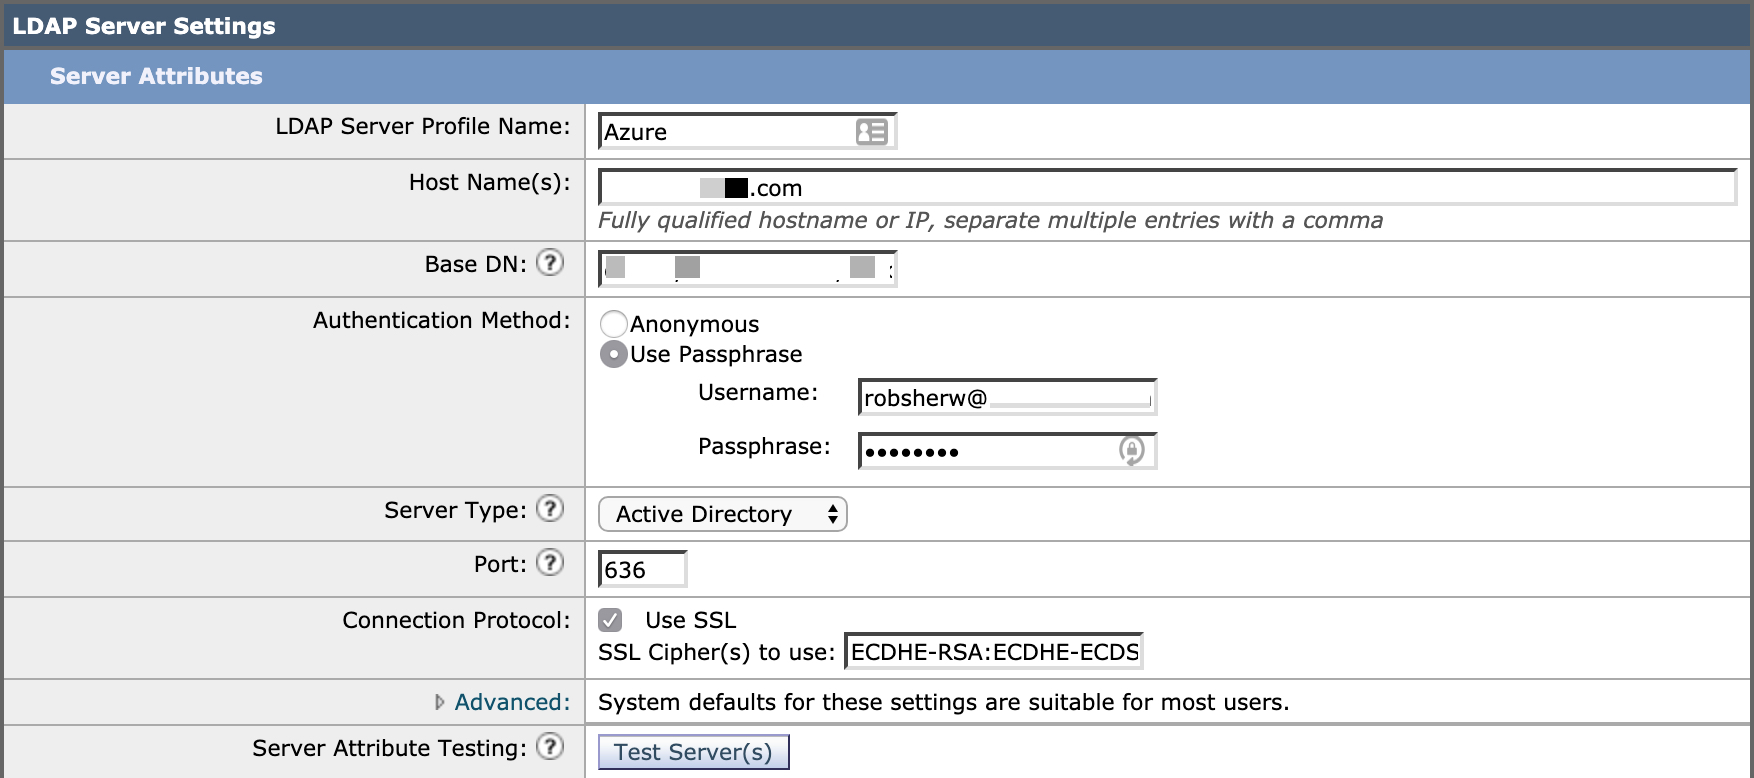
Your LDAP Server Settings (Server Profile) should look similar to those shown here.
- Click Test Server(s) and you should see something like this:
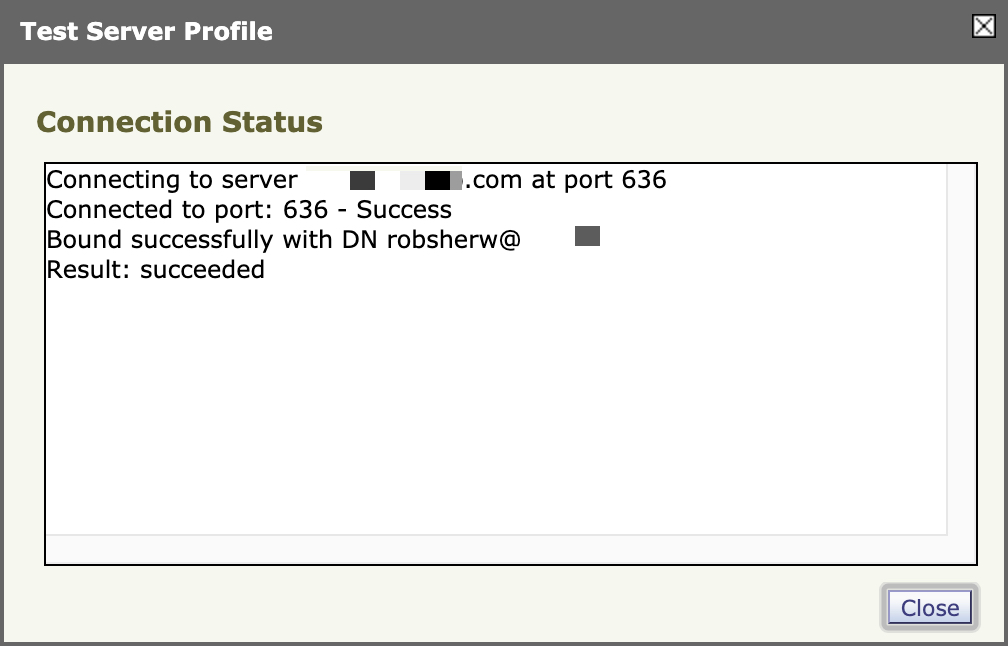
Next, you will need to configure your accept query.
- Click the Accept Query checkbox.
- Modify the query string to use (proxyAddresses=smtp:{a}).
- Click Test Query.
- Enter a valid email address for your domain to test.
- Click Run Test.
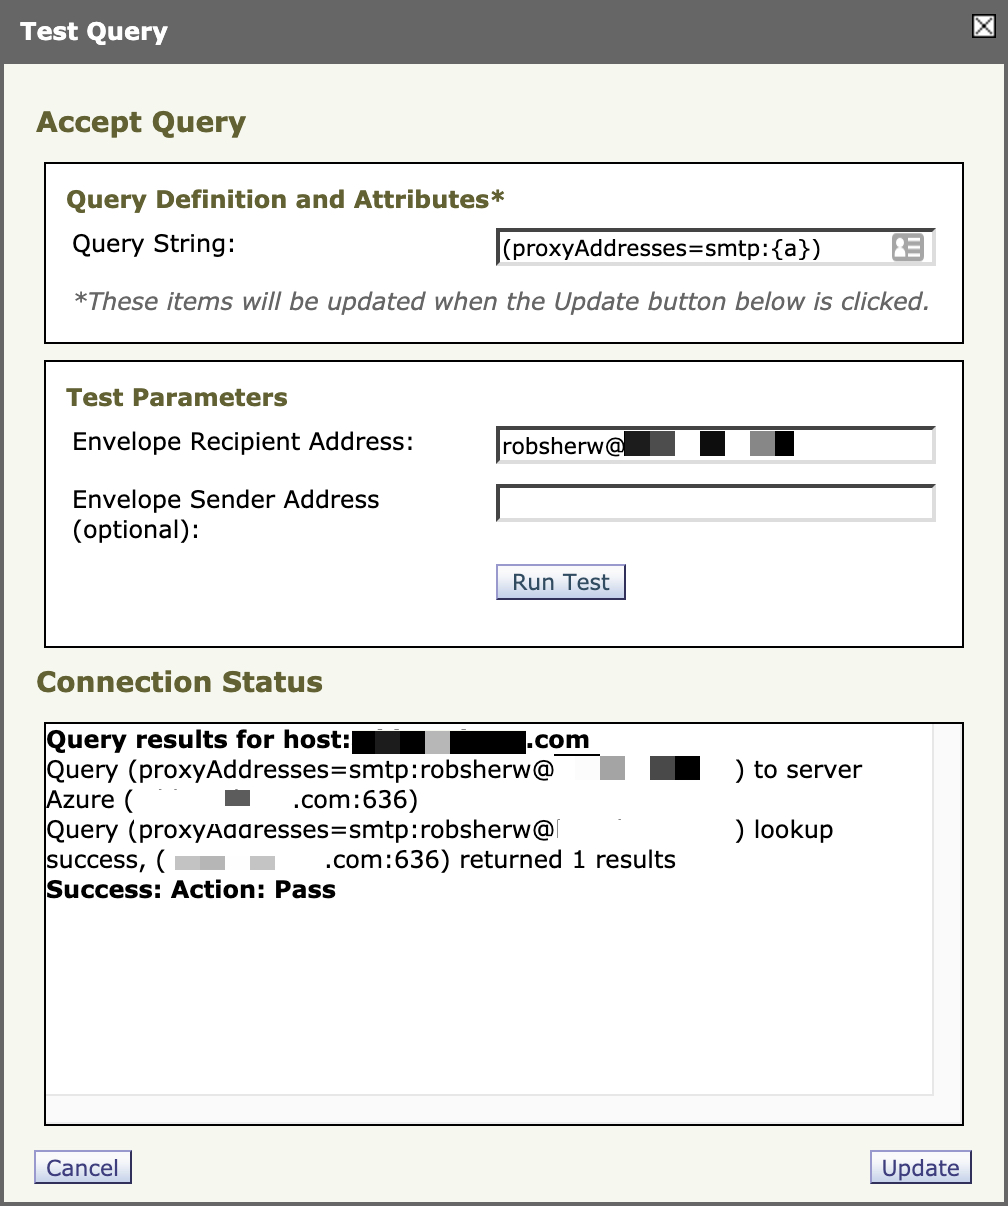
Finally, you will also want to configure your group query.
- Click the Group Query checkbox.
- Modify the query string to use (&(memberOf={g})(proxyAddresses=smtp:{a})).
- Click Test Query.
- Enter a valid email address AND group for your domain to test.
✏️ The example below uses the group string as follows:
cn=GROUP NAME,ou=aaddc users,dc=SUBDOMAIN,dc=DOMAIN,dc=comWhere GROUP NAME is the actual name of the group my user resides in, as configured in Azure, and where "aaddc users" is the default main group assign from Azure.
You can retrieve the group name using your third-party external LDAP tool by running a simple search for the group name. This should highlight the value for the DN of the group name, as well as where the group falls with-in the LDAP schema for your Azure AD DS configuration.
- Click Run Test.
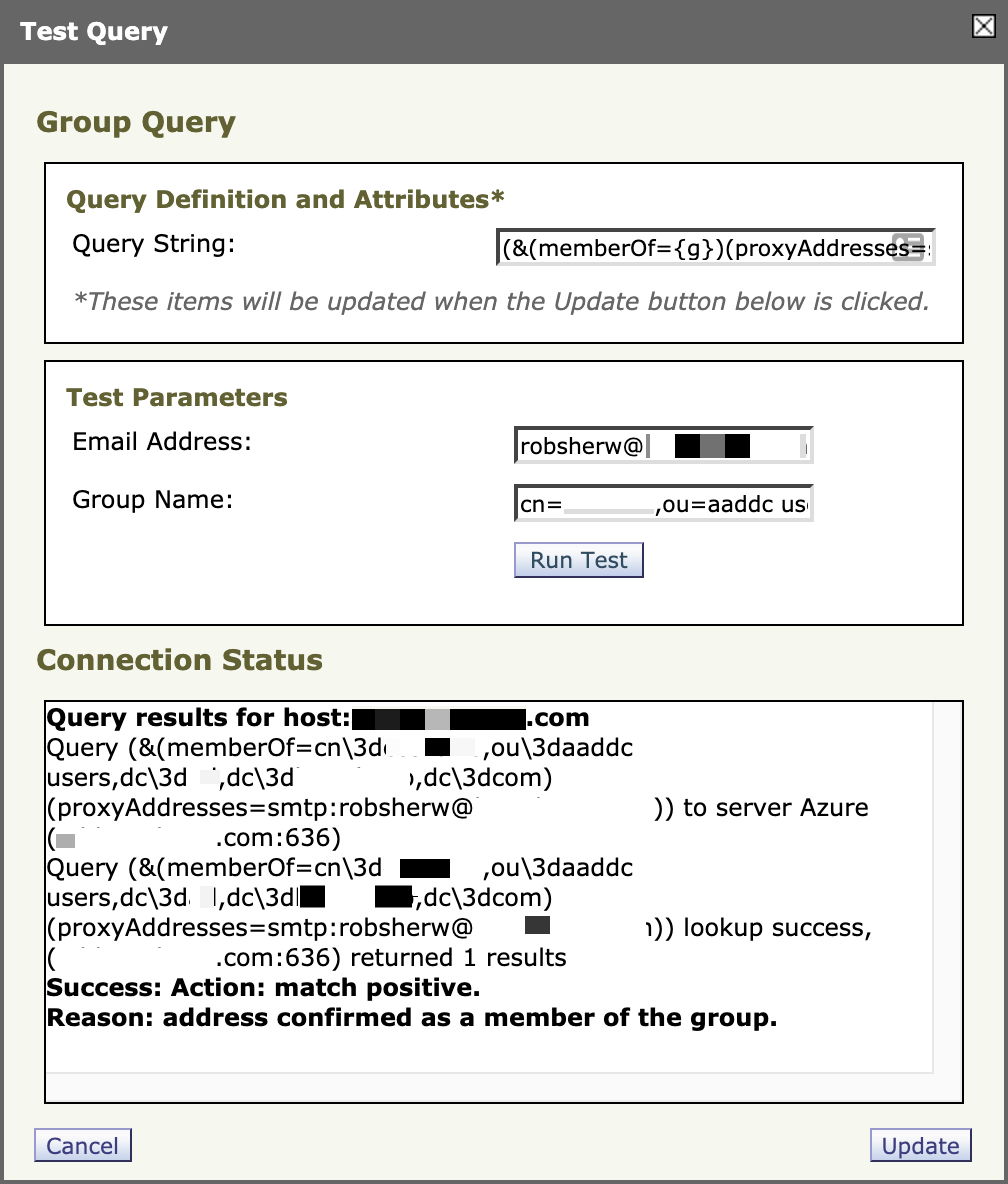
At this time, you have configured your LDAP server profile and your queries associated with Azure AD DS and completed the needed verification. Click Submit to complete and then commit your changes.
At this time we have completed the following:
- Configure Azure AD DS
- Configure Azure AD DS to use Secure LDAP
- Lockdown Secure LDAP access over the internet
- Verify your Azure AD DS (LDAP)
- Configure LDAP Server Profile(s) for Cisco Email Security
- Configure Listener to use LDAP Queries for Cisco Email Security
- Verify LDAP usage on Cisco Email Security
Configure Listener to use LDAP Queries for Cisco Email Security
- From your ESA UI, click on Network > Listeners
- Select your Listener Name. (In most cases, this should be the accepting listener of the appliance, how mail is allowed IN on your ESA.)
- Scroll down until you see LDAP Queries. Expand the drop-down section for LDAP Queries, if needed.
- Expand the drop-down section for Accept.
✏️ Best practice recommendation is to leave the SMTP Conversation to return error code if LDAP is unreachable.
- Select the accept query you have just configured in the section before from the drop-down menu.
- Expand the drop-down section for Group.
- Select the group query you have just configured in the section before from the drop-down menu.
- Click Submit to complete and then commit your changes.
Note
If you have additional LDAP queries that are needed, you can turn those on for the listener here as well. For the scope of this document, we are only covering accept and group queries.
At this time we have completed the following:
- Configure Azure AD DS
- Configure Azure AD DS to use Secure LDAP
- Lockdown Secure LDAP access over the internet
- Verify your Azure AD DS (LDAP)
- Configure LDAP Server Profile(s) for Cisco Email Security
- Configure Listener to use LDAP Queries for Cisco Email Security
- Verify LDAP usage on Cisco Email Security
Verify LDAP usage on Cisco Email Security
There are two specific logs that you will wish you review for LDAP verification and troubleshooting on the ESA:
- IronPort Text Mail Logs
- LDAP Debug Logs
IronPort Text Mail Logs are enabled by default. You will see this log listed in the Log Subscriptions as "mail_logs".
LDAP Debug Logs are not enabled by default and will need to be created in order to be logged. LDAP debug logs are meant for debugging LDAP installations. (See the “LDAP Queries” chapter of the User Guide.) Useful information about the queries that the Email Security appliance is sending to the LDAP server is recorded here. (See "Using LDAP Debug Logs" in the "Logging" chapter of the User Guide for more information.)
✏️ It is important to note, if mail_logs are configured to Debug log level, LDAP actions are recorded to the mail_logs as well.
With LDAP enabled on the listener, your Recipient Access Table (RAT) and recipient addresses that you accept mail for on your ESA will validate LDAP unless you specifically bypass LDAP queries at the RAT.
An example of when you would see LDAP unable to query is for a domain that is not associated with your Azure AD DS instance:
Sat May  9 08:19:37 2020 Info: New SMTP ICID 647152 interface Data 1 (139.138.123.123) address 136.56.123.123 reverse dns host unknown verified no
Sat May  9 08:19:37 2020 Info: ICID 647152 ACCEPT SG SUSPECTLIST match sbrs[none] SBRS None country United States
Sat May  9 08:19:37 2020 Info: Start MID 53721 ICID 647152
Sat May  9 08:19:37 2020 Info: MID 53721 ICID 647152 From: <[email protected]>
Sat May  9 08:19:37 2020 Info: MID 53721 ICID 647152 To: <[email protected]> Rejected by LDAPACCEPT
Sat May  9 08:19:37 2020 Info: Message aborted MID 53721 Receiving aborted by sender
Sat May  9 08:19:37 2020 Info: Message finished MID 53721 aborted
Sat May  9 08:19:37 2020 Info: ICID 647152 close
✏️ In the mail logs example above, ocsic.com is in the ESA's RAT, however, ocsic.com is not associated with the LDAP domain. LDAPACCEPT is rejecting the mail for this domain.
For our ESA to accept mail for cisco.com without having LDAP configured:
- From the ESA UI, click on Mail Policies > Recipient Access Table (RAT).
- Select "ocsic.com" from the recipient address listing.
- Check the checkbox for "Bypass LDAP Accept Queries for this Recipient".
If you have a domain that is being rejected and is actually in your LDAP domain configured in Azure AD DS, you will need to review the LDAP server profile and advanced settings to make sure that you have configured the schema correctly and that any associated domain assignments are correct.
One other tool that may be of use from the Cisco Email Security side is the "LDAP Debug Logs" from the Log Subscriptions. With an LDAP debug log configured and logging, you will be able to see the LDAP call as it is made from the ESA to the associated LDAP server.
Sat May  9 08:33:25 2020 Debug: LDAP: (accept) Query (proxyAddresses=smtp:[email protected]) to server Azure (ad.ocsic.com:636)
Sat May  9 08:33:25 2020 Debug: LDAP: Query (proxyAddresses=smtp:[email protected]) following continuation: ldaps://ad.ocsic.com/CN=Configuration,DC=ad,DC=bce-demo,DC=com
Sat May  9 08:33:25 2020 Debug: LDAP: Query (proxyAddresses=smtp:[email protected]) following continuation: ldaps://ad.ocsic.com/CN=Schema,CN=Configuration,DC=ad,DC=bce-demo,DC=com
Sat May  9 08:33:25 2020 Debug: LDAP: (accept) Query (proxyAddresses=smtp:[email protected]) lookup success, (ad.ocsic.com:636) returned 1 results
✏️ In the LDAP debug log example above, the email sent to [email protected] is validated via the LDAP call to Azure, and marked as 'success' with 'returned 1 results'. This indicates that LDAP validated the email address exists in the ocisc.com domain, and the mail is delivered as intended.
If there were a lookup issued against an email address NOT in ocsic.com domain that is managed, it would look like this:
Sat May  9 08:37:43 2020 Debug: LDAP: (accept) Query (proxyAddresses=smtp:[email protected]) to server Azure (ad.ocsic.com:636)
Sat May  9 08:37:43 2020 Debug: LDAP: Query (proxyAddresses=smtp:[email protected]) following continuation: ldaps://ad.ocsic.com/CN=Configuration,DC=ad,DC=bce-demo,DC=com
Sat May  9 08:37:43 2020 Debug: LDAP: Query (proxyAddresses=smtp:[email protected]) following continuation: ldaps://ad.ocsic.com/CN=Schema,CN=Configuration,DC=ad,DC=bce-demo,DC=com
Sat May  9 08:37:43 2020 Debug: LDAP: (accept) Query (proxyAddresses=smtp:[email protected]) lookup success, (ad.ocsic.com:636) returned 0 results
✏️ In the LDAP debug log example above, the email sent to [email protected] is validated via the LDAP call to Azure and marked as 'success' with 'returned 0 results'. This indicates that LDAP did NOT find the user the email is attempted to be sent to, and if we were to review the mail logs we would see that the mail is rejected by LDAPACCEPT.
Sat May 9 08:37:43 2020 Info: MID 53728 ICID 647165 To: <[email protected]> Rejected by LDAPACCEPT
At this time we have completed the following:
- Configure Azure AD DS
- Configure Azure AD DS to use Secure LDAP
- Lockdown Secure LDAP access over the internet
- Verify your Azure AD DS (LDAP)
- Configure LDAP Server Profile(s) for Cisco Email Security
- Configure Listener to use LDAP Queries for Cisco Email Security
- Verify LDAP usage on Cisco Email Security
Updated about 2 years ago
