Configuring Journal/BCC for PoV
Cisco Secure Email Cloud Gateway
About
This page covers the necessary steps to configure the journal rule for your Microsoft 365 or Google Workspace and share copies of inbound messages to the Cisco Secure Email Cloud Gateway.
Prerequisites
Cisco recommends that you have the following knowledge and permissions to configure:
- Cisco Secure Email Cloud Gateway Trial Portal
- Admin access to your Microsoft 365 Admin Center or Google Workspace Admin portal
Background Information
You should receive an encrypted email from Cisco that provides you with Cisco Secure Email Cloud Gateway's IP addresses, login information, and, most importantly, a unique journal recipient email address.
If you have not received this encrypted letter, please reach out to [email protected] with your contact information, customer name and domain name.
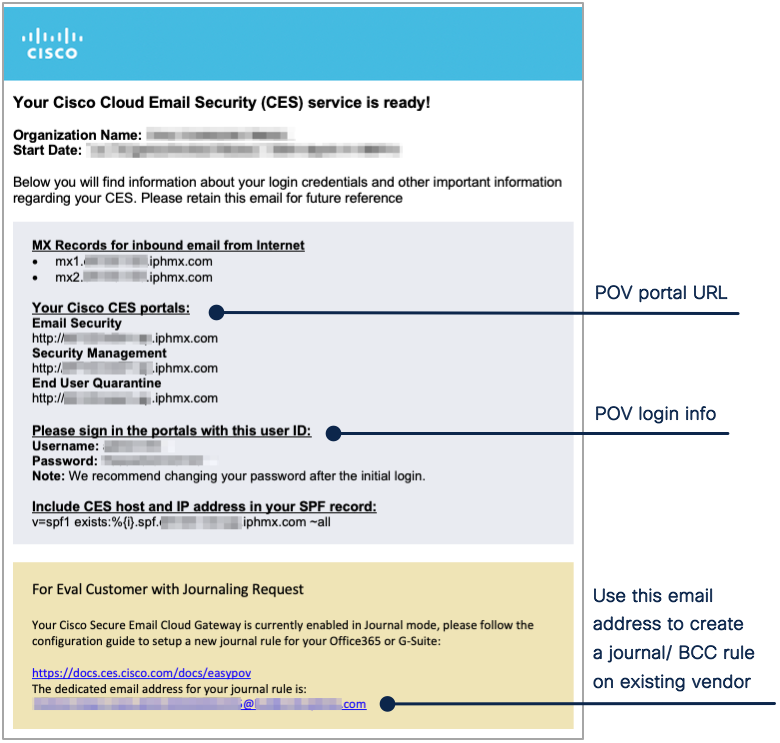
All information provided in this encrypted email is unique for each customer and will not likely change without notification.
Configure
Journal rule for Microsoft 365
- Log in to the Microsoft 365 Admin Center (https://portal.microsoft.com)
- Go to Admin Centers > Exchange
- Click > compliance management
- Click > journal rules tab
- Click +
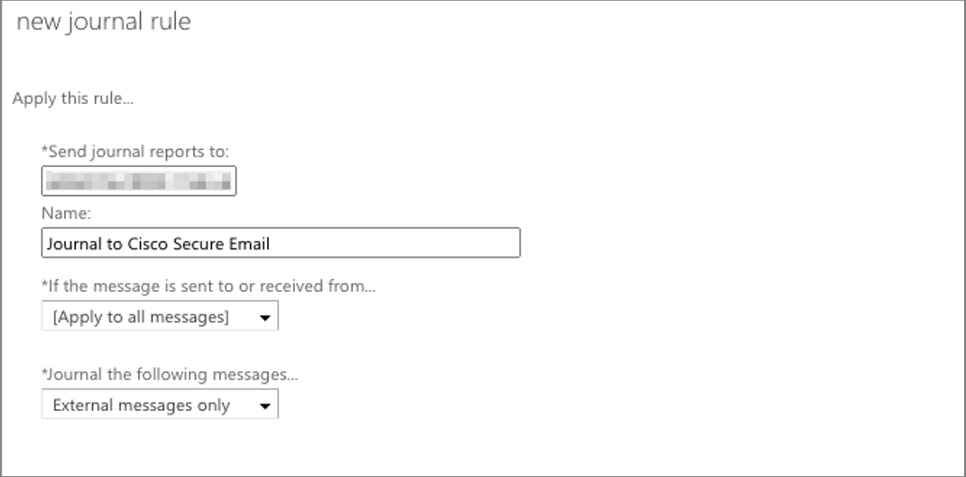
- In the 'Send journal reports to,' type the unique email address received from Cisco
- Name the new journal rule (Journal to Cisco Secure Email )
- For 'If the message is sent to or received from', select > [Apply to all messages]
- In the 'Journal the following messages' drop-down list, select > External messages
- Click > Save
- Click > Yes in the confirmation message
BCC Rule for Microsoft Office 365
- Log in to the Microsoft 365 Admin Center (https://portal.microsoft.com)
- Go to Admin Centers > Exchange
- Click > mail flow
- Click > rule tab
- Click +
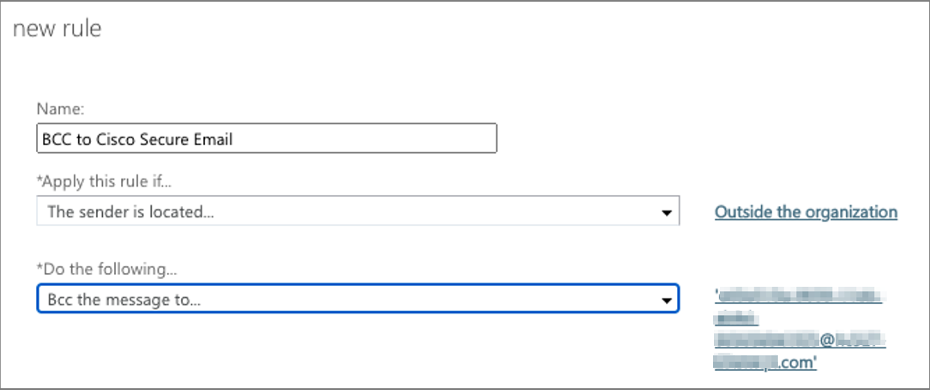
- Name the new BCC rule (BCC to Cisco Secure Email)
- Configure > Apply the rule if: The sender is located …
- Choose: Outside the organization
- Click OK
- Configure > Do the following: Bcc the message to …
- Insert Check names: the unique email address received from Cisco
- Click Check names (Note: “unique email address” will be added into 'Add ->' box)
- Click > OK
- Click > SAVE
Journal Rule for Google Workspace
- Log in to the Google Admin (https://admin.google.com)
- Go to Apps > Google Workspace > Gmail
- Scroll down the page, and click > Routing
- Click > ADD ANOTHER
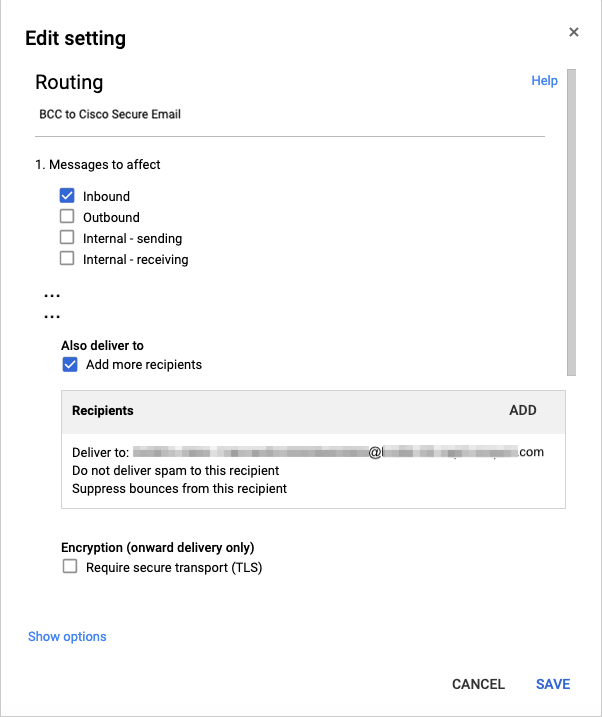
- Name the new routing setting (BBC to Cisco Secure Email)
- For 'Message to affect', choose > Inbound
- Look for 'Also deliver to', select > Add more recipients
- Click ADD
- In 'Recipient address', enter the unique email address received from Cisco
- Click > Save
- Click > ADD SETTING
- Click > SAVE at the bottom of the main page
Verify the status of journal mail flow in Cisco Secure Email Cloud Gateway
Once the above steps have been completed, Cisco Secure Email Cloud Gateway will receive copies of inbound messages sent to your organization. You can confirm the traffic flow by logging in to the Cisco Secure Email and Web Manager portal.
- Log in to the Cisco Secure Email and Web Manager (i.e.: https://dh123-sma1.iphmx.com/ng-login )
- Click > Tracking tab
- Click > Search
- All email messages journaled from Microsoft 365 or Google Workspace are listed in the search result page.
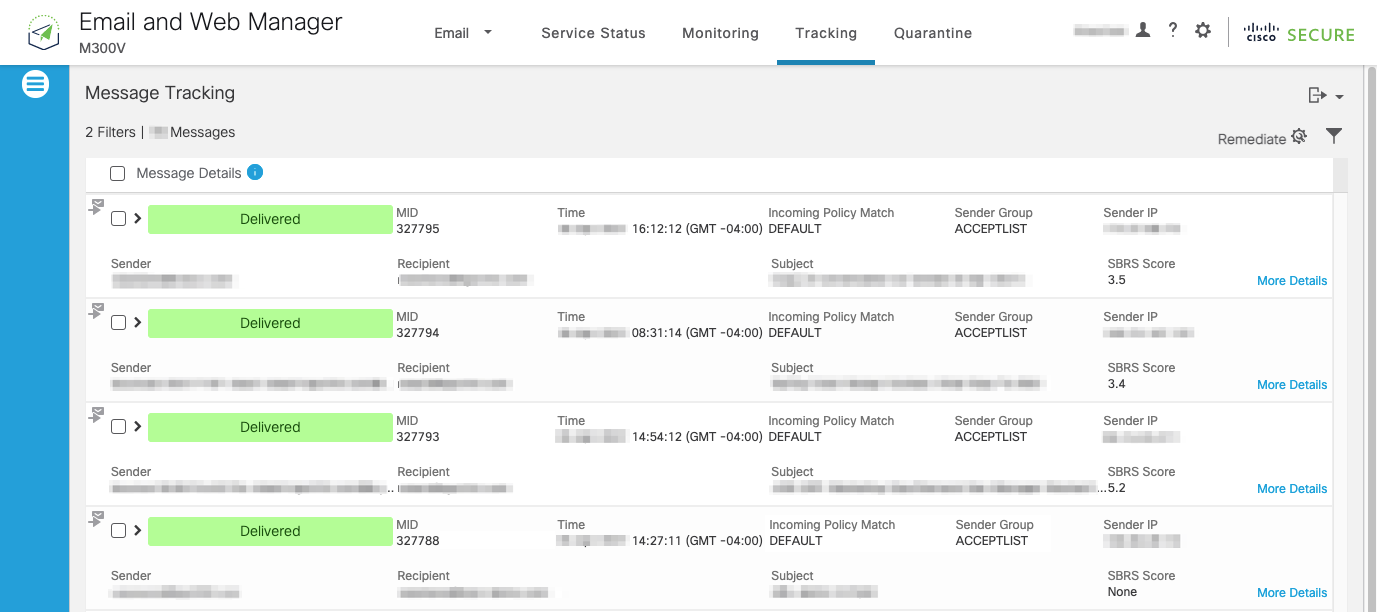
- Click > More Detail on one of the messages
- Make sure the SPF, DKIM, and/or DMARC verification result = Pass

Configure Incoming Relay Setting (OPTIONAL)
The Journal/BCC deployment method has been developed for seamless Microsoft 365 and Google Workspace integration. In principle, this module does not expect that there is a previous element in front of Microsoft 365 or Google Workspace.
If a Secure Email Gateway (SEG) is present, we will follow the steps to enable SEG support It is necessary to configure the "Incoming Relay" setting on the Cisco Secure Email Cloud Gateway to optimize the POV outcome.
- Log in to your Cisco Secure Email Cloud Gateway UI (i.e: https://dh123-esa1.iphmx.com)
- Navigate to Network > Incoming Relay
- Click > Enable
- Click > Add Relay …
- Name the relay profile (example: O365)
- Add the MTA IP address or hostname (example: .outlook.com)
- On the Header option, stay as Parse the "Receiving" header
- Keep 'Begin parsing after' as from
- Choose the appropriate hop count (*) from the drop-down list.
(*) Recommended hop count for O365 (.outlook.com) is 3+N, and G-Suite (.google.com) is 2+N
- Click > Submit
- Click > Commit Changes (the yellow button on the top right corner)
- Give an optional comment and click > Commit Changes again

To avoid errors, disable SPF and DMARC verification:
- Navigate to Mail Policies > Mail Flow Policies
- Click > Default Policy Parameters
- Click > Off on SPF/SIDF verification
- Click > Off on DMARC Verification
- Click > Submit
- Click > Commit Changes (the yellow button on the top right corner)
- Give an optional comment and click > Commit Changes again
PLEASE READ CAREFULLY
Cisco strongly advices customers to keep the setting of "Recipient Access Table" and "SMTP Routes" as default when Journal or BCC mode is enabled in Cisco Secure Email Cloud Gateway. Please contact [email protected] if you need to change these settings.
Updated about 2 years ago
