Security Review (Optional)
Efficacy Guide using Cisco Secure Email
Additional Hardening Recommendations
Admins should always keep in mind who has access to the mail gateway. Please always be sure to have best practices for the following to keep your configuration safe:
Scanning of Password-protected Attachments
Starting with the AsyncOS 14.0 was made available.
- Security Services > Scan Behavior
- Click Edit Global Settings...
- In Scanning of Password-protected Attachments, click Enabled for Inbound Mail Traffic
- Outbound Mail Traffic is optional
- In Probable Password for Analysis, click Enabled
- Define up to five (5) passwords in the setting
- Submit and Commit your configuration changes
Sender Domain Reputation
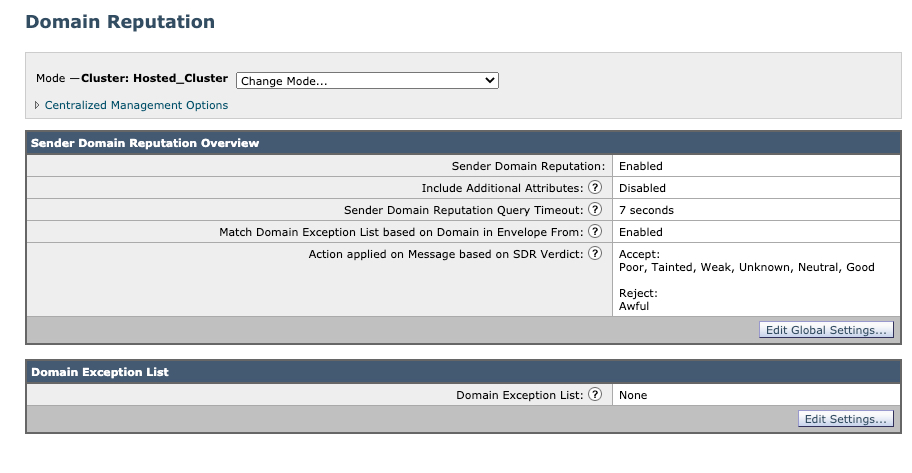
Sender Domain Reputation (SDR) was introduced in AsyncOS 12.0. This is enabled by default. Assure that you are running the minimum configuration of SDR:

Note: Cluster: Hosted_Cluster as this is Cloud Gateway
User Config
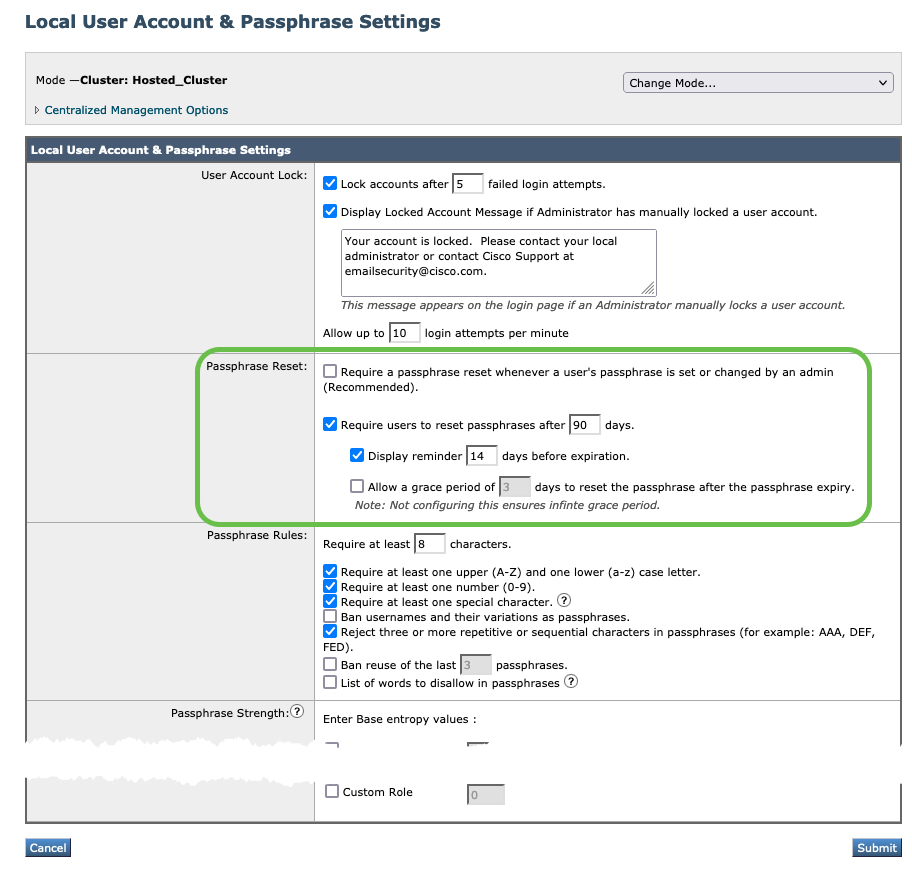
For your Gateway/Cloud Gateway, enforce 90-day passphrase expiration.
- System Administration > Users
- In Local User Account & Passphrase Settings, click Edit Settings...
- For Passphrase Reset, configure Require users to reset passphrases after 90 days
- Submit and Commit your configuration changes

Two-factor Authentication (2FA)
For your Gateway/Cloud Gateway, enable Two-factor Authentication.
You can use a RADIUS directory to configure two-factor authentication for specific user roles. The email gateway supports the following authentication protocols for communicating with the RADIUS server:
- Password Authentication Protocol (PAP)
- Challenge Handshake Authentication Protocol (CHAP)
You can enable two-factor authentication for the following user roles:
- predefined
- custom
The feature has been tested with:
- RSA Authentication Manager v8.2
- FreeRADIUS v1.1.7 and above
- ISE v1.4 and above
Enabling Two-Factor AuthenticationBefore You Begin
Make sure that you get the required RADIUS server details for two-factor authentication from your IT administrator.
Procedure
Step 1 | On the System Administration > Users page, click Enable under Two-Factor Authentication.
Step 2 | Enter the hostname or IP address of the RADIUS server.
Step 3 | Enter the port number of the RADIUS server.
Step 4 | Enter the Shared Secret password of the RADIUS server.
Step 5 | Enter the number of seconds to wait for a response from the server before timing out.
Step 6 | Select the appropriate authentication protocol.
Step 7 | (Optional) Click Add Row to add another RADIUS server. Repeat steps 2 to 6 for each RADIUS server.
Note: You can add up to ten RADIUS servers.
Step 8 | Select the required user roles for which you want to enable two-factor authentication.
Step 9 | Submit and commit your changes.
When two-factor authentication is enabled, the user is prompted to enter a passcode after entering the username and passphrase, to login to the email gateway.
Guide Checklist
At this time, we have completed the following:
- Introduction
- Validate Detection Services
- Review of Bypass, Accept or Allow Lists
- Aggressive Profile for Anti-Spam
- Review and Validate MX Records
- Submissions to Talos
- Support Requests
- Security Review (Optional)
Congratulations! You're at the end of the Efficacy Guide using Cisco Secure Email! Thank you for taking the time to step through this guide.
Up next, if you wish - ensure that you get full use and detection of URLs with our URL Defense Guide.
Updated about 2 years ago
