

SecureX + Cisco Threat Response Private Intelligence Feeds
Introduction
Utilizing SecureX and Cisco Threat Response's Intelligence, Cisco Secure Email administrators can take advantage of private judgments and observables seen within Threat Response. These judgments are Indicators of Compromise (IoC) such as URL, SHA256, domain name, or IP address. These IoCs may be consumed from the Cisco Secure Email Gateway or Cloud Gateway using the External Thread Feeds (ETF) Manager, and then with-in Content Filters for mail policies, detecting and stopping malicious URLs, attachments, domains, or IPs.
Prerequisites
-
Cisco Secure Email Gateway or Cloud Gateway with External Threat Feeds enabled
-
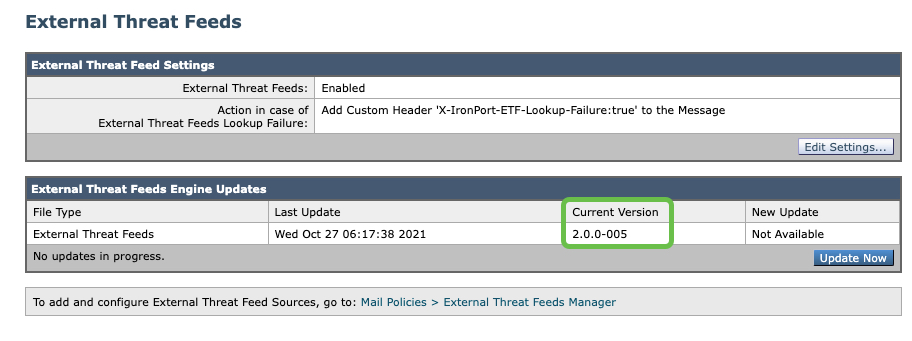
External Threat Feeds engine running v2.0.0-005
Click here for "How-to confirm your ETF version"
To verify which version your External Threat Feeds engine is running...
- From the UI: Security Services > External Threat Feeds:
- From the CLI run the following command: threatfeedstatus:
esa.local> threatfeedstatus

Component                 Version         Last Updated
External Threat Feeds     2.0.0-005       27 Oct 2021 06:17 (GMT +00:00)
Not running v2.0.0-005?
There are two options to force update the engine:
- From the UI: Security Services > External Threat Feeds menu, click Update Now.
- From the CLI run the following command: threatfeedupdate force
Once you have issued the update, in the updater_logs you will see the threatfeeds service updates requested and applied:
Wed Oct 27 06:17:37 2021 Info: Server manifest specified an update for threatfeeds Wed Oct 27 06:17:37 2021 Info: threatfeeds was signalled to start a new update Wed Oct 27 06:17:37 2021 Info: threatfeeds processing files from the server manifest Wed Oct 27 06:17:37 2021 Info: threatfeeds started downloading files Wed Oct 27 06:17:37 2021 Info: threatfeeds waiting on download lock Wed Oct 27 06:17:37 2021 Info: threatfeeds acquired download lock Wed Oct 27 06:17:37 2021 Info: threatfeeds beginning download of remote file "http://stage-updates.ironport.com/threatfeeds/1.0.0/engine/default/200005" Wed Oct 27 06:17:38 2021 Info: threatfeeds released download lock Wed Oct 27 06:17:38 2021 Info: threatfeeds successfully downloaded file "threatfeeds/1.0.0/engine/default/200005" Wed Oct 27 06:17:38 2021 Info: threatfeeds started applying files Wed Oct 27 06:17:38 2021 Info: threatfeeds applying file "engine" Wed Oct 27 06:17:38 2021 Info: threatfeeds Shutting down External Threat Feeds Engine Wed Oct 27 06:17:38 2021 Info: threatfeeds installing new bin Wed Oct 27 06:17:38 2021 Info: threatfeeds installing new config Wed Oct 27 06:17:38 2021 Info: threatfeeds installing new lib Wed Oct 27 06:17:38 2021 Info: threatfeeds Reinit External Threat Feeds Engine Wed Oct 27 06:17:38 2021 Info: threatfeeds verifying applied files Wed Oct 27 06:17:38 2021 Info: threatfeeds updating the client manifest Wed Oct 27 06:17:38 2021 Info: threatfeeds update completed Wed Oct 27 06:17:38 2021 Info: threatfeeds waiting for new updates - From the UI: Security Services > External Threat Feeds:
To get started, let's review the setup for Cisco Threat Response.
SecureX/Cisco Threat Response | Create Your Indicator
- Log in to Cisco SecureX
- Launch Threat Response
- Click on Intelligence from the Threat Response toolbar
- Click on Indicators
- Change the drop-down from Source: Public to Source: Private
- Click Create Indicator
- Provide a Title
- Expiration should be left checked for "Never"
- Provide a Description
- Optional:
- You may go through and set the Confidence, Severity, and TLP; you will be able to assign these when adding judgments to the Indicator
- As this Indicator will be specific to email, you may wish to check the indicator types for Domain Watchlist, File Hash Watchlist, IP Watchlist, Malicious Email, URL Watchlist
- Click Save
The Indicator is ready, but there is no external authentication URL/feed associated. You will need to complete the following steps to assign the Feed.
SecureX/Cisco Threat Response | Create Your Feed
- Click Feeds
- Click Create Feed URL
- Provide a Title
- For Indicator, select the Indicator you have just completed in the section before
- For Output, leave this set as Observables
Note
Do NOT set to your Feed as Judgements. This will result in the following error from your Gateway/Cloud Gateway, as seen from the threatfeeds log:
Wed Oct 13 12:44:32 2021 Warning: THREAT_FEEDS: Unable to fetch the observables from the source: MY_CTR_FEED after 3 failed attempts. Reason for failure: Cisco Threat Response feeds not supported for 'judgements' format
- Click Save
Your Indicator and Feed are now ready. Let's get the information you need to sync the Feed with your Cisco Secure Email Gateway or Cloud Gateway.
SecureX/Cisco Threat Response | Find Your Threat Feed (TAXII) Details
- Click Indicators
- Change the drop-down from Source: Public to Source: Private
- Click on the Indicator you have just created in the first section
- Click on View Full Indicator
- You will see the Feeds section on this page, click once on the Feed name you created in the section before
- With the section expanded, you should see the URL listed; copy this URL

- You will take the following information from this URL:

- Hostname: private.intel.amp.cisco.com
- Polling Path: /ctia/feed/feed-7fedf330-xxyy-xxyy-xxyy-156b3ec7fb03/view
- Collection Name: 071c6b6f-xxyy-xxyy-xxyy-a7b2b0776442
The Hostname, Polling Path, and Collection Name are needed for the External Threat Feeds Manager setup in the next section.
Note
It is important that you have "/view" at the end of your Polling Path, exactly as shown.
Cisco Secure Email Gateway or Cloud Gateway | Add Source
Your new Private indicators and feed are ready for use.
- Log in to your Cisco Secure Email Gateway or Cloud Gateway
- Mail Policies > External Threat Feeds Manager
- Click Add Source
- Set your Source Name (recommend naming this something that would reference your SecureX/CTR instance)
- Provide a Description (again, reference your SecureX/CTR so you'll know what/where this source lives)
- For the following, you created these entries in the section above:
- Hostname
- Polling Path
- Collection Name
- Depending on how often you want your feed polled, the following are set based on your preferences:
- Polling Interval
- Age of Threat Feeds
- Time Span of Poll Segment
- Leave Use HTTPS set to Yes and Polling Port = 443
- For Configure User Credentials, set to No
- Click Submit
- Click Commit Changes to save your configuration on your Gateway or Cloud Gateway
Your feed should look similar to the following:

Polling should initiate immediately. After a few minutes, the External Threat Feeds Manager page should reflect the successful poll and status:

Please review the threatfeeds log on your Gateway or Cloud Gateway to see any errors, or issues. For more information regarding External Threat Feeds, please refer to Configuring Email Gateway to Consume External Threat Feeds chapter for the End-User Guide for the version of AsyncOS you have running for your Gateway or Cloud Gateway.
Using Your Feed
! Coming shortly