ideiio Connect – Bridge install Guide (Updated)
Cisco Secure Email Cloud Gateway
Introduction
ideiio Connect is a tool for synchronizing identity data between different applications using a variety of different technologies. Connect provides basic identity mapping capabilities to transfer identity data to and from identity sources and for user provisioning.
Attention
This document only pertains to the Directory Service Sync Tool. Please disregard this document if you are not utilizing or deploying the Directory Service Sync Tool.
Architecture
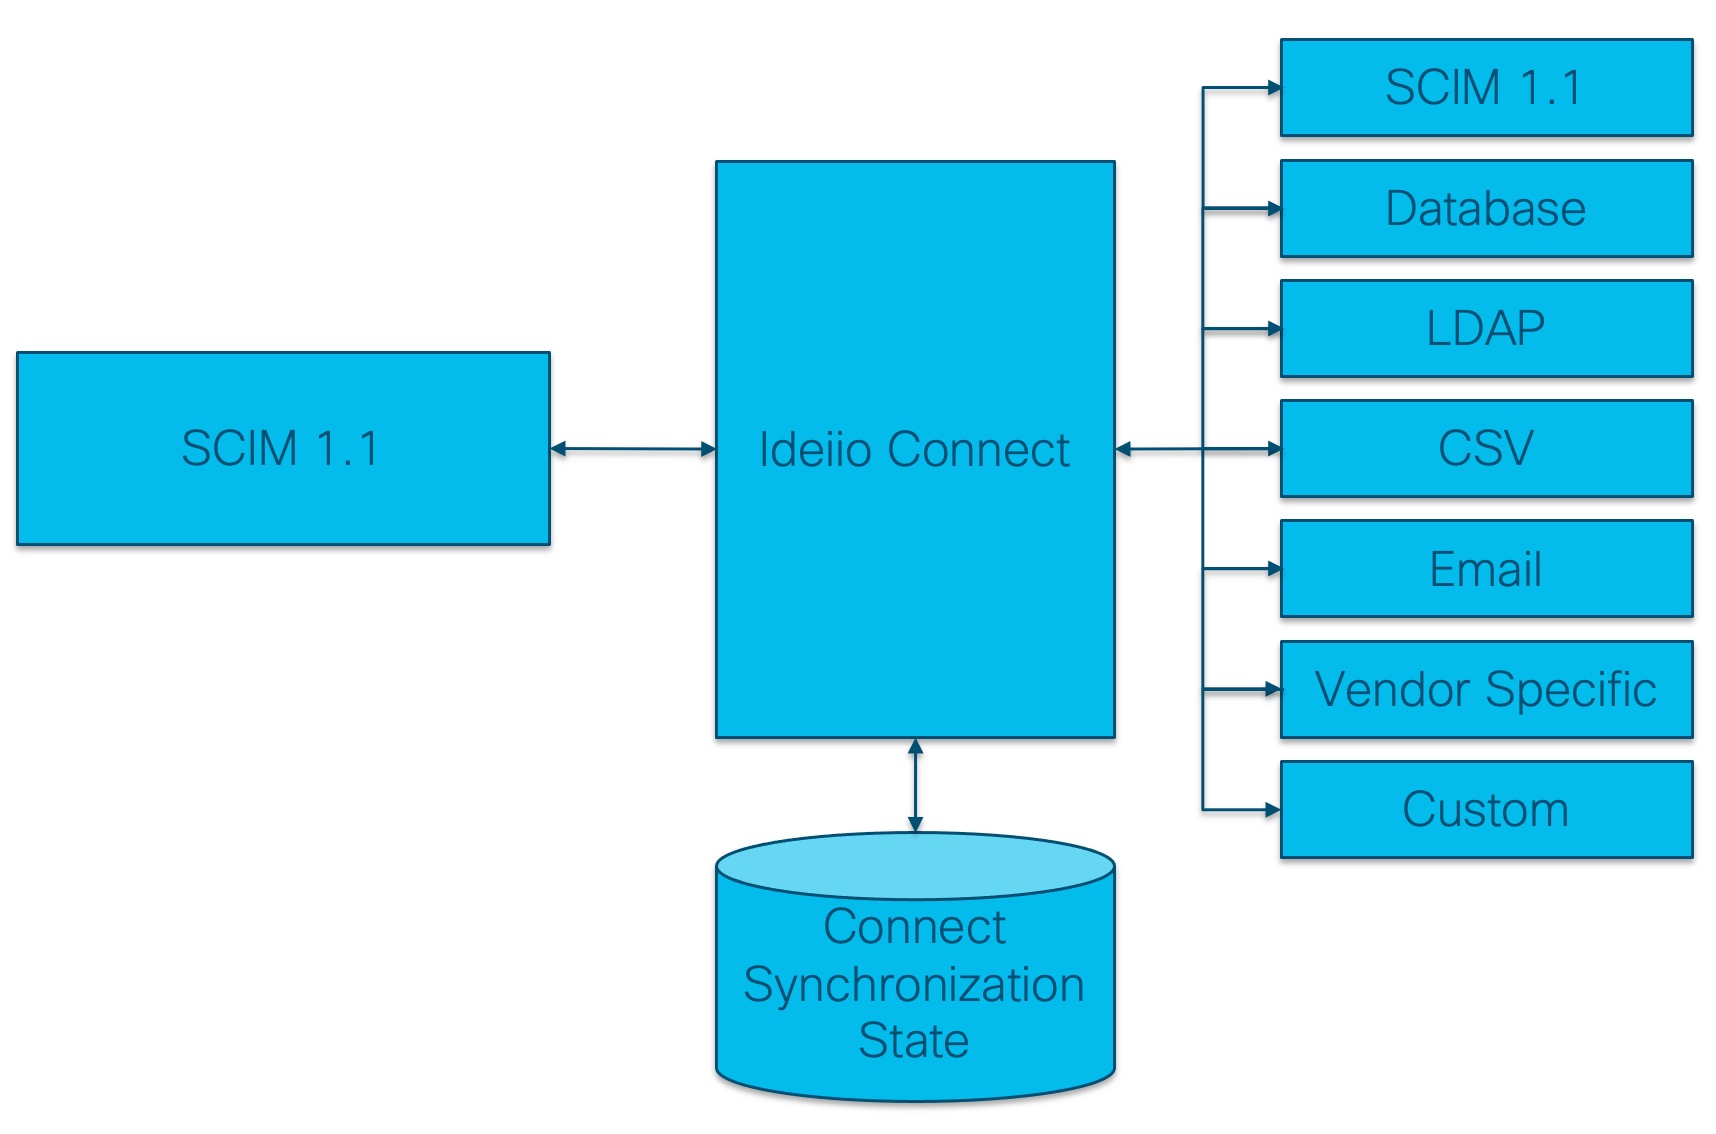
ideiio Connect uses the SCIM 1.1 data format for synchronization between source and target identity data. In most use cases, ideiio acts as the SCIM 1.1 source of data into Connect, sending identity information to provisioning targets.

ideiio Connect can run purely in the cloud as a SaaS service, or the ideiio connect bridge agent can be installed locally to synchronize data between systems that are not exposed to the internet. This document will describe the installation process for the ideiio connect bridge agent.
Installation
This section describes the process to install a new ideiio bridge. To upgrade an existing bridge, refer to the upgrade section of this document.
Requirements
Item Requirement OS Supported GNU/Linux distribution (Debian 11 recommended) Networking LDAP or LDAPS access to Domain Controllers (TCP/389 or TCP/636) HTTPS access to ideiio SaaS (TCP/443) HTTPS access to Cisco LDAP Service (TCP/443) Database MariaDB 10.3+ RAM 16GB CPU 4 vCPU Storage 20GB + 1GB per 10k synchronized accounts Note: Please wait for installation services before deploying any VM in a customer environment.
Prerequisites
The installation is supported on any recent 64-bit GNU/Linux operating system. The instructions below are for Debian 11 and will need to be adjusted for use with other operating systems. Install a basic install of Debian 11 onto a virtual or physical machine. If the server does not have openssh-server and sudo installed, then install those as root:
apt install openssh-server sudo
Install MariaDB server and Amazon Corretto JDK
Logged in as a standard user account execute the commands:
# Ensure that the system is up to date
sudo apt update

# Install MariaDB
sudo apt install -y mariadb-server mariadb-client

# Install pre-requisite packages for add-apt-repository
sudo apt install -y software-properties-common wget gnupg2

# Trust and add the Amazon Corretto repository
wget -O- https://apt.corretto.aws/corretto.key | sudo apt-key add -
sudo add-apt-repository 'deb https://apt.corretto.aws stable main'

# Install Java 11
sudo apt update && sudo apt install -y java-11-amazon-corretto-jdk
You will configure the Bridge in the temporary directory and then use the install script to install files to the proper locations.
Install haveged (optional)
If the server is Debian 11 this step can be skipped.
Virtual servers may have insufficient entropy to run ideiio connect effectively. If an operating system other than Debian 11 is used, and the running kernel is 5.5 or older, haveged should be installed.
Insufficient entropy manifests as ideiio connect 'hanging' for several minutes during startup.
# Install haveged (for Debian 9/10, Ubuntu <=18.04)
sudo apt -y install haveged
Configure MariaDB
Some MariaDB defaults must be changed to improve performance and to ensure that all timestamps are in UTC. The latter point is important as timestamps are used to control the scope of delta synchronizations and continuation checks. Active Directory always uses UTC timestamps for comparison. Edit /etc/mysql/mariadb.conf.d/50-server.cnf, underneath [mysqld] add the following:
default-time-zone = +00:00
innodb_buffer_pool_size = 12G
innodb_log_file_size = 256M
innodb_flush_log_at_trx_commit = 2
innodb_flush_method = O_DIRECT
Restart and secure MariaDB
sudo systemctl restart mysql
sudo mysql_secure_installation
When running on Debian 11 the recommended answers are as follows (although check that internal policies do not require a specific root password).
| Prompt | Answer | Comment |
|---|---|---|
| Enter current password for root | <Enter> | By default, there is no password, having root (or sudo root) on the root local machine is sufficient. |
| Switch to unix_socket authentication | N | TCP connections are required by ideiio connect. |
| Change the root password | N | Recommend leaving this blank. |
| Remove anonymous users | Y | |
| Disallow root login remotely | Y | |
| Remove test database and access to it | Y | |
| Reload privilege tables now | Y | Apply the changes. |
Install ideiio connect
Copy and unzip the ideiiobridge-5.1.x-<name>.zip on the server. Note that the version number may be different from this example:
unzip ideiiobridge-5.1.4-fabrikamDev.zip
Now install the software:
cd ideiiobridge-5.1.4
sudo ./install.sh
If a MariaDB root password has been set enter it now. The database server will be populated with the ideiio connect schema and synchronization database tables.
If prompted, supply the passwords for each of the systems where the passwords are not known:
Please enter the password ‘SmtpPassword’ (will not echo):
SmtpPassword set successfully

Please enter the password ‘ActiveDirectoryPassword1’ (will not echo):
ActiveDirectoryPassword1 set successfully
ideiio connect will now start. You can monitor the progress by executing:
sudo tail -Fn0 /var/log/ideiio/bridge.log
Updated about 1 year ago
